Security and Access Control
Configure Firebase authentication for storefront login
Where to find it: This is configured automatically through your platform environment settings.
When you'd use this: When your storefront needs to authenticate customers using Firebase Identity Platform. This is required for customer login, registration, and password reset functionality on your storefront.
What you need first:
- Firebase project set up with Identity Platform enabled
- Firebase Web API key configured in your platform environment
How it works:
When customers interact with your storefront (logging in, creating accounts, or resetting passwords), the storefront communicates with Firebase using an API key. The platform automatically provides this key to your storefront through the settings API.
The Firebase API key is retrieved when your storefront requests authentication module settings from the platform. This happens automatically when the storefront loads, ensuring customers can authenticate without additional configuration on your part.
Troubleshooting:
-
Customers can't log in or create accounts on the storefront — The Firebase API key may not be configured in your platform environment. Contact your platform administrator to verify that the Firebase Web API key is properly set in the identity-platform configuration.
-
Authentication fails after a platform update — The Firebase API key configuration may need to be refreshed. Check with your platform administrator to ensure the key is still valid and properly configured in your environment settings.
Control Google reCAPTCHA fraud protection by customer type
When you'd use this: When you want to protect checkout from fraudulent orders using Google reCAPTCHA Enterprise, but need different protection levels for B2B customers, B2C customers, and guest shoppers. For example, you might enable fraud checks for B2C and guest customers while disabling it for trusted B2B accounts that may be blocked by automated verification.
What you need first:
- Google reCAPTCHA Enterprise configured in your platform environment
- Understanding of your customer base and which groups require fraud protection
How it works:
You can enable or disable Google reCAPTCHA fraud checking separately for three customer types: B2B customers (logged-in business accounts), B2C customers (logged-in individual shoppers), and guest customers (shopping without an account). This gives you flexibility to balance security and user experience for different audiences.
When enabled for a customer type, Google reCAPTCHA Enterprise analyzes checkout behavior to detect and prevent fraudulent transactions. When disabled for a customer type, those customers can complete checkout without reCAPTCHA verification.
Troubleshooting:
-
Legitimate B2B customers are blocked at checkout — The fraud check may be enabled for B2B customers when it's not needed for your trusted business accounts. Consider disabling the fraud check for B2B customers while keeping it enabled for B2C and guest customers.
-
Fraud check settings aren't taking effect — Contact your platform administrator to verify the store mode settings are properly configured for your store's default language.
-
"AGENT_ISSUE - There is a configuration issue with the remote agent" error appears in Store Manager — This can occur when authentication tokens are issued by a different regional server than the one validating them, or during platform deployments when services are restarting. The platform handles these cross-region authentication scenarios automatically. If the error persists, contact your platform administrator to verify the authentication service configuration.
Configure session security and lifetime
When you'd use this: When you need to control how long users stay logged in and protect against stolen session credentials. For example, you might limit how long a single login session can last before requiring re-authentication, periodically refresh session identifiers to reduce the window an attacker could exploit a stolen session token, or automatically log out users who leave their session unattended.
What you need first:
- Understanding of your security requirements and how long users typically work in a single session
- Platform administrator access to configure session timeout settings
How it works:
The platform manages four layers of session security that work together to protect user accounts:
Inactivity timeout — Automatically ends the session after 30 minutes of inactivity for logged-in users. When you're logged in and stop using the admin or storefront, the platform watches for activity like page loads, navigation, and actions. Background activity like automatic session renewal or router prefetches doesn't count as user activity, so they won't keep an idle session alive. After 30 minutes without genuine user activity, your session expires and you'll need to log in again. The platform shows a notice explaining the session timed out, so you know why you're back at the login screen. Guest sessions (shoppers who haven't logged in) don't have an inactivity timeout — they can leave items in their cart for up to 24 hours. The inactivity timeout is set by your platform administrator and must remain between 15 and 30 minutes to meet security requirements.
Maximum session length (absolute timeout) — A hard limit on how long any login session can last, measured from the moment you log in. When this limit is reached, you must log in again regardless of activity. This prevents stolen session tokens from remaining valid indefinitely, even if an attacker keeps the session active. The default is 12 hours, which works well for office workers who log in at the start of their workday. Your platform administrator can adjust this to match your actual usage patterns.
Session identifier rotation — The platform periodically generates a new session identifier mid-session while keeping you logged in. This limits how long any single session identifier remains valid, reducing the time window an attacker could use a stolen identifier. The session identifier rotates automatically at regular intervals and also regenerates immediately when your privileges change (such as logging in, logging out, or assuming another user's session). This prevents session fixation attacks where an attacker tries to hijack a session by predicting or pre-setting its identifier.
Session transport security — Session cookies are marked as secure and protected so they cannot be intercepted. In production environments, session identifiers only travel over encrypted HTTPS connections and are configured to prevent cross-site attacks. The cookies are also httpOnly, meaning client-side JavaScript cannot access them.
These four mechanisms work together: the inactivity timeout stops someone from using an unattended session, the maximum session length bounds how long any session can last regardless of activity, identifier rotation limits how long a stolen token is useful, and transport security prevents the session from being stolen in the first place.
The platform handles all of this automatically. You experience seamless sessions that stay active while you work, with the session identifier refreshing transparently in the background and login required only when the maximum session length is reached or after 30 minutes of inactivity.
Troubleshooting:
-
Users are logged out unexpectedly during the workday — The maximum session length may be set too short for your usage patterns. The default is 12 hours, which accommodates a full workday. If your users work longer shifts or need to stay logged in across multiple days, contact your platform administrator to increase the session maximum age.
-
Session expired message appears even though the user was actively working — This could mean either the absolute session timeout was reached (a hard limit from login time), or the inactivity timeout fired slightly early. The inactivity timeout can expire up to 60 seconds before the configured time due to how the platform tracks activity. The user needs to log in again to start a fresh session.
-
Session expires during a long task without page navigation — If you're working on a single screen for more than 30 minutes without loading new pages or taking actions that communicate with the server, the inactivity timeout will fire. The platform counts only genuine user requests as activity — staying on one page doesn't keep the session alive. Navigate to another page or take an action at least once every 30 minutes to keep your session active.
-
Login sessions don't reach their configured maximum length — The session ends when whichever limit is reached first: the inactivity timeout (30 minutes without activity) or the maximum session length (12 hours by default). If the inactivity timeout fires first, you'll be logged out even if the maximum session time hasn't been reached. Both timeout types work independently.
-
Local development environment can't maintain sessions — Session cookies are marked secure in production but not in development environments to allow local HTTP testing. Verify your development environment is configured correctly and that session storage is accessible.
Manage store users and site administrators separately
Where to find it:
- Customers → Manage Store Users (
/admin/customers/manage-store-users) — for B2B and B2C customers who shop on your storefront - Settings → Site Admins (
/admin/settings/site-admins) — for administrators who manage your store
When you'd use this: When you need to manage your customer base separately from your administrative team. Store users are the shoppers who purchase from your storefront (both B2B business accounts and B2C individual customers). Site administrators are the team members who manage your store through the admin interface.
How it works:
The platform maintains two distinct user populations:
Store Users include registered customers, business accounts, guest shoppers, and unapproved B2B accounts. These are the people who browse and purchase from your storefront. The Customers → Manage Store Users screen shows only these users — no administrators appear in this list.
Site Admins include Master Admins and Site Managers who have access to the admin interface. The Settings → Site Admins screen shows only administrative users. If you're logged in as a Master Admin, you'll see both Master Admins and Site Managers in the list. If you're logged in as a Site Manager, you'll see only other Site Managers — Master Admins are hidden from your view.
This separation makes it easier to find and manage the right type of user without sorting through mixed lists.
Using it day-to-day:
-
To manage customers who shop on your storefront, go to Customers → Manage Store Users. Use this screen to view customer activity, update customer details, or manage B2B account approvals.
-
To manage your administrative team, go to Settings → Site Admins. Use this screen to review who has access to your admin interface, check their roles, and manage administrator accounts.
-
The user group type information helps you identify what kind of access each user has. Store users have customer group types (like registered users, business accounts, or guest shoppers), while site admins have administrative group types.
Troubleshooting:
-
I can't find a user I'm looking for — Check that you're on the correct screen. Customers appear only in Customers → Manage Store Users, while administrators appear only in Settings → Site Admins. A user can't appear in both lists.
-
Some administrators are missing from the Site Admins list — If you're logged in as a Site Manager, Master Admins are intentionally hidden from your view. Only Master Admins can see other Master Admins in the Site Admins list.
-
Sales representatives or custom user groups aren't appearing — Sales representatives and custom groups are managed separately and don't appear in either the Store Users or Site Admins screens. Contact your platform administrator if you need to manage these user types.
Create and edit site administrators
Where to find it: Settings → Site Admins (/admin/settings/site-admins)
When you'd use this: When you need to add a new member to your administrative team or update an existing administrator's details, customer assignments, or warehouse access. This allows you to control who can manage your store through the admin interface. Only Master Admins can create or edit administrators — Site Managers have read-only access to this screen.
What you need first:
- Master Admin access (Site Managers can view the Site Admins screen but cannot create or edit administrators)
- For creating admins: understanding of which customers and warehouses the new admin should have access to
- For editing admins: the admin's existing user ID
How it works:
New administrators are always created as Site Managers — the standard administrative role with full access to the admin interface. Master Admins are provisioned outside the admin interface and synchronized automatically, so you cannot create or edit their group assignment.
When creating or editing an administrator, you configure:
Customer assignment — Link the admin to one or more customers from your store. The first customer you select becomes the primary assignment. This determines which customer accounts the admin is associated with.
Warehouse assignment — Choose a primary warehouse and up to three secondary warehouses from your store's warehouse list. This controls which inventory locations the admin can work with.
Status — When editing an existing admin, you can disable the account to revoke access without deleting it.
The admin's user group (Site Manager or Master Admin) is read-only and cannot be changed. The scope is automatically set to B2B and is not shown in the editor.
All write operations on site administrators — creating new admins, editing existing admins, or changing admin settings — require Master Admin privileges. Site Managers can view the Site Admins list but cannot modify administrator accounts. This prevents privilege escalation where a Site Manager could grant themselves higher-level permissions.
Using it day-to-day:
-
Go to Settings → Site Admins. If you're logged in as a Master Admin, you'll see the New Site Admin button. Site Managers see a read-only list.
-
Click New Site Admin to create a new administrator.
-
Fill in the admin's details including email, name, and password.
-
In the customer assignment section, search for and select the customers this admin should be linked to. The first customer you add will be marked as primary.
-
In the warehouse assignment section, choose a primary warehouse and optionally add up to three secondary warehouses from your store's available locations.
-
Click Save to create the admin account. The new admin will be able to log in using the credentials you provided.
-
To edit an existing administrator, find them in the Site Admins list and click Edit on their row.
-
Update their details, customer assignments, or warehouse assignments as needed. The User Group field shows their current role (Site Manager or Master Admin) but cannot be changed.
-
To disable an admin's access, toggle the Disable switch and save. The account remains in the system but the user can no longer log in.
-
Click Save to apply your changes or Cancel to discard them.
Troubleshooting:
-
The New Site Admin button doesn't appear — Only Master Admins can create new administrator accounts. If you're logged in as a Site Manager, you'll see the Site Admins list but cannot create or edit administrators. Contact a Master Admin on your team if you need to make changes.
-
I can edit my own admin details but not other administrators — Master Admins can create and edit any administrator account. Site Managers can view the list but cannot modify administrator accounts, even their own.
-
I can't change an admin's user group — User groups are read-only in the admin editor. New admins are always created as Site Managers. Master Admins are provisioned outside the admin interface and their group assignment cannot be changed.
-
The save button is disabled — If no Site Manager (Administrator) group exists in your store, you cannot create new admins. This is normally a stock configuration, so contact your platform administrator if you encounter this.
-
I get a "not a site admin" error when editing a user — The user ID you're trying to edit belongs to a store user, not an administrator. Only accounts with admin-capable groups can be edited through Settings → Site Admins. To edit store users, go to Customers → Manage Store Users instead.
-
Password field is required but I only want to update customer assignments — When editing an existing admin, you do not need to change the password. The password field is required only when creating a new admin account.
Configure administrator group permissions
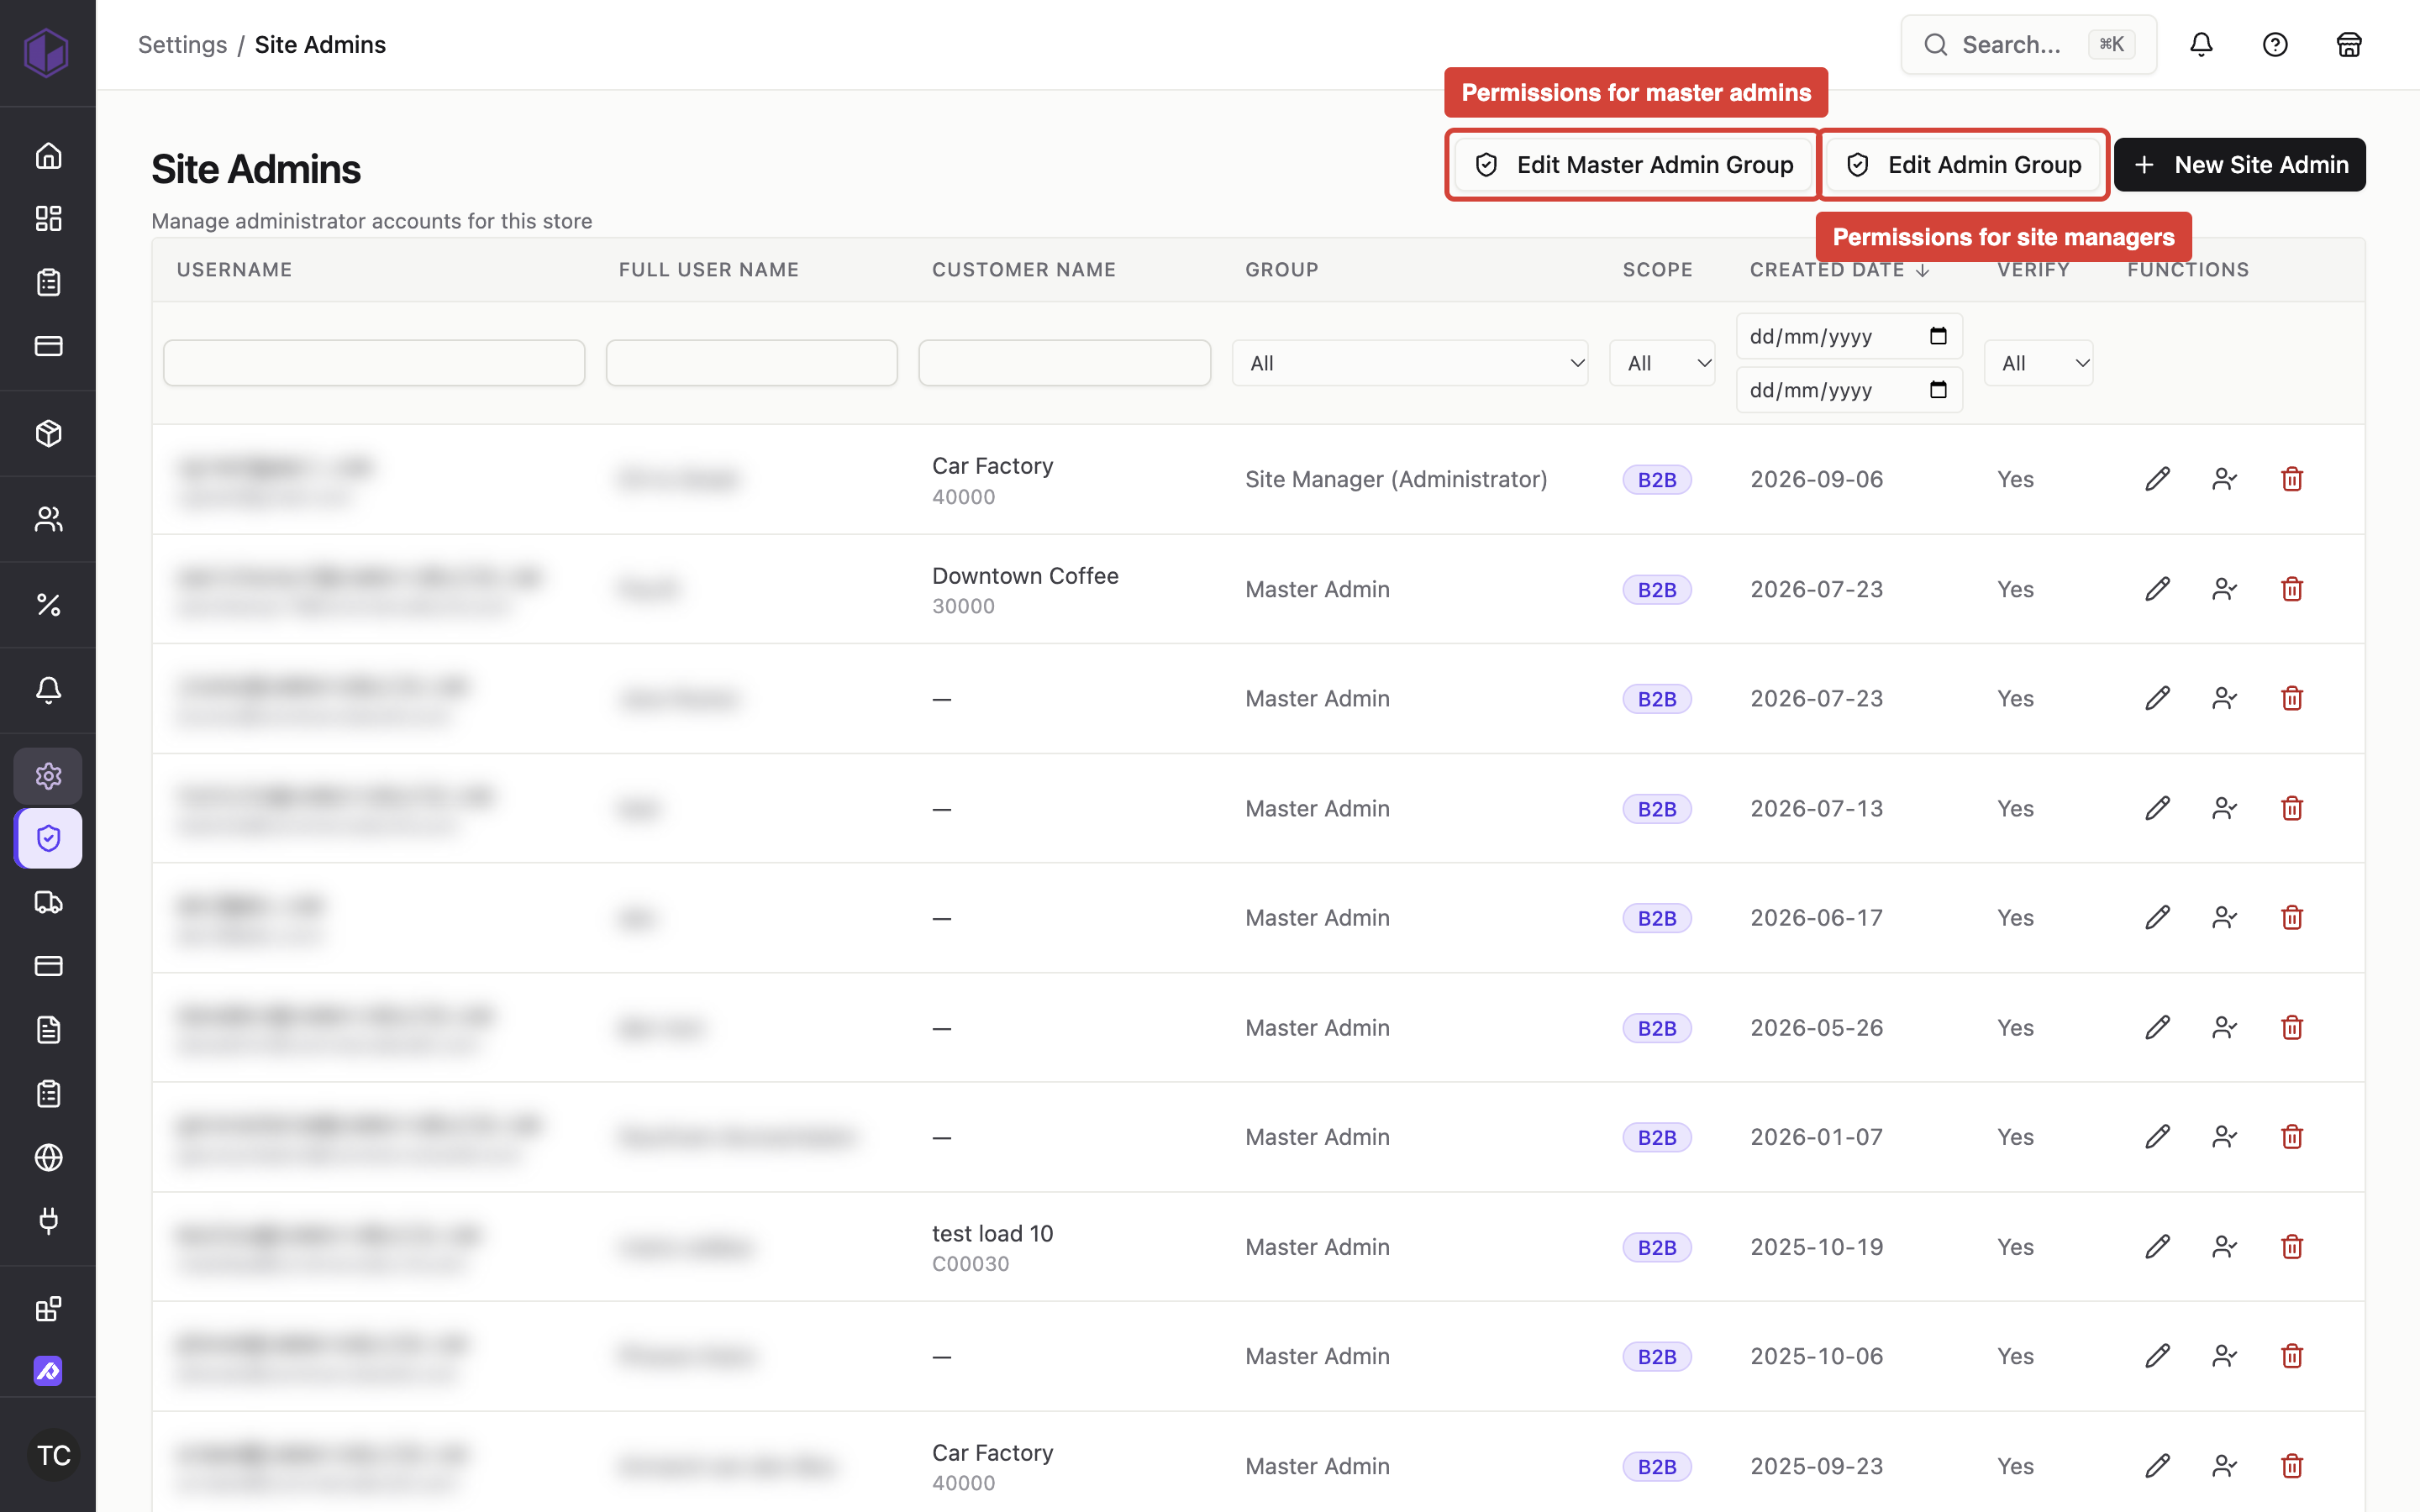
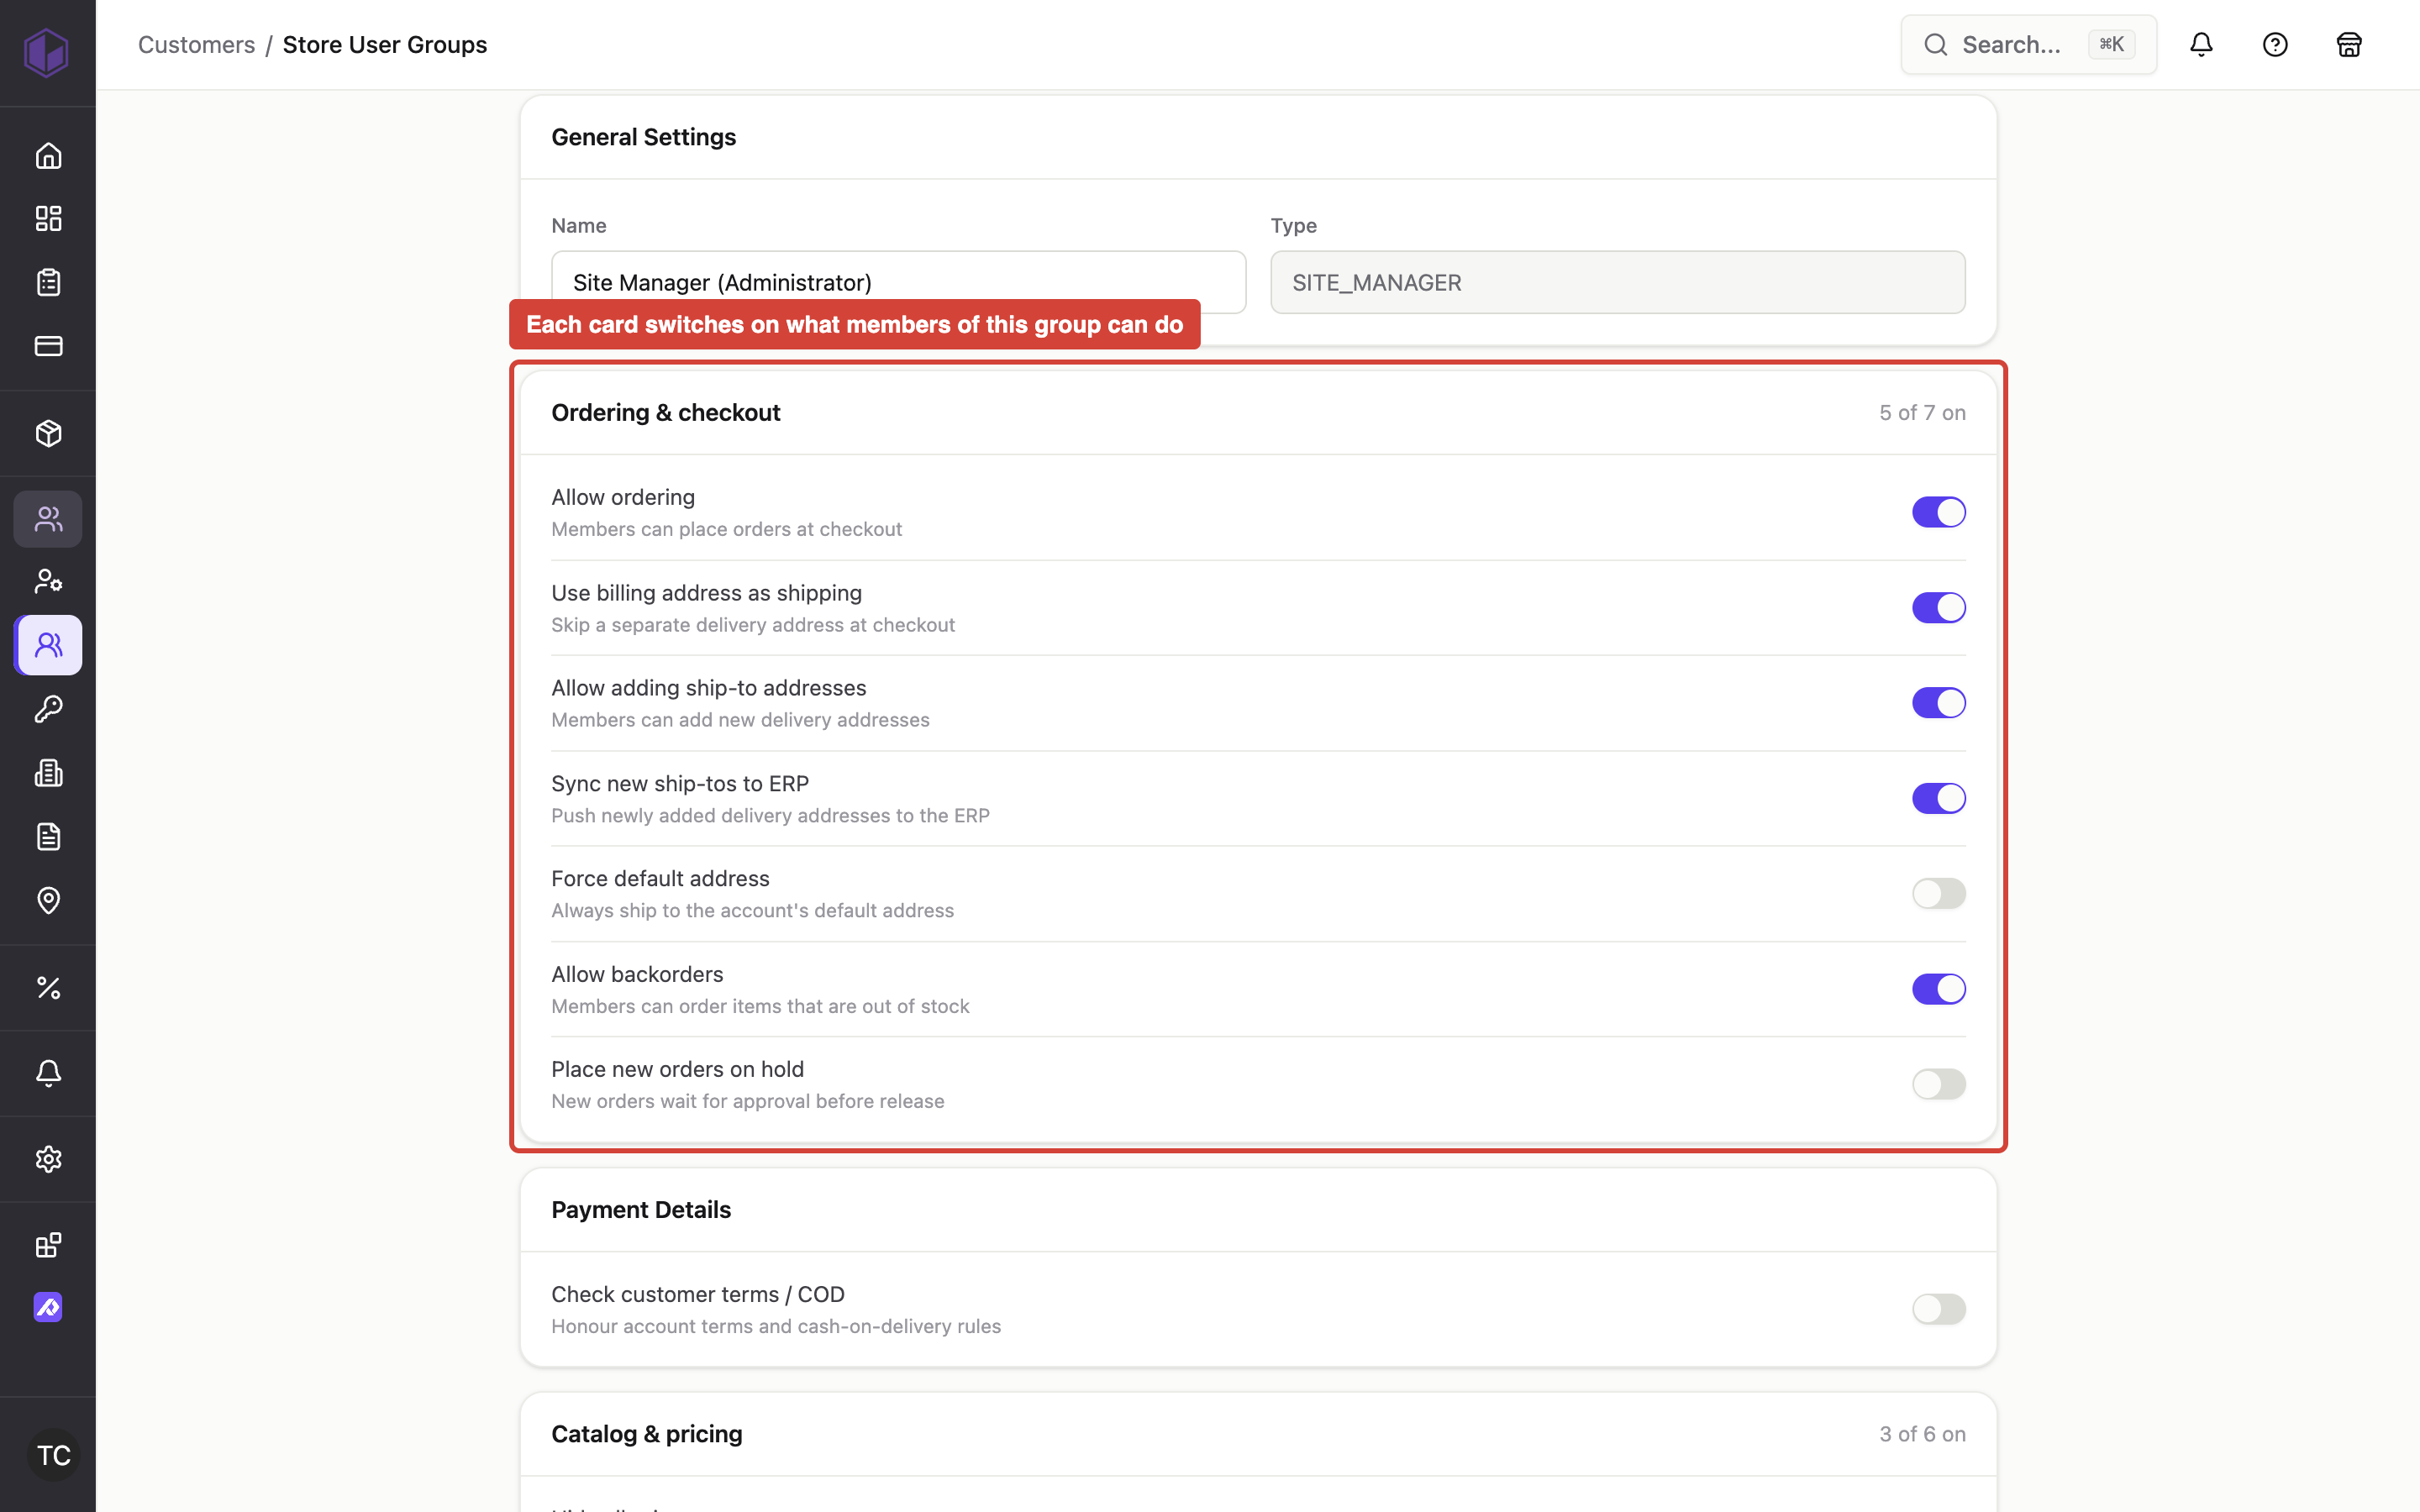
Where to find it: Settings → Site Admins (/admin/settings/site-admins), then Edit Admin Group or Edit Master Admin Group
When you'd use this: When you need to adjust what Site Managers or Master Admins can see and do in the admin interface. For example, you might want to control which admin screens are available, set password requirements, or manage checkout and catalog permissions for admin users. Only Master Admins can edit administrator group permissions — Site Managers can view the Site Manager group settings but cannot change them.
What you need first:
- Master Admin access (only Master Admins can edit both admin groups; Site Managers can view the Site Manager group in read-only mode)
- Understanding of which permissions your administrative team needs
How it works:
Administrator group permissions work the same way as store user group permissions, but apply to your admin team instead of customers. There are two admin groups:
Site Manager (Administrator) — The standard admin role with access to the admin interface. All Site Managers belong to this group.
Master Admin — The elevated admin role with full platform access. Master Admins belong to this group and can see and edit both admin groups.
Master Admins can edit both groups using the Edit Admin Group (Site Manager) and Edit Master Admin Group buttons in the Site Admins header. Site Managers can access only the Edit Admin Group button to view their own group in read-only mode — the Master Admin group is hidden from them, and they cannot modify group settings.
Each admin group controls the same eight permission areas as store user groups:
- General — Basic group settings including name, description, and status
- Ordering & checkout — Whether members can place orders, add to cart, choose shipping addresses, backorder out-of-stock items, and whether new orders require approval
- Payment — Available
Configure store user groups and permissions
Where to find it: Users → Groups (/v5-admin/{lang}/users/groups)
When you'd use this: When you need to control what different types of customers can see and do on your storefront. For example, you might want B2B customers to see pricing and place orders, while guest shoppers can only browse the catalog without prices. Or you might need sales representatives to be able to place orders on behalf of customers and manage invoice payments.
What you need first:
- Understanding of your customer segments and what permissions each group needs
- For B2B groups: knowledge of which customer accounts should be assigned to each group
- For editing the Master Admin group: Master Admin access (Site Managers cannot view or edit this group)
How it works:
Store user groups define what features and content are available to different types of customers. The platform includes built-in system groups for common customer types:
- B2B groups — REMOTE_CUSTOMER (approved business accounts), STORE