Images and Assets
Upload product images to cloud storage
Where to find it: Admin → Products → [Product Details] → Images tab
When you'd use this: When adding or updating product images. All images uploaded through the admin are automatically stored in cloud storage and served from your store's domain.
What you need first:
- PRODUCT_WRITE permission for the catalog
- A product already created in your catalog
How it works:
When you upload product images through the admin, they're automatically:
- Stored in cloud storage (not on local servers)
- Served from your store's own domain name
- Registered in the Digital Asset Manager for visibility
- Tagged with metadata linking them to the specific product
- Assigned a unique version identifier to ensure browsers and CDNs display the latest image
Supported image formats:
- JPEG (
.jpg,.jpeg) - PNG (
.png) - WebP (
.webp)
WebP is a modern image format that provides superior compression compared to JPEG and PNG, resulting in smaller file sizes and faster page load times without sacrificing visual quality. When you upload a WebP image, it's processed and stored just like JPEG or PNG files.
Image types:
- Main image — The primary product photo shown on product listings and detail pages
- Supporting images — Additional photos shown in the product gallery
Working with images:
-
Add a new image: Upload through the product detail page. If the product doesn't have a main image yet, the first image you upload automatically becomes the main image. Additional images become supporting images.
-
Replace the main image: Upload a new image and set it as the main image, or use the "Set as main" option on an existing supporting image. When you upload a replacement image, a new version identifier is automatically generated so the updated image displays immediately across all browsers and devices.
-
Reorder supporting images: Drag and drop supporting images to change their display order in the product gallery. Supporting images are numbered starting at 1, with lower numbers appearing first in the gallery.
-
Update image alt text: Edit the alt text field to improve accessibility and search optimization.
-
Delete an image: Remove supporting images using the delete option. Main images can be replaced but the product must always have at least one image.
How image caching works:
Product images are delivered through a content delivery network (CDN) for fast loading. When you upload or replace an image, the system automatically generates a unique version identifier that's added to the image URL. This ensures that browsers and the CDN immediately fetch the new version instead of showing a cached older version.
The version identifier appears in the image URL as a query parameter (e.g., ?v=fa29zsd4). You don't need to manually manage these identifiers — they're created and updated automatically whenever you upload a new image.
Finding product images in the Digital Asset Manager:
Product images appear in the Digital Asset Manager but are filtered out of the default view to keep the interface manageable. Use the product image filter to show them when needed. Each image includes tags identifying:
- Which product it belongs to (format:
productImage:productCode001) - The image format or type (format:
productImageFormat:cartThumbnail)
Technical details:
Images are stored with metadata flags that distinguish cloud-hosted images from older images that may still reside on legacy servers. The system handles both types seamlessly — you don't need to migrate or convert existing images unless you want to update them.
Troubleshooting:
- Upload fails with an error message — Check that your image uses one of the supported formats (JPEG, PNG, or WebP). If the file is corrupt or uses an unsupported format, the upload will fail. Try opening the image in an image editor and re-saving it in a supported format, then upload again.
Upload product images in bulk
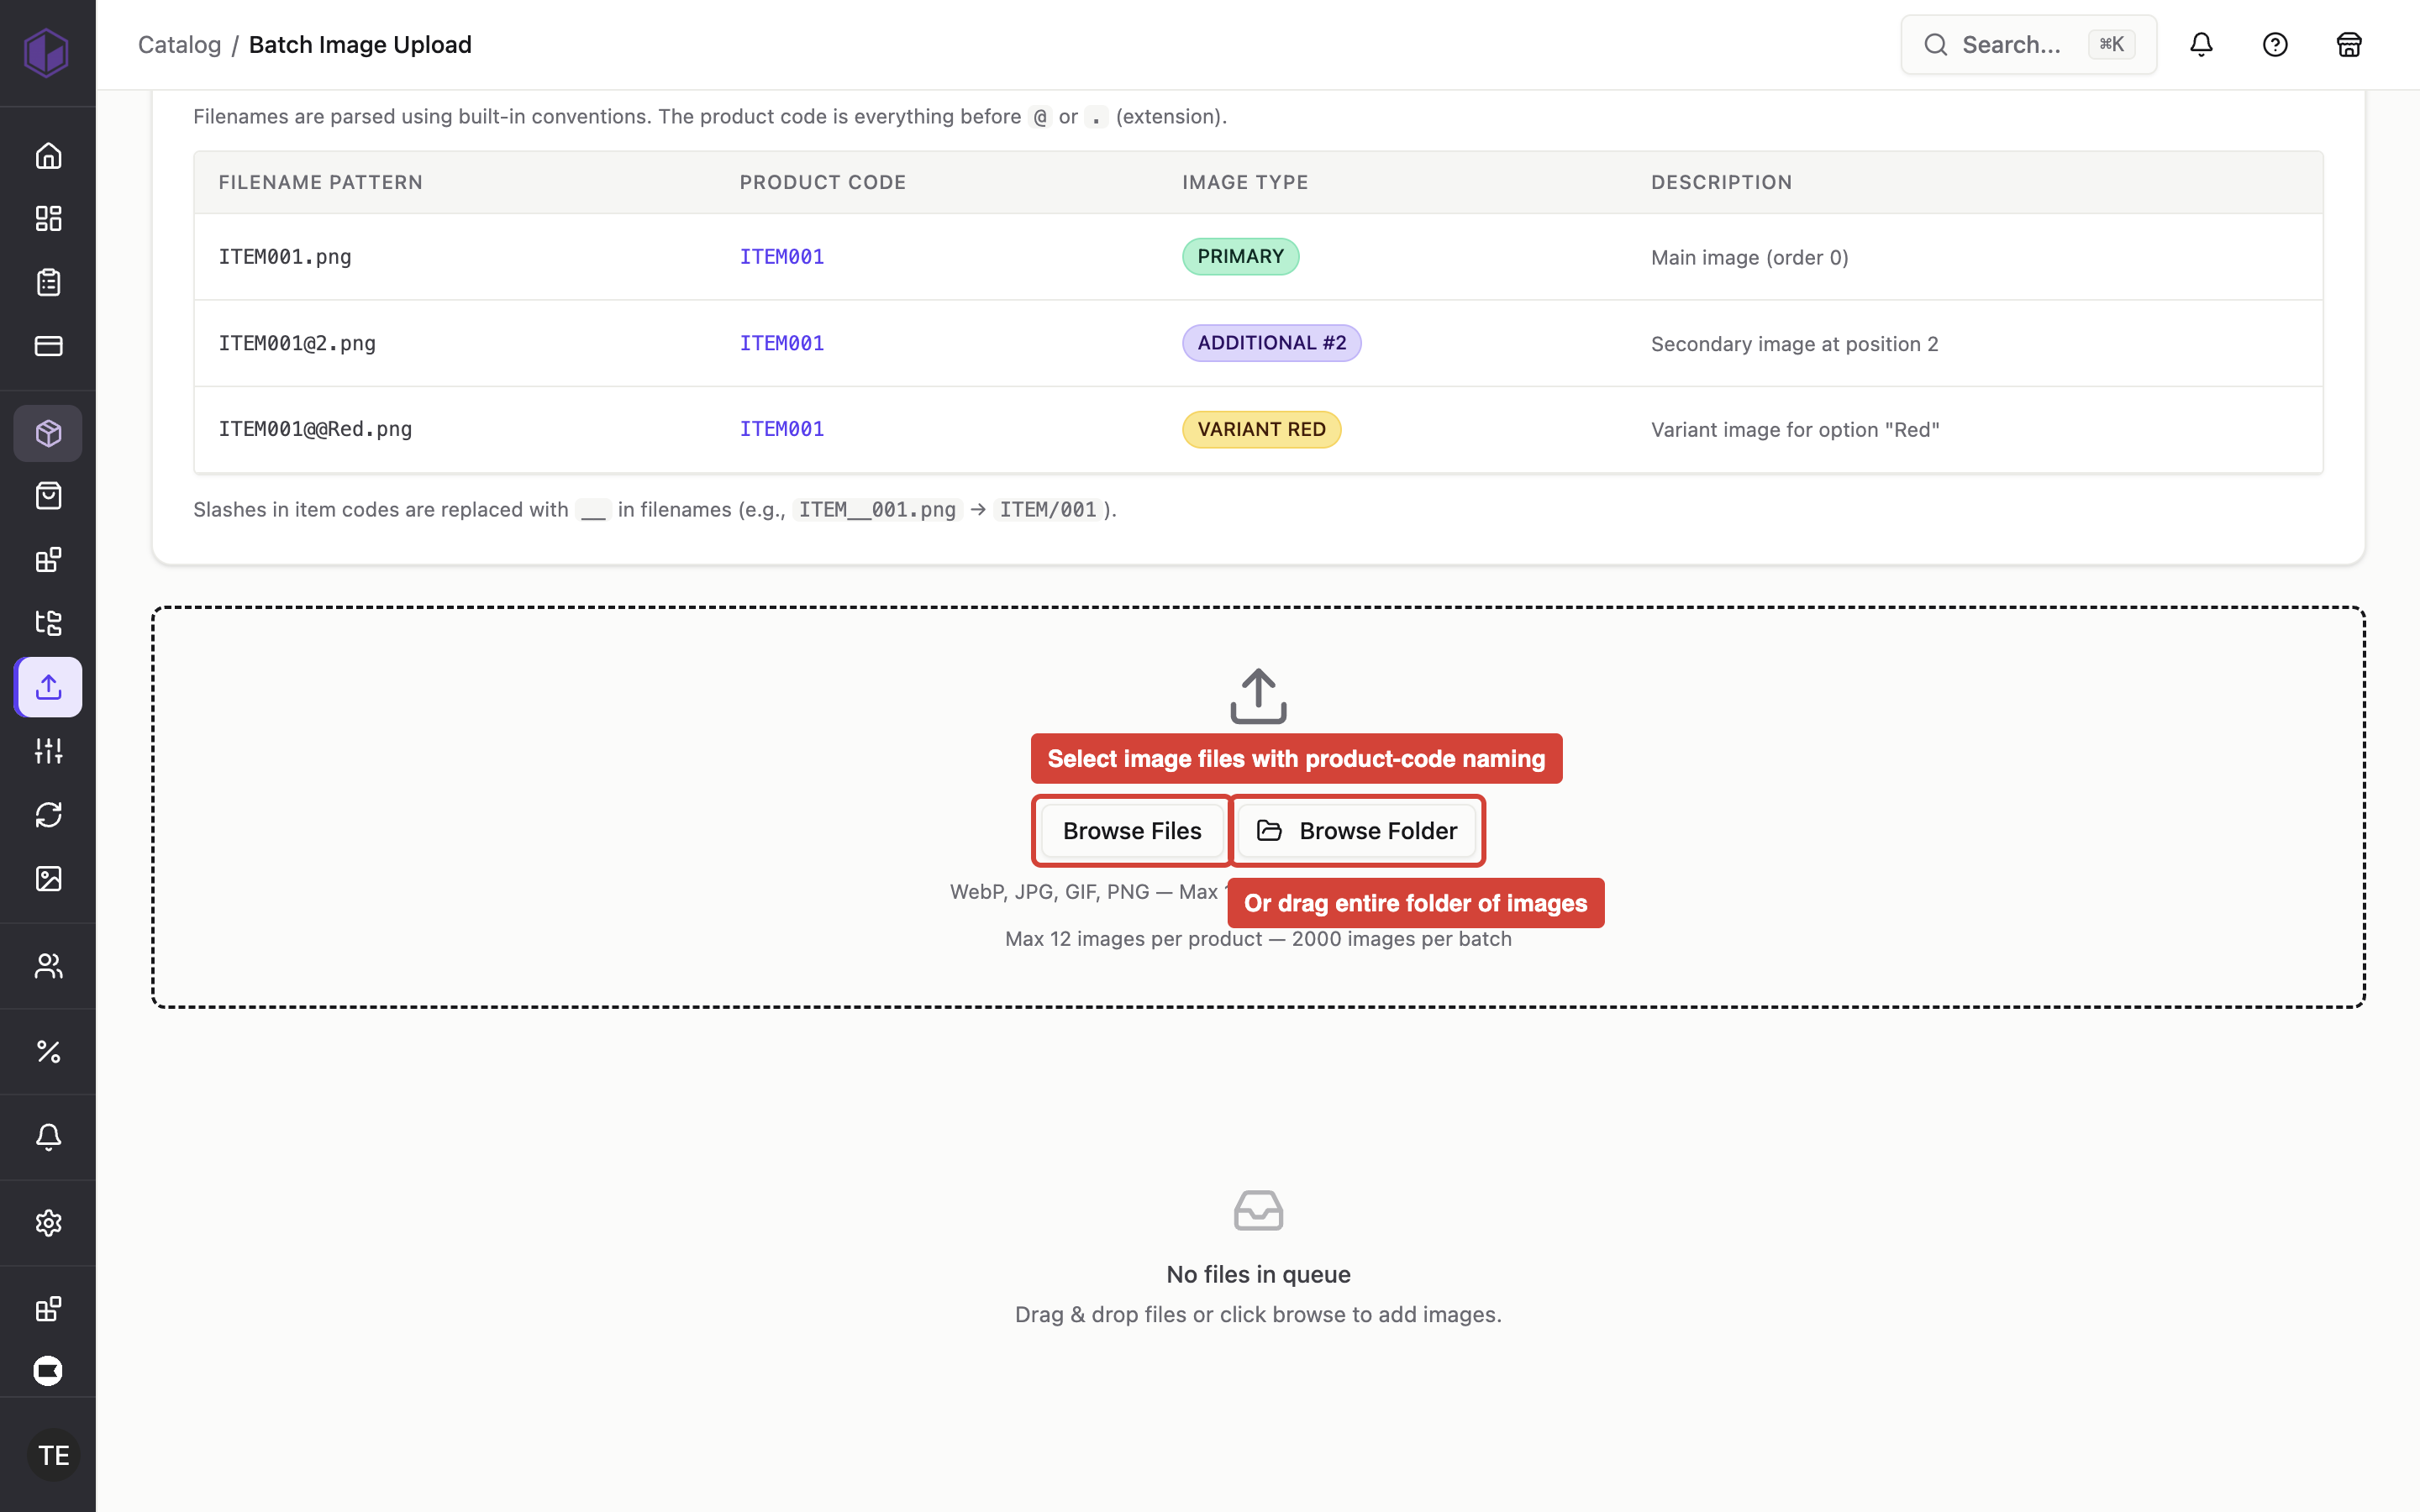
Where to find it: Admin → Products → Batch Upload
When you'd use this: When you need to add or update product images for many products at once, rather than uploading them one product at a time through individual product detail pages.
What you need first:
- PRODUCT_WRITE permission for the catalog
- Products already created in your catalog
- Image files named according to the batch upload conventions
How it works:
The batch upload page accepts image files that follow a naming convention based on product codes. The system reads the filename to determine which product the image belongs to and what type of image it is.
File naming conventions:
- Primary image:
{ProductCode}.jpg,{ProductCode}.png, or{ProductCode}.webp - Additional images:
{ProductCode}@2.jpg,{ProductCode}@3.jpg, etc. - Variant images:
{ProductCode}@@{variant}.jpg
For example:
WIDGET001.webp— main image for product WIDGET001WIDGET001@2.jpg— second supporting image for product WIDGET001WIDGET001@@blue.png— variant image for the blue option of product WIDGET001
Supported formats:
All three image formats (JPEG, PNG, and WebP) work with batch upload. You can mix formats in the same upload batch — for example, uploading WIDGET001.webp and WIDGET002.jpg in the same operation.
Using it day-to-day:
- Prepare your image files with the correct naming convention
- Navigate to Admin → Products → Batch Upload
- Select or drag your image files into the upload area
- The system processes each file, matches it to the corresponding product, and uploads the images to cloud storage
- Check the upload results to confirm all images were processed successfully
Show a secondary image when shoppers hover over product cards
Where to find it: Admin → Storefront → Theme Editor → Product Card
When you'd use this: When you want to give shoppers a richer preview of products directly on category pages, search results, or carousels without requiring them to click through to the detail page. Works best when products have multiple images that show different angles or features.
What you need first:
- Products with at least two images (a main image and one or more supporting images)
- Access to the Theme Editor
How it works:
When enabled in your Product Card theme settings, the main product image cross-fades to the first supporting image when a shopper hovers their mouse over a product card. The effect appears on:
- Category pages
- Search results
- Product carousels (Hot Deals, Related Products, etc.)
The first supporting image (supporting image #1 in the display order) is used as the hover image. If a product has only one image, the card displays that single image without any hover effect.
Set it up:
- Navigate to Admin → Storefront → Theme Editor
- Select the Product Card component
- In the Hover section, enable the "Image" toggle
- Preview the effect in the theme editor preview panel
- Save your theme changes
Using it day-to-day:
The hover effect automatically uses the first supporting image for each product. To control which image appears on hover:
- Open the product in Admin → Products → [Product Details] → Images tab
- Reorder supporting images by dragging and dropping
- Place the image you want to appear on hover in the first position (supporting image #1)
The effect works immediately after you've enabled it in the theme — no per-product configuration needed. Products without supporting images simply show their main image without the hover transition.
Find which products and categories use an image
Where to find it: Admin → Digital Asset Manager → [Select an image] → Used In panel
When you'd use this: Before deleting an image file, to verify it isn't being used by any products, variants, categories, or background images. Also helpful when auditing which catalog items reference a specific image file.
How it works:
The Digital Asset Manager's "Used In" panel shows everywhere an image file is referenced across your catalog. When you select an image, the system searches for that file name across:
- Product main images — Products using the image as their primary photo
- Product supporting images — Products showing the image in their gallery
- Product image custom fields — Custom fields configured to hold image references
- Variant option swatches — Color, size, or other variant options using the image as a swatch thumbnail
- Category images — Categories using the image as their category photo or advanced menu thumbnail
- Background images — Module background images and category page backgrounds
The system recognizes all image sizes automatically. When the image upload pipeline creates multiple sizes of an uploaded file (such as main_, big_, middle_, small_, cart_, category_, and brand_ versions), a search for any size returns all uses of that image — you don't need to check each rendition separately.
Image name matching:
The lookup matches file names exactly, including case sensitivity and special characters:
Product-Photo.jpgandproduct-photo.jpgare treated as different filesPart #4.jpgkeeps the#as part of the file name (not treated as a URL fragment)- Only the
?v=cache-buster portion of the URL is ignored during matching
Using it day-to-day:
- Navigate to Admin → Digital Asset Manager
- Locate and select the image file you want to check
- Look at the "Used In" panel — it displays all catalog locations referencing that image
- Each reference shows the item code or ID, description, and which type of image it is (main image, supporting image, swatch, etc.)
The panel displays results immediately. For large catalogs, the lookup runs directly against the database rather than checking products one at a time.
About derivative image matching:
If you have a file genuinely named big_hero.jpg (not an auto-generated size variant), the system cannot distinguish it from the pipeline's big_ version of hero.jpg. In this case, the "Used In" panel shows uses of both files to ensure no references are missed. This is intentional — showing one extra use is safer than missing a reference when deciding whether to delete a file.