Managing Products
Browse and filter products in the admin
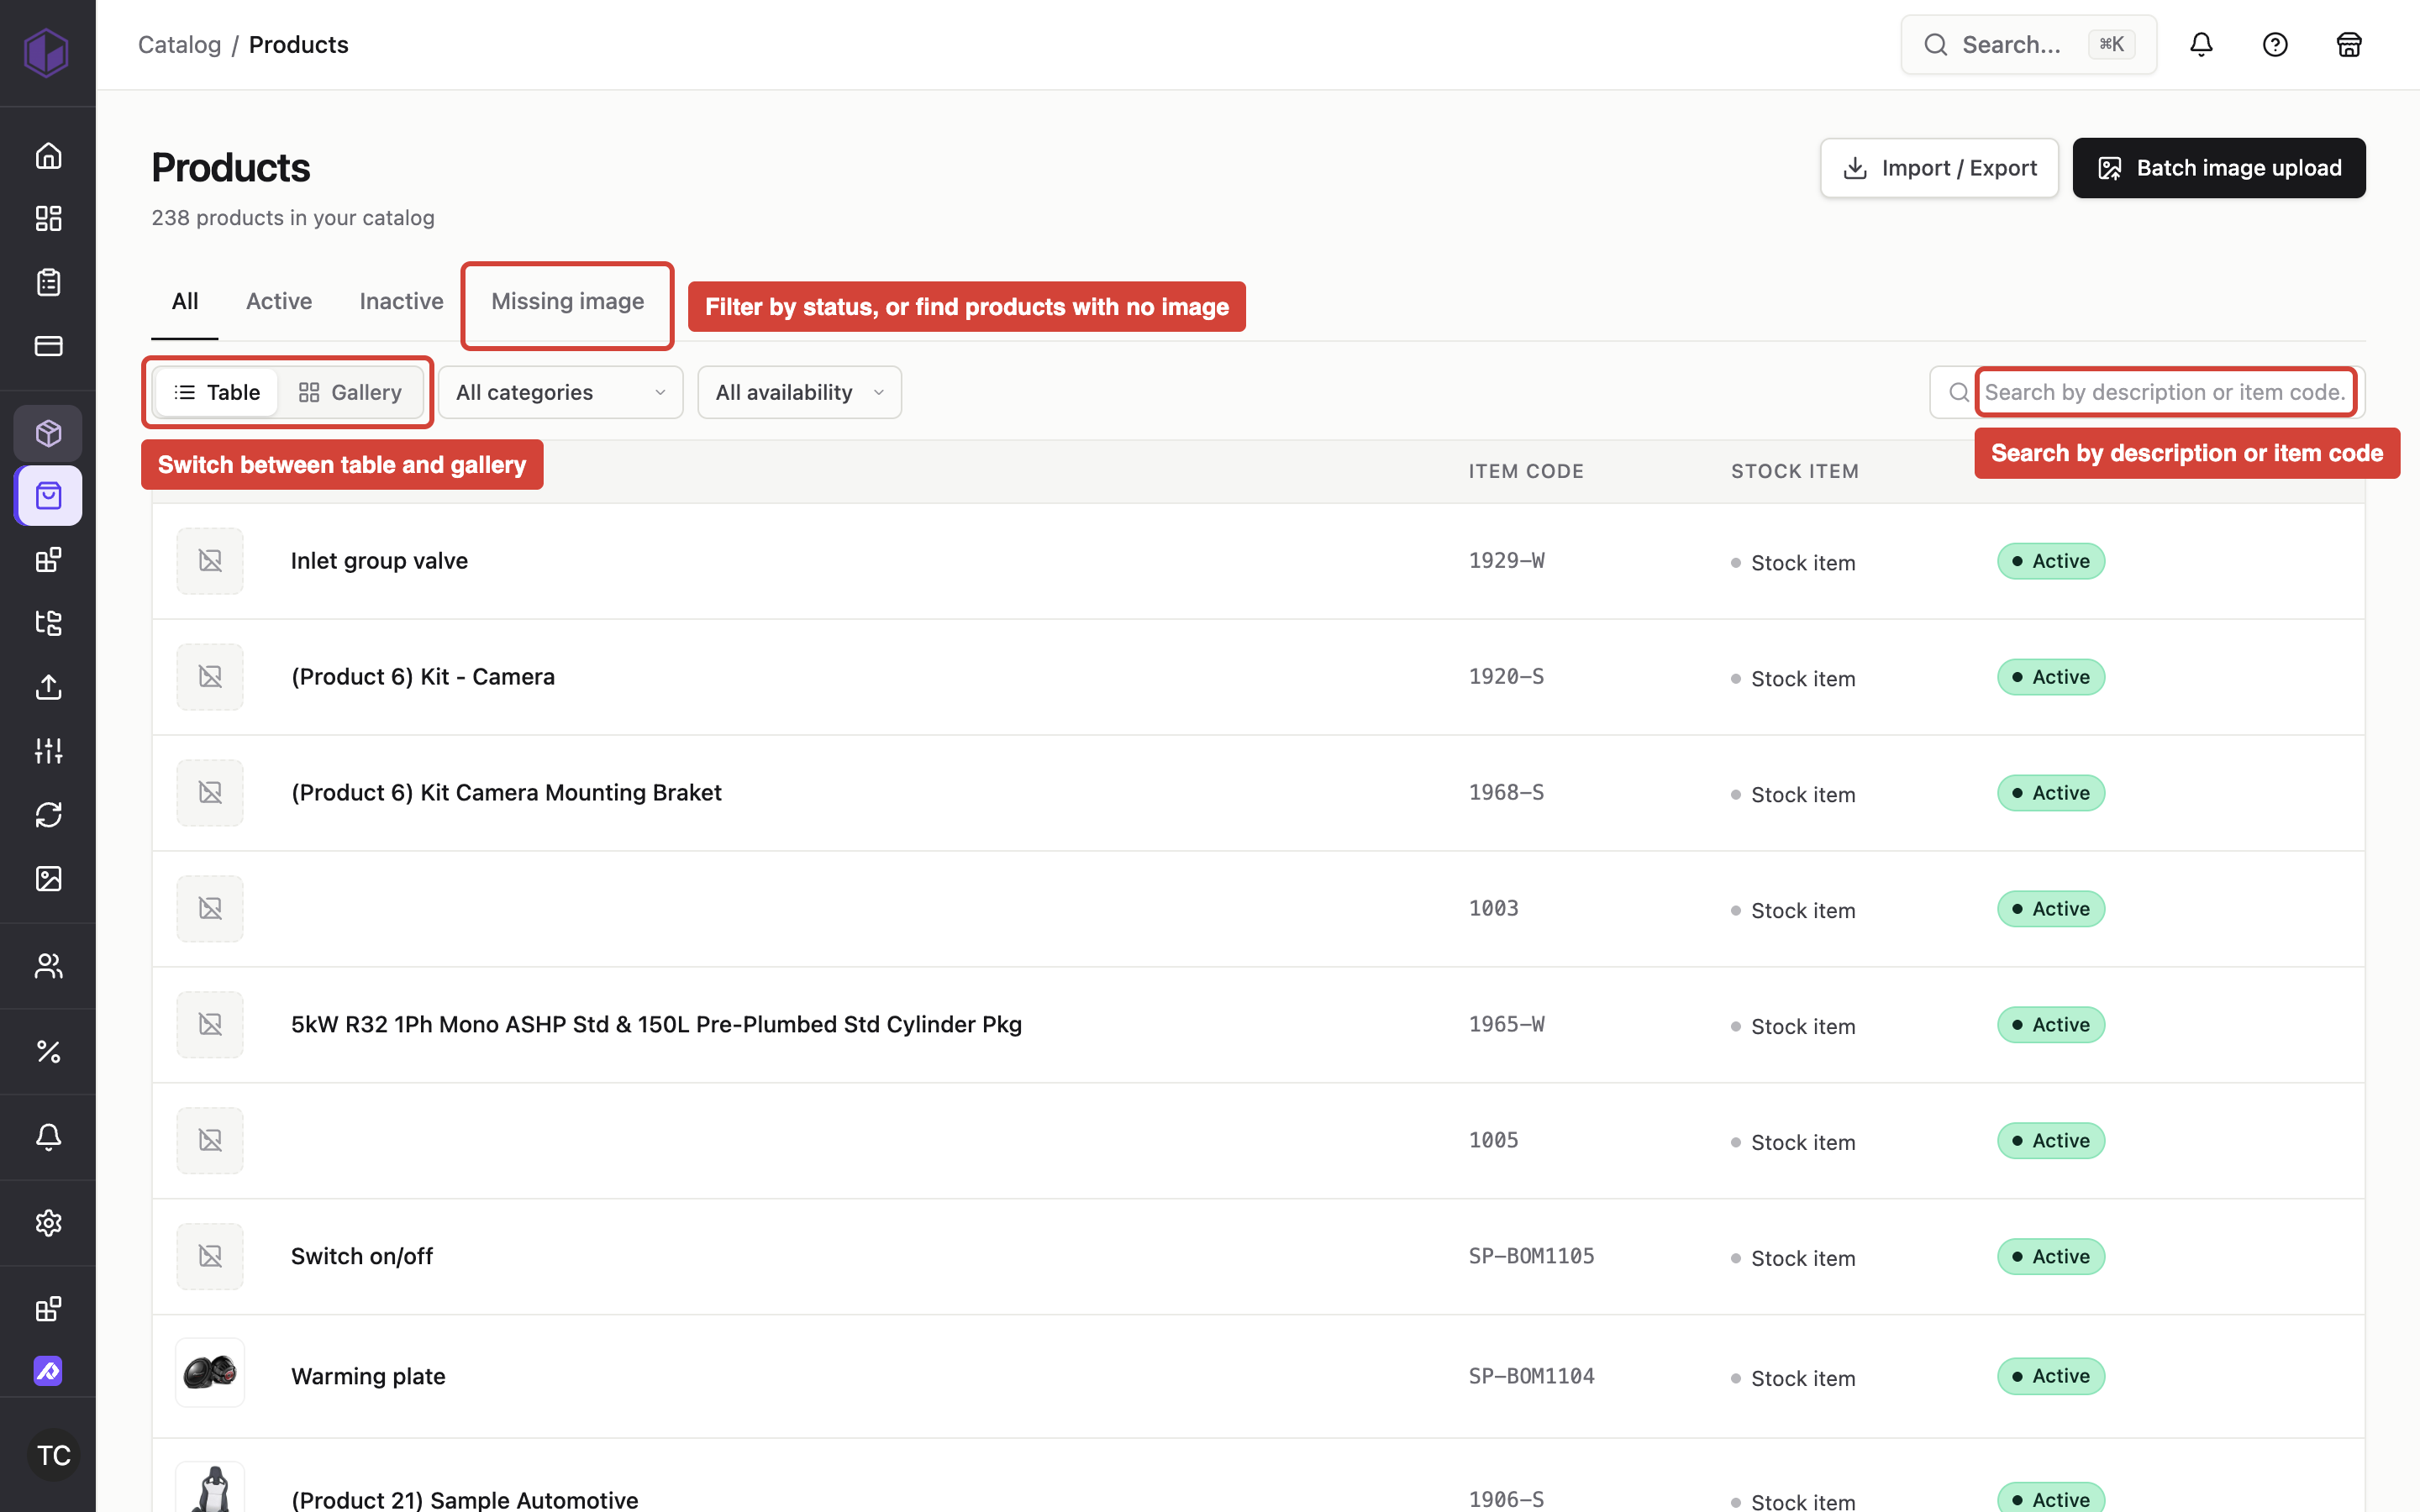
Where to find it: Admin → Products
When you'd use this: When you need to find products, review product data, identify items missing images, or triage active versus inactive products across your catalog.
What it does:
The Products list shows your complete product catalog with filtering, search, and export tools. You can view products in a table layout showing key details, or switch to a gallery view that displays product thumbnails for visual merchandising work.
The list includes built-in filters to help you find products quickly:
Status tabs let you view all products, only active products, only inactive products, or products missing images. These filters apply at the server level and update the list to show only matching items.
Category assignment filters show products assigned to B2B categories, B2C categories, specific categories, or products not assigned to specific categories. You can filter by multiple categories at once to narrow your results.
Availability filters show products currently in stock, out of stock, or all products regardless of stock status.
Search looks for products by description or item code. Results update automatically as you type.
Sorting lets you order the list by product description or item code, in ascending or descending order.
Product thumbnails appear next to each item when available. If a product has no image assigned, a placeholder appears instead. If an image fails to load, the platform displays a tinted placeholder rather than a broken image indicator.
Each product row shows a modification timestamp indicating when anything about that product last changed. This includes changes to the product record itself, the product detail record, or any custom field values. The timestamp helps you identify recently updated products and track when product information was last modified. Changes to category assignments, support images, or warehouse restrictions do not update this timestamp—only changes to the product's core data and custom fields. Setting or clearing the main product image does update the timestamp because the main image is stored as part of the product detail record.
You can select individual products or use select-all to choose multiple items at once. When products are selected, a bulk action bar appears with an option to export the selection to CSV. The export includes item codes, descriptions, and status information for the selected products.
The header toolbar includes an Export button that exports the current page of products to CSV, and a Batch image upload button for uploading multiple product images at once.
All filter selections, search terms, sort order, and pagination settings are reflected in the page URL. This means you can bookmark specific views or share links to filtered product lists with your team.
The product description shown in the list depends on whether your store allows custom product descriptions. If your store is configured to allow editable descriptions, the list shows any custom description you've set on the product detail page. If you haven't customized the description, or if your store keeps descriptions synchronized with your ERP system, the list shows the ERP-synchronized description. This ensures the product list matches what customers see on your storefront and reflects your store's description management approach.
The platform keeps product results in a stable, consistent order. When you sort by a field where multiple products have the same value—such as products with identical descriptions or category positions—the list breaks ties using item code, so the same products always appear in the same order. This means you'll see the same results whether you're browsing before or after a catalog update, and pagination remains consistent as you move through pages.
Using it day-to-day:
When you open the Products list, the system displays all products by default in table view. Use the status tabs at the top to quickly jump to active items, inactive items, or products missing images.
Switch between table and gallery view using the view toggle. Your view preference persists across sessions—when you return to the Products list, it opens in whichever view you last used.
Apply filters and search terms to narrow the list. The platform updates results automatically and adds your selections to the URL so you can return to the same filtered view later.
To filter products by category membership, use the category assignment filters. You can show only products assigned to specific categories, or show only products not assigned to specific categories. When you filter by multiple categories using the "in categories" filter, the list shows products assigned to any of the selected categories. The "not in categories" filter shows products that aren't assigned to any of the selected categories. You cannot use both filters at the same time.
Click any product row to open the product detail editor. In table view, an Edit action also appears when you hover over a row.
When you edit a product's description in the detail page and save your changes, the updated description appears in the products list immediately when you navigate back—but only if your store allows custom product descriptions. If your store keeps descriptions synchronized with the ERP system, your custom description is stored but won't display in the product list or on the storefront. The platform refreshes the list data automatically to show your edits when applicable. The modification timestamp updates to reflect the change.
To export products, either select specific items and use the bulk export action, or use the Export button in the header to download the current page.
Troubleshooting:
-
Product thumbnail shows a placeholder instead of the product image — The product either has no image assigned, or the image file failed to load. Check the product detail page to verify whether an image is configured. If an image is assigned but not loading, the image file may be missing or inaccessible.
-
Filters or search terms don't persist when I navigate back — The Products list stores all filter state in the URL. If you navigate away and return via browser history or a bookmark, your previous filters should restore automatically. If filters reset, you may have used a link that doesn't include the filter parameters.
-
Gallery view doesn't show product images — Gallery view displays the same thumbnails as table view. If products don't have images assigned or if images fail to load, placeholders appear instead. Assign images to products to see them in gallery view.
-
Export doesn't include all my products — The header Export button exports only the current page of results. To export multiple pages, either increase the page size setting or use the bulk selection with select-all to export across pages.
-
Category filter shows products assigned to only some of my selected categories — When you filter by multiple categories using the "in categories" filter, the list shows products assigned to any of those categories, not all of them. A product only needs to be in one of the selected categories to appear in results.
-
Product description I just edited doesn't appear in the list — If your store allows custom product descriptions, the list updates automatically after you save changes to a product. If you're still seeing the old description, try refreshing your browser. If your store keeps descriptions synchronized with the ERP system, custom descriptions you enter in the product detail page are stored but won't display in the product list—the ERP description appears instead. Check with your site administrator to confirm whether custom descriptions are enabled for your store.
-
Modification timestamp didn't update after I changed category assignments — The timestamp tracks changes to the product record, detail record, and custom field values only. Changes to category assignments, support images, and warehouse restrictions do not update the timestamp. The exception is the main product image—setting or clearing it updates the timestamp because it's stored as part of the product detail record.
Edit product custom fields in the admin
Where to find it: Admin → Products → [select a product] → Custom Fields section
When you'd use this: When you need to add product-specific information that isn't part of your standard product data—things like color, size, material, technical specifications, or links to external resources like spec sheets, videos, or documentation.
What it does:
Product custom fields let you capture and display additional product information beyond the standard catalog data. Your store defines which custom fields are available—each field has a name, type, and whether it allows multiple values.
The custom fields section on the product detail page shows all configured fields for your store. Each field appears with an input appropriate to its type:
Text fields accept plain text values. You can enter short descriptive information, identifiers, or any single-line text.
Rich content fields let you enter formatted text with headings, lists, links, and other formatting. These fields are useful for detailed product descriptions, usage instructions, or feature lists. The platform stores rich content as structured JSON documents, not HTML. The document format supports headings (levels 2 through 6), paragraphs, bullet lists, ordered lists, and text with bold, italic, and link formatting. Links must start with http:// or https:// and may be up to 2048 characters. When you save a rich content field, the platform validates the entire document against a predefined structure. If the document contains formatting outside the supported set—such as tables, images, strikethrough text, or javascript: links—the save fails with a detailed error showing exactly what was invalid, and nothing is stored. The document may not exceed 65535 bytes. An empty value clears the field.
URL fields accept web addresses pointing to external resources. Enter an absolute http:// or https:// URL—for example, a link to a YouTube video, a PDF spec sheet, a manufacturer's product page, or any other web resource. The platform validates that the value is a properly formatted web address and trims any extra whitespace before storing it. URL fields accept only a single web address, not multiple links. How the URL appears to customers depends on your storefront theme—the field stores the link, and the theme decides how to display it.
List fields let you select one or more predefined values from a dropdown. The available options are configured in your store's custom field settings.
Some custom fields are managed directly in the platform—you can edit them on the product detail page and your changes save immediately. Other custom fields are mastered in your ERP or PIM system. For ERP-mastered or PIM-mastered fields, the values display on the product detail page but you cannot edit them—those values are controlled by the source system and sync automatically.
When you edit a custom field value and save, the product's modification timestamp updates to reflect the change.
Using it day-to-day:
Open a product in the admin and scroll to the Custom Fields section. The section shows all configured custom fields for your store, with current values if any are set.
To edit a store-managed field, click into the input and enter or update the value. For text fields, type the information directly. For rich content fields, use the formatting toolbar to structure your content. For URL fields, paste or type the web address—the field validates that it's a properly formatted http:// or https:// URL and shows an error if the format is invalid. For list fields, select from the available options.
Save your changes using the Save button at the bottom of the page. The platform validates all fields before saving. If a URL field contains an invalid web address, you'll see an error and the save will not complete until you correct the value. If a rich content field contains formatting outside the supported structure, you'll see an error naming the specific problem, and the save will not complete until you remove the unsupported formatting.
For ERP-mastered or PIM-mastered fields, the values display but the inputs are disabled. These values update automatically when your ERP or PIM system syncs product data—you cannot edit them directly in the admin.
Troubleshooting:
-
Cannot edit a custom field value — The field is mastered in your ERP or PIM system. Values for these fields are controlled by the source system and sync automatically. You cannot edit them directly in the admin. If you need to change the value, update it in the source system and wait for the next sync.
-
URL field shows an error when I try to save — The platform validates that URL field values are properly formatted absolute http:// or https:// web addresses. Check that your URL starts with http:// or https://, includes a domain name, and is less than 2000 characters. Other URL schemes like ftp:// or relative URLs are not supported. Remove any extra spaces before or after the URL.
-
URL field saved but the link doesn't appear on the storefront — URL custom fields store the web address, but your storefront theme controls how and where the link displays. If the URL isn't visible to customers, your theme may not be configured to render that field. Contact your site administrator or theme developer to configure how URL fields appear on product pages.
-
Rich content field shows an error when I try to save — The platform validates rich content documents against a predefined structure when you save. The error message shows exactly what was invalid—for example, an unsupported node type like table or image, a strikethrough mark, a link with a javascript: scheme, or a document that exceeds the size limit. Remove the unsupported formatting and save again. The supported formatting includes headings (levels 2-6), paragraphs, bullet lists, ordered lists, and text with bold, italic, and link marks. Links must use http:// or https:// schemes only.
-
Custom field value I just entered doesn't appear on the storefront — After saving a custom field value in the admin, the change should appear on the storefront immediately. If you don't see the updated value, try refreshing the product page. If the field still doesn't appear, check whether your theme is configured to display that custom field.
-
Product modification timestamp didn't update after I changed a custom field — The timestamp updates when you save changes to store-managed custom fields. If the timestamp didn't update, the field may be ERP-mastered or PIM-mastered, or the save may not have completed successfully. Check that you received a save confirmation after making your change.
Configure custom field settings
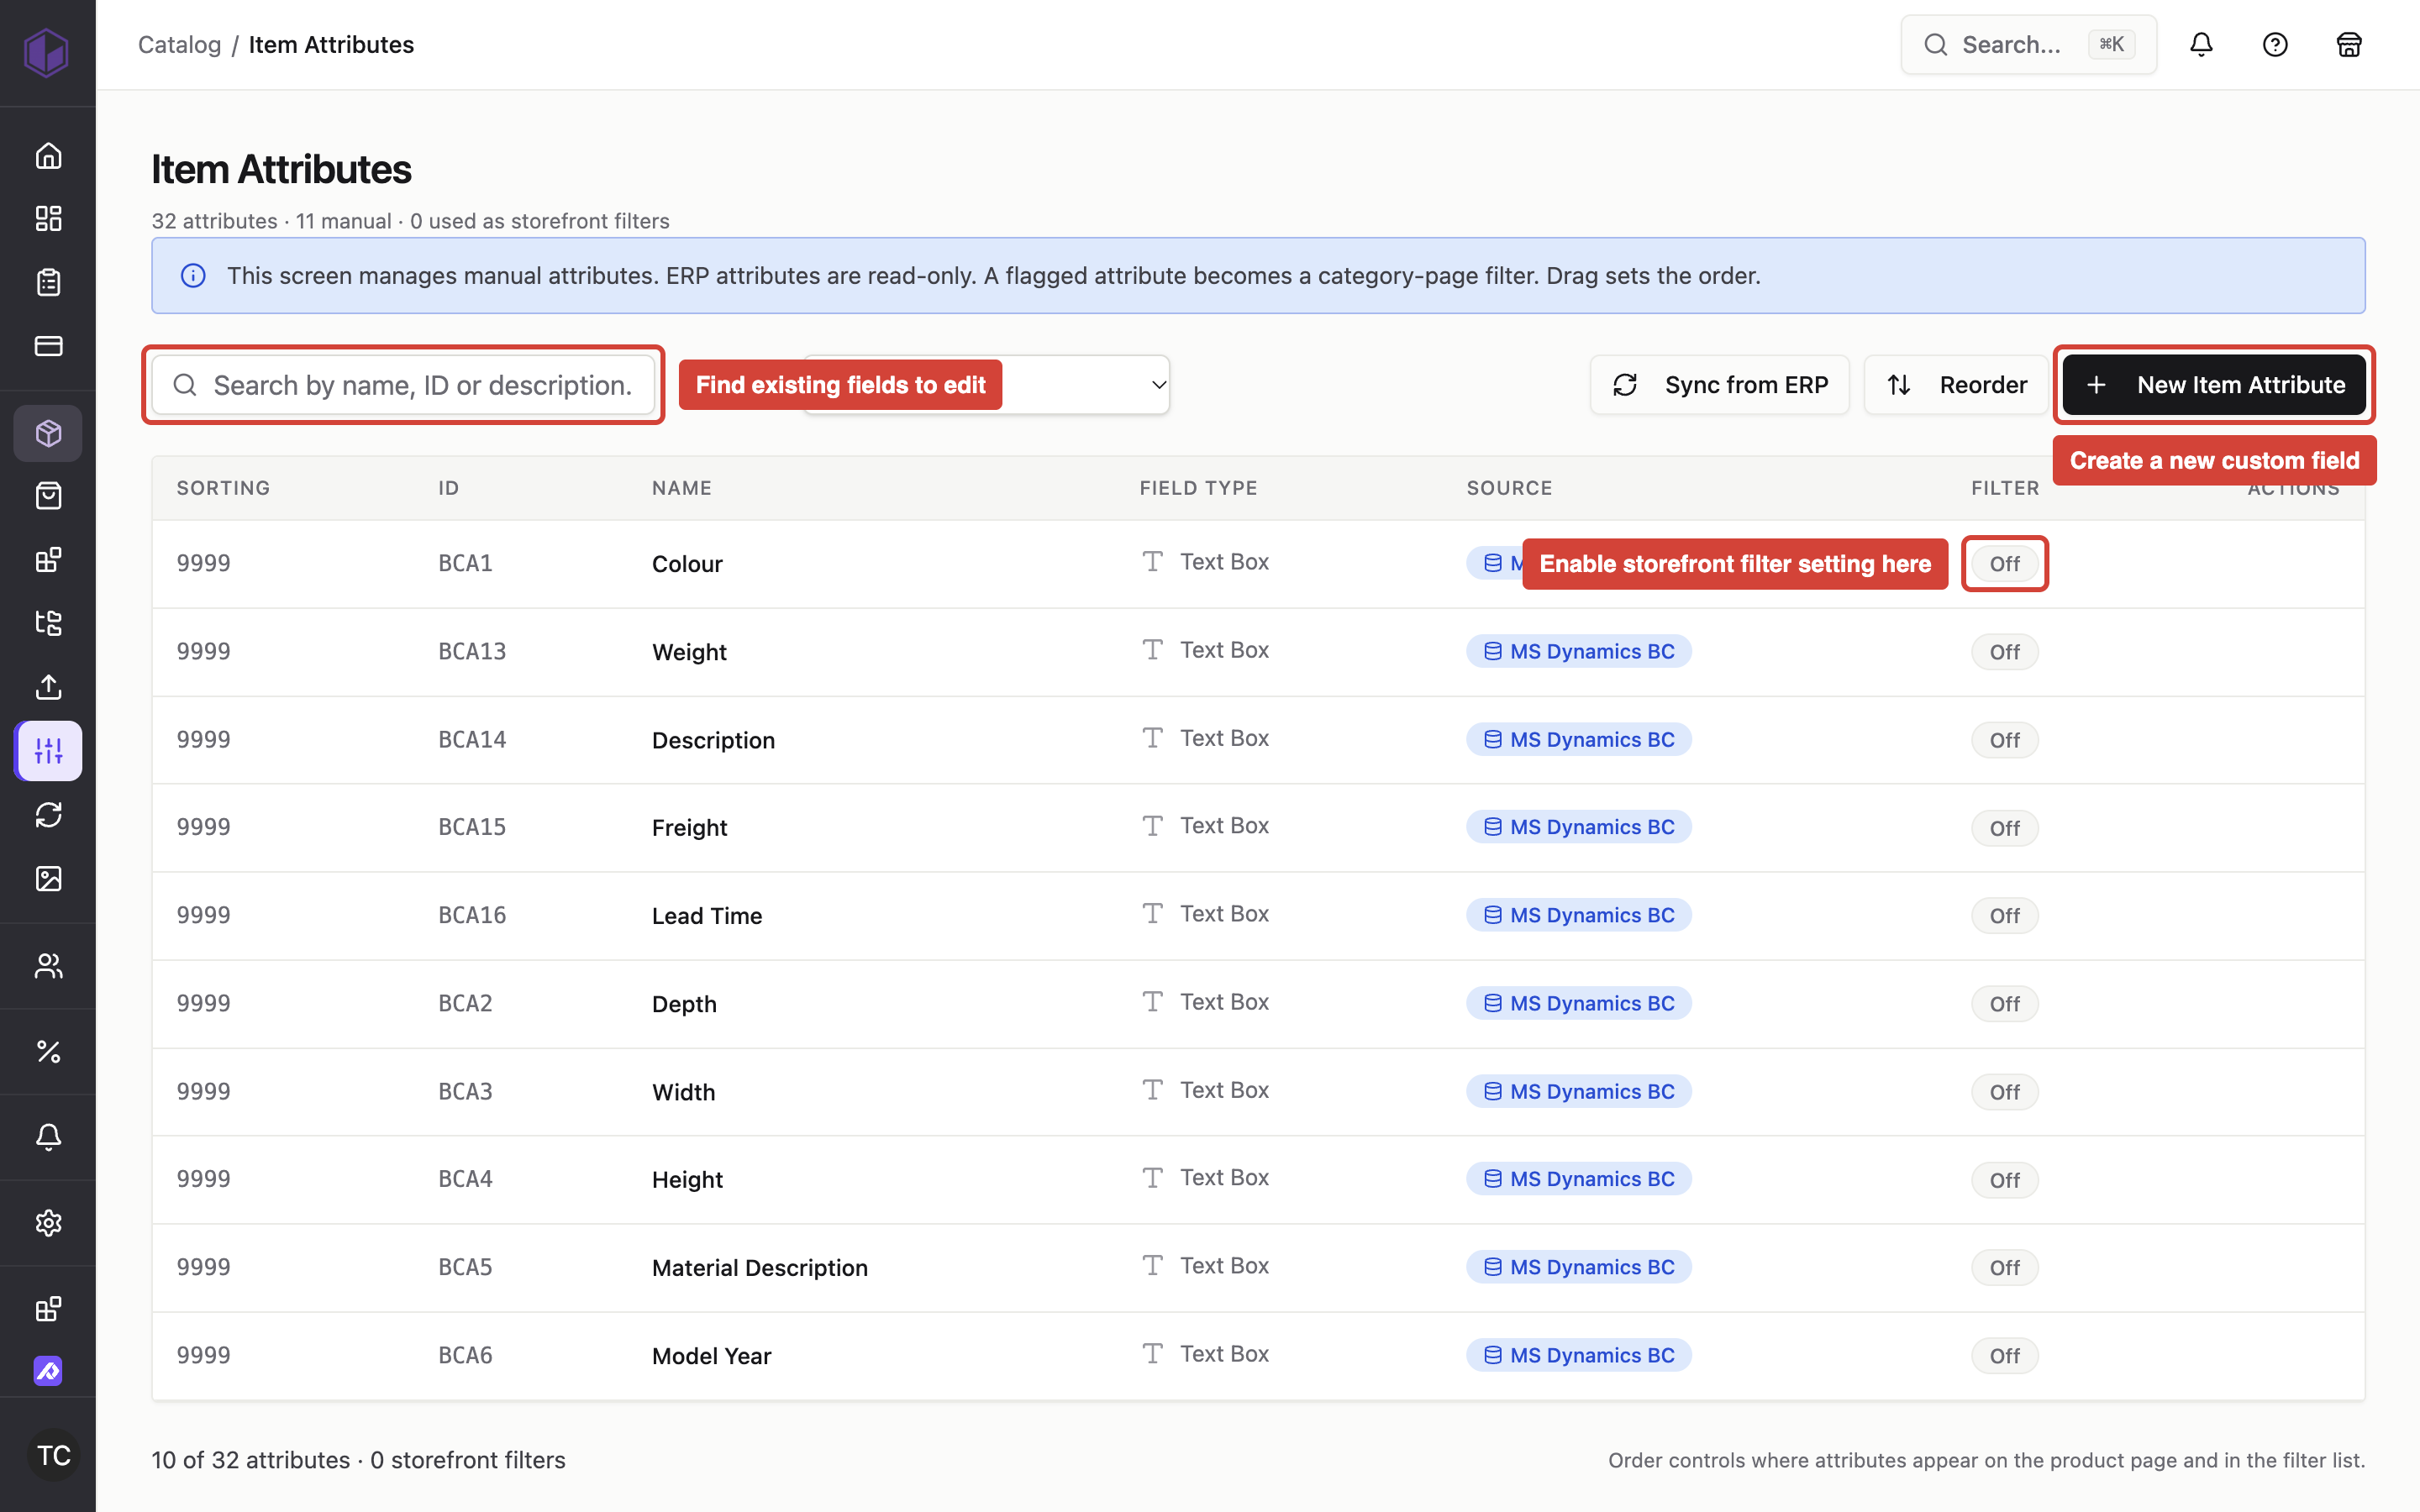
Where to find it: Admin → Products → Custom Field Settings
When you'd use this: When you need to define new product attributes for your catalog, update field names and types, reorder how fields display on product pages, or configure which custom fields appear as filters on category pages.
What it does:
Custom field settings let you define the product attributes your store collects and displays. Each custom field has a name, type, display order, whether it allows multiple values, and whether it should appear as a filter on category pages.
When you configure a custom field as a storefront filter, the platform automatically builds category-page filters from the values entered on products. Customers can filter products by those attributes without you needing to manually link products to filter values. The filter rebuilds automatically when you change product values or when your ERP syncs updated information.
Text fields collect short text values like part numbers, color names, material descriptions, or any single-line information.
Checkbox fields store yes/no values. When configured as storefront filters, checkbox fields let customers filter by "Yes" or "No" values.
List fields and multi-value list fields let you define predefined options. List fields accept a single selection per product, while multi-value fields let you assign multiple values to one product. When configured as storefront filters, each distinct value becomes a separate filter option customers can select.
The storefront filter setting determines whether a custom field appears on category pages as a clickable filter. When you enable this setting, the platform indexes all non-empty values for that field across your catalog and makes them available as filter options. The filter displays the custom field name as the filter group heading, and each unique value as a checkbox option. Customers can select one or more values to narrow the product list.
Filter options appear in alphabetical order on category pages. The platform updates filter availability automatically when products come in or out of stock, and rebuilds the complete filter list whenever the catalog reindexes.
Custom fields configured as storefront filters work alongside any legacy filters you've configured. Both types appear together on category pages. You can gradually transition from legacy filters to custom field filters by enabling the storefront filter setting on attributes that already exist in your catalog.
Set it up:
To create or modify a custom field, open the Custom Field Settings page. Add a new field or select an existing field to edit.
Enter the field name as you want it to appear on product pages and in the admin. This name also appears as the filter heading on category pages if you enable the storefront filter setting.
Choose the field type based on what kind of information you're collecting. Text fields work for free-form values. Checkbox fields work for yes/no attributes. List and multi-value list fields work when you have a defined set of options.
Set the display order to control where this field appears relative to other custom fields on the product detail page.
To make this custom field available as a category-page filter, enable the storefront filter setting. The platform will index values from this field and make them available as filter options when customers browse categories. Customers will be able to select multiple values from this filter to narrow results.
Save your changes. If you enabled the storefront filter setting, the platform includes this field in the next catalog index. The filter becomes available on category pages after the index completes.
Using it day-to-day:
When you add or update custom field values on product pages, those values automatically flow through to storefront filters if the field is configured as a filter. You don't need to separately link products to filter values—the platform builds the filter from the custom field values you enter.
If your custom field values come from your ERP system, the storefront filters update automatically when the ERP syncs new values. The filter options stay current with your product data without manual intervention.
The filter shows all unique values from products in the current category. If a product has multiple values for a multi-value custom field, each value appears as a separate filter option. Checkbox fields contribute "Yes" and "No" options based on whether products have the checkbox enabled or disabled.
Troubleshooting:
- Custom field doesn't appear as a storefront filter — Check that the storefront filter setting is enabled for that custom field in the Custom Field Settings page. After enabling the setting, the catalog must reindex before the filter appears on category pages. Contact your site administrator if the filter doesn't appear after the next
Manage product categories in the admin
Where to find it: Admin → Categories
When you'd use this: When you need to organize products into browseable groups, create catalog structure for your storefront, or reorganize existing category hierarchies. This applies to both B2B and B2C categories.
What it does:
The Categories section lets you create, edit, and organize the category structure that customers use to browse products on your storefront. You can manage parent-child relationships between categories, control which categories appear active, and see how many products are assigned to each category.
The category list shows all categories in a hierarchical tree view, displaying parent categories with their nested subcategories beneath them. Each category shows its product count and last-modified timestamp, helping you identify which categories contain products and when they were last updated.
You can search and paginate through the category list to locate specific categories in large catalogs. The interface displays key information for each category including name, status, parent category, and sort order.
The platform maintains separate category trees for B2B and B2C scopes. When working with categories, you're managing the category structure for the currently selected scope.
Using it day-to-day:
Navigate to the Categories section from the admin navigation. The list displays your category tree with all parent and child relationships visible.
To create a new category, use the create option and fill in the category details including name, URL slug, parent category, and status. The category appears in the list once saved.
To edit an existing category, open it from the list and modify its fields. You can change the category name, adjust its position in the hierarchy by assigning a different parent, update its sort order, or activate and deactivate categories.
The platform shows the number of products directly assigned to each category, helping you identify empty categories or confirm that products are correctly organized.
When you modify a category's parent or position in the hierarchy, the platform recalculates the category tree structure. Changes you make in the admin reflect on the storefront category pages after the system processes the update.
To delete a category, select the delete option and confirm the action. Deleting a category removes it from the category tree. Verify how deletion affects assigned products based on your catalog configuration.
Troubleshooting:
-
Category doesn't appear on the storefront — Check that the category is marked as active and that it has products assigned. Inactive categories don't display to customers. If the category is active but still not visible, verify that the catalog structure has been reindexed.
-
Product count shows zero but I know products are assigned — The product count reflects products directly assigned to this specific category. Products assigned to child categories appear in those subcategories' counts, not the parent. Navigate to the category's product assignment view to see the complete list of assigned items.
-
Changes to category name or hierarchy don't appear immediately — Category modifications may require cache clearing or reindexing before they display on the storefront. The admin view shows updated information immediately, but customer-facing pages may take a few minutes to reflect changes.
-
Cannot delete a category — Categories with assigned products or active subcategories may be restricted from deletion. Remove product assignments and child categories first, or deactivate the category instead of deleting it.
Assign products to categories
Where to find it: Admin → Categories → select a category → Assigned Items, or Admin → Products with category filters applied
When you'd use this: When you need to add products to categories so they appear in the right places on your storefront, or remove products from categories they shouldn't be in. This controls where products display in your catalog structure and affects product URLs.
What it does:
Product assignment connects products to categories so customers can find them when browsing your storefront. You can assign products to categories from either the category management interface or the product list with category filters applied.
When viewing a category's assigned products, you see all products currently in that category. You can search within the category's products to quickly find specific items—the search looks through item codes, formatted codes, and product descriptions across all products in the category, not just the ones on the current page.
When you need to add products to a category, you can filter the main product list to show only products not assigned to that category. This gives you a searchable, paginated list of products available to add, making it easy to find and assign the right items even in large catalogs.
The platform maintains separate category assignments for B2B and B2C scopes. When you filter products by category or view a category's assigned products, you're working within the currently selected scope.
When you assign a product to a category, the platform automatically creates the URL paths for that product and makes them available on the storefront. The new URLs become resolvable within a few seconds—customers can visit the category page and see the product, or navigate directly to the product's URL path that includes the category structure.
Using it day-to-day:
To see which products are in a category, navigate to that category and open the Assigned Items section. The list displays all products currently assigned, with their position and primary category status. Use the search field to find specific products within the category—results update as you type and search across the full membership list, not just the current page.
To add products to a category, go to the Products list and filter by "not in categories," selecting the category you want to add products to. This shows only products that aren't already in that category. Search and filter this list to find the products you need, then use the bulk assignment action to add them to the category.
When you save the product-to-category assignment, the platform publishes the change and updates the product's URL registry automatically. The newly assigned category path becomes available on the storefront once the update completes—usually within a few seconds.
To remove products from a category, view the category's assigned products list, select the items you want to remove, and use the bulk removal action.
If you assign a product to multiple categories, each assignment creates a different URL path, and the platform determines which one is canonical based on your primary category settings.
Troubleshooting:
-
Search within a category returns no results but I know the product is assigned — The search looks for matches in item codes, formatted codes, and descriptions. Verify you're searching for text that appears in one of those fields. If the product is assigned but doesn't match your search term, try a different keyword or browse through the list.
-
Cannot see products to add to a category — Verify you're using the "not in categories" filter on the main Products list, and that you've selected the correct scope (B2B or B2C). If the filter shows no results, all active products may already be assigned to that category.
-
Product appears in category assignment list but not on storefront — Check that both the product and the category are marked as active. Inactive products or categories don't display to customers even if the assignment exists. Also verify that the catalog has been reindexed if you recently made changes.
-
New category assignment doesn't create a URL for the product — After assigning a product to a category, the platform publishes the change and updates the URL registry automatically. If the new URL doesn't resolve within a few seconds, verify that the product is active and that the category is active. If the URL still doesn't work after a minute or two, try running a full reindex to rebuild the URL registry.
-
Adding products to a category is slow — For large catalogs, use the search and filter tools to narrow down the "not in categories" list before selecting products. The platform pages through unassigned products efficiently, but selecting and assigning many items at once may take time to process.
Import and export category assignments
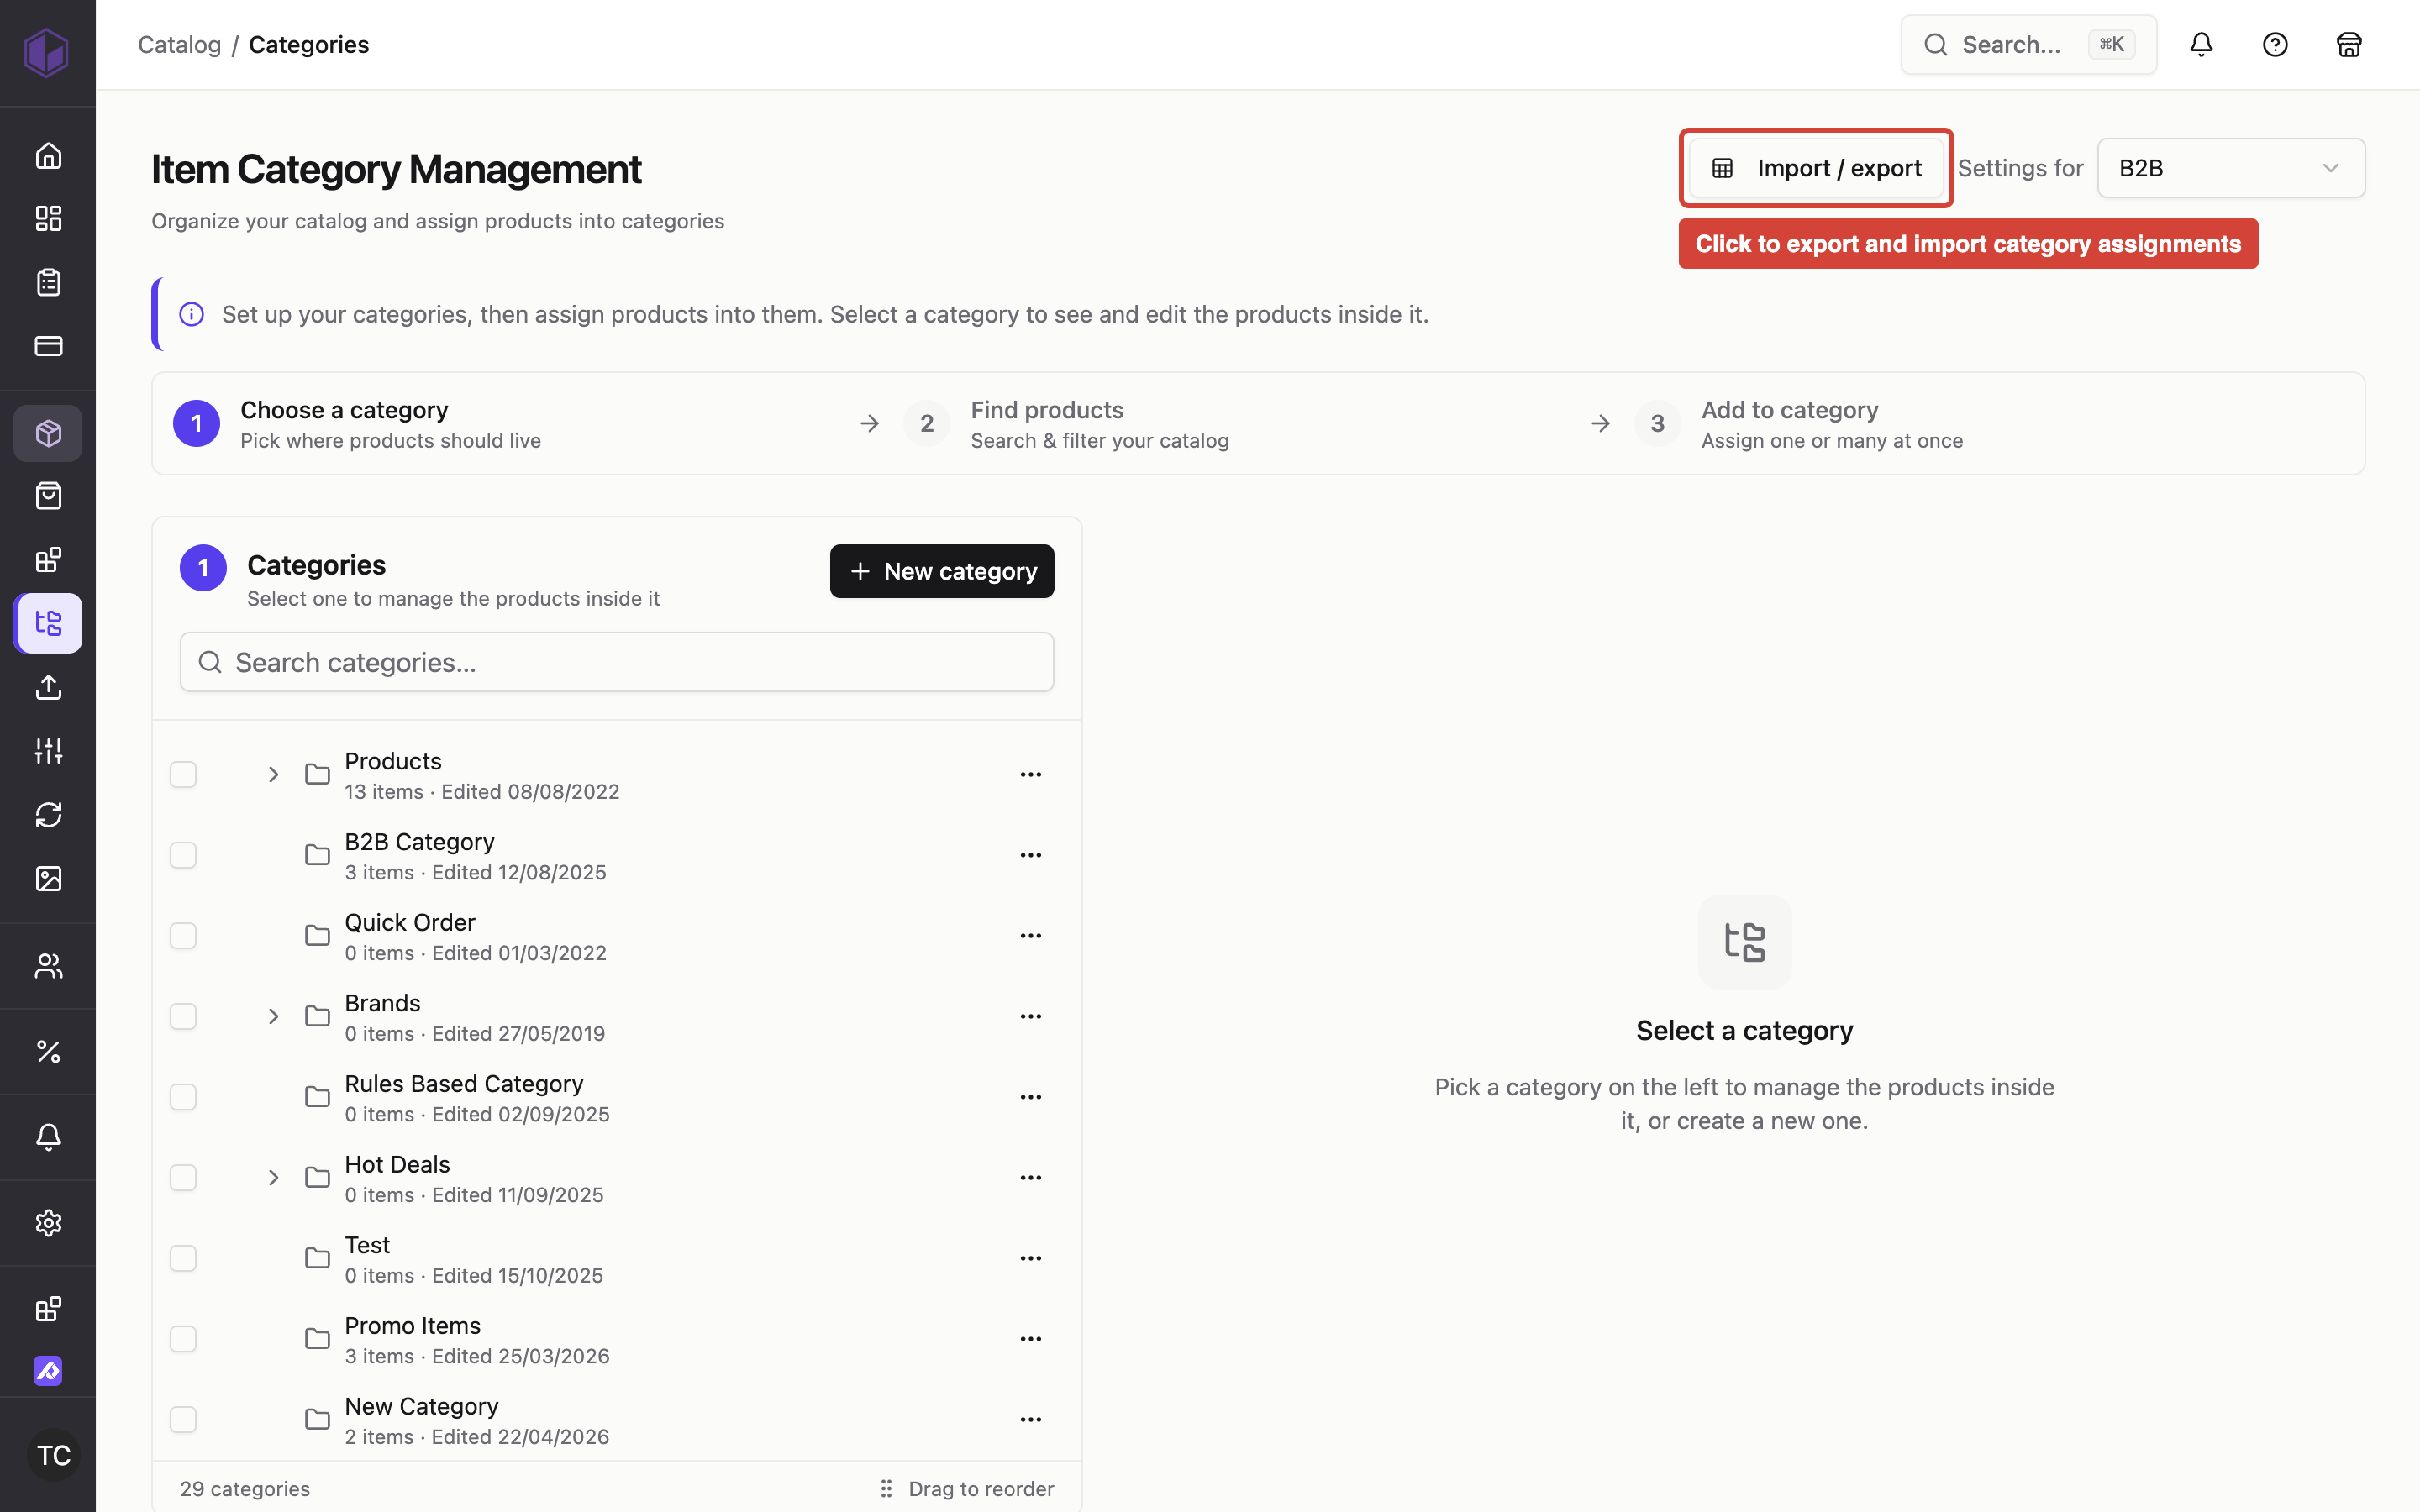
Where to find it: Admin → Categories → Import/Export
When you'd use this: When you need to assign hundreds of products to categories at once from a spreadsheet, reorder products within categories in bulk, or export current assignments for review and planning in Excel. This works for manually assigned products only—assignments from your ERP system or from custom field rules cannot be changed through import.
What it does:
The category assignment import and export tools let you manage product-to-category relationships in bulk using spreadsheet files. You can export the current assignments for one or more categories, make changes in Excel, and import the updated file to apply those changes to your catalog.
When you export category assignments, the platform generates a spreadsheet showing which products are in which categories, their position in each category, and whether each assignment is marked as primary. The export includes only the categories you select and shows all products currently assigned to those categories.
When you import a file, the platform validates the entire file before making any changes. It checks that category IDs exist, that item codes match active products, and that each combination of category and item code appears only once in the file. Valid rows are written to the catalog. Rows with errors are reported in a detailed error file you can download, showing exactly what went wrong on each row.
The import handles three types of assignments differently based on where they came from:
Manual assignments are products you or your team assigned by hand in the admin. These are fully editable through import—you can create new manual assignments, change the position of products within categories, and set which category is primary for each product.
ERP assignments come from your ERP system through the product data feed. The platform shows these assignments in exports so you can see the complete picture, but you cannot change or remove them through import. Rows in your import file that try to modify ERP assignments are reported as errors.
Custom field assignments are driven by product attributes and automatic assignment rules. Like ERP assignments, these appear in exports but cannot be changed through import.
The import uses a composite match key: the combination of category ID and item code together identifies each row. This means the same item code can appear many times in your file—once for each category you're assigning it to. A duplicate error only occurs when the same category ID and item code pair appears twice in the file.
When the platform finds duplicate pairs in your import file, it reports every row of the duplicate and does not write any of them. This ensures you can see all the conflicting rows and decide which values you meant, rather than the system silently choosing one based on file order.
Using it day-to-day:
To export category assignments, navigate to the Categories section and open the import/export interface. Select the categories you want to export—you can choose one category or multiple categories at once. The platform generates a spreadsheet file containing all products assigned to those categories, including position, primary status, and assignment source.
Open the exported file in Excel or another spreadsheet program. Each row represents one product in one category. You can add new rows to assign products to categories, change the position values to reorder products, or set the primary indicator to control which category path is canonical for each product.
Control product URLs and canonical paths through category assignment
Where to find it: Admin → Categories → select a category → Assigned Items, or Admin → Products → select a product → category assignment section
When you'd use this: When you need to control where products appear on your storefront and which URL path customers use to reach each product. This affects both how products display in category navigation and how search engines index your product pages.
What it does:
When you assign a product to one or more categories, the platform generates URL paths for that product based on the category structure. Each category assignment creates a unique URL path combining the category path with the product's URL identifier.
The platform marks one URL path as the canonical path—the primary, authoritative URL for the product. Search engines use this canonical path when indexing your products, and internal links default to the canonical path when available.
When a product is deleted or made inactive in your ERP system, the platform automatically removes the product's URL from the registry. Customers who visit a deleted product's URL receive a "page not found" response instead of seeing outdated product information. This keeps your storefront synchronized with your ERP's product availability.
When you trigger a full reindex of your product catalog in the admin, the platform automatically updates the URL registry at the same time. This ensures that both your product search index and your product URLs reflect the current state of your catalog together—if a reindex removes a product from search results, that product's URL stops resolving as well.
How canonical paths are determined:
If a product is assigned to multiple categories, the platform selects the canonical path using these rules in order:
-
Explicit primary category — If you set one category as the product's primary category, the platform uses that category path as canonical.
-
Single category assignment — If the product is assigned to exactly one category, that category path becomes the canonical URL automatically, even if you haven't explicitly marked it as primary.
-
First assigned category — If the product is in multiple categories with no explicit primary set, the platform uses the first assigned category as the canonical path.
Category-dependent versus category-independent URLs:
Most products use category-dependent URLs, where the product's path includes the category structure (for example, electronics/smartphones/product-name). These products have different URL paths for each category they're assigned to.
Some products use category-independent URLs that don't include category paths, such as products with custom route-based URLs. These products have exactly one URL regardless of how many categories they're in, and that URL is always canonical.
Using it day-to-day:
Assign products to categories through either the category management interface or the product editor. The platform generates URL paths automatically based on your category structure and the product's URL identifier.
If a product should appear in multiple categories but you want to control which URL path is canonical, set the primary category explicitly for that product. The primary category determines the canonical URL path.
When you assign a product to its first category, the platform marks that path as canonical immediately. If you later add more categories without changing the primary category setting, the first category remains canonical and additional categories create alternate URL paths.
For products with category-independent URLs (custom routes or configuration that bypasses category paths), the platform marks those URLs as canonical automatically since the product has only one possible URL.
When products are deleted or deactivated in your ERP system, the platform cleans up their URLs automatically during synchronization. You don't need to manually remove URLs for discontinued products—the system handles this as part of the normal ERP sync process.
If you need to force a complete URL refresh across your catalog—for example, after fixing data issues or reorganizing categories—run a full reindex from the admin. The platform rebuilds both the product search index and the URL registry together, ensuring they stay consistent.
Troubleshooting:
-
Product is reachable at multiple URLs but has no canonical URL set — This should resolve automatically. Products assigned to one or more categories receive a canonical URL based on either the explicit primary category or the first assigned category. If the canonical path isn't set, try reassigning the product to its categories or verify that the product has an active category assignment.
-
Canonical URL doesn't match my primary category setting — Changes to primary category settings may require cache clearing or reindexing to take effect. The admin view should reflect your primary category selection immediately, but the canonical URL on customer-facing pages may take a few minutes to update.
-
Product appears in multiple categories with the wrong canonical path — Set the correct category as the product's primary category.