Payments
Accept Exact payments at checkout
Where to find it: Admin → Settings → Payments → Add Processor → Select "Exact"
When you'd use this: When you want to process credit card payments through Exact (formerly E-xact) at checkout.
What you need first:
- An Exact merchant account (demo account for testing, production account for live payments)
- Your Exact credentials:
- Payment Page ID
- Transaction Key
- Exact ID
- API Password
Set it up:
- In the CommerceBuild admin, go to Settings → Payments
- Add a new processor and select "Exact" from the list
- Enter your Exact credentials in the configuration fields:
- Payment Page ID
- Transaction Key
- Exact ID
- API Password
- Choose whether to run in test mode (uses Exact's demo environment) or live mode
- Select your capture preference:
- Authorize and capture — funds are captured when the customer completes checkout
- Authorize — funds are held but not captured until you manually capture them later
- Save the processor configuration
Using it day-to-day:
When a customer checks out, they'll be presented with the Exact payment form where they enter their card details. The system automatically generates a secure payment request using your credentials.
If a customer enters incorrect card details (such as the wrong expiry date or CVV) and the payment is declined, they can correct the information and resubmit their payment without needing to start the checkout process again.
If you selected "Authorize" during setup, you'll need to capture authorized payments manually:
- Find the authorized payment in your payment records
- Select the capture action
- Confirm the capture amount
To void an authorized payment before capturing it:
- Find the authorized payment in your payment records
- Select the void action
- Confirm the void
Troubleshooting:
- Payment form doesn't appear — Verify your Payment Page ID is correct and matches your test/live mode setting
- Authorization fails with no error message — Check that your Transaction Key matches your Exact account and test/live mode
- Capture or void operations fail — Ensure your Exact ID and API Password are correct and have the necessary permissions in your Exact account
- Payment authorization returns an error during checkout — This may indicate a temporary service issue. The checkout process protects against duplicate charges by using the unique order reference, so customers can safely retry their payment if they encounter an error
- "Payment method is currently unavailable" error at checkout — This can occur if the shipping or billing address is missing a country code. Ensure customer addresses include a valid country value before proceeding to payment
Accept PAYA Connect payments at checkout
Where to find it: Admin → Settings → Payments → Add Processor → Select "PAYA Connect"
When you'd use this: When you want to process credit card payments through PAYA Connect at checkout. Customers enter their card details in a secure hosted payment form.
What you need first:
- A PAYA Connect merchant account
- Your PAYA Connect credentials
Set it up:
- In the CommerceBuild admin, go to Settings → Payments
- Add a new processor and select "PAYA Connect" from the list
- Enter your PAYA Connect credentials in the configuration fields
- Select your capture preference:
- Authorize and capture — funds are captured when the customer completes checkout
- Authorize — funds are held but not captured until you manually capture them later
- Save the processor configuration
Using it day-to-day:
When a customer checks out, they'll be presented with the PAYA Connect hosted payment form where they enter their card details. The system validates and processes the transaction, and upon success, creates the order in your ERP with the payment reference for reconciliation.
Customers can choose to save their credit card during checkout for future purchases. When using a saved card, if the payment fails, an error message is displayed and the customer can retry.
If a customer enters incorrect card details (such as the wrong expiry date or CVV) and the payment is declined, they can correct the information and resubmit their payment without needing to start the checkout process again.
If you selected "Authorize" during setup, you'll need to capture authorized payments manually:
- Find the authorized payment in your payment records
- Select the capture action
- Confirm the capture amount
Accept Bambora payments at checkout
Where to find it: Admin → Settings → Payments → Add Processor → Select "Bambora"
When you'd use this: When you want to process credit card payments through Bambora (Worldline North America) at checkout. Customers enter their card details in a secure embedded payment form.
What you need first:
- A Bambora merchant account
- Your Bambora credentials:
- Merchant ID
- API Passcode (found in Administration → Account Settings → Order Settings → API access passcode in the Bambora portal)
Set it up:
- In the CommerceBuild admin, go to Settings → Payments
- Add a new processor and select "Bambora" from the list
- Enter your Bambora credentials in the configuration fields:
- Merchant ID
- API Passcode
- Select your capture preference:
- Authorize and capture — funds are captured when the customer completes checkout
- Authorize — funds are held but not captured until you manually capture them later
- Save the processor configuration
Using it day-to-day:
When a customer checks out, they'll be presented with the Bambora payment form where they enter their card details and name on card. The system tokenizes the card information securely and processes the transaction.
If a customer enters incorrect card details (such as the wrong expiry date or CVV) and the payment is declined, they can correct the information and resubmit their payment without needing to start the checkout process again.
If you selected "Authorize" during setup, you'll need to capture authorized payments manually:
- Find the authorized payment in your payment records
- Select the capture action
- Confirm the capture amount
To void an authorized payment before capturing it:
- Find the authorized payment in your payment records
- Select the void action
- Confirm the void
Accept Authorize.Net payments at checkout
Where to find it: Admin → Settings → Payments → Add Processor → Select "Authorize.Net"
When you'd use this: When you want to process credit card payments or ACH bank debits through Authorize.Net at checkout. Customers enter their payment details in a secure embedded payment form.
What you need first:
- An Authorize.Net merchant account (sandbox account for testing, production account for live payments)
- Your Authorize.Net credentials:
- API Login ID
- Transaction Key
- Public Client Key
Set it up:
- In the CommerceBuild admin, go to Settings → Payments
- Add a new processor and select "Authorize.Net" from the list
- Choose the payment method type:
- Card — for credit card payments
- ACH — for bank account debits through eCheck.Net
- Enter your Authorize.Net credentials in the configuration fields:
- API Login ID
- Transaction Key
- Public Client Key
- Choose whether to run in test mode (uses Authorize.Net's sandbox environment) or live mode
- Select your capture preference:
- Authorize and capture — funds are captured when the customer completes checkout
- Authorize — funds are held but not captured until you manually capture them later (card payments only; ACH payments are always captured immediately)
- Save the processor configuration
Using it day-to-day:
When a customer checks out, they'll be presented with the Authorize.Net payment form where they enter their payment details. The public client key securely tokenizes the payment information in the customer's browser, so card numbers and bank account details never reach your server.
For credit card payments:
Customers enter their card details, which are tokenized and processed. The system authorizes the payment and holds the funds for later capture, or captures them immediately depending on your configuration.
If a customer enters incorrect card details (such as the wrong expiry date or CVV) and the payment is declined, they can correct the information and resubmit their payment without needing to start the checkout process again.
If you selected "Authorize" during setup, you'll need to capture authorized payments manually:
- Find the authorized payment in your payment records
- Select the capture action
- Confirm the capture amount (you can capture a partial amount if needed)
To void an authorized payment before capturing it:
- Find the authorized payment in your payment records
- Select the void action
- Confirm the void
For ACH bank account payments:
Customers enter their bank account details (account number, routing number, account type). The system tokenizes the information and submits the payment for clearance. ACH payments do not have an authorization step — the bank does not respond in real time — so the payment is captured immediately regardless of your capture preference setting.
Account type is limited to checking accounts and savings accounts.
Troubleshooting:
- Payment form doesn't appear — Verify your Public Client Key is correct and matches your test/live mode setting
- Authorization fails with no error message — Check that your API Login ID and Transaction Key match your Authorize.Net account and test/live mode
- Void operation fails after the transaction has settled — Authorize.Net refuses to void a transaction once it has been included in the nightly settlement batch. The error message will indicate that a refund is the only remaining option for returning funds
- Payment shows as held for review — Authorize.Net may hold a transaction if it triggers your merchant account's fraud filters. Review the transaction in the Authorize.Net Merchant Interface to approve or decline it
- Partial capture fails — Ensure the capture amount is not higher than the original authorization amount
Accept manual bank transfer payments at checkout
Where to find it: Admin → Settings → Payments → Add Processor → Select "Manual Bank Transfer"
When you'd use this: When you want customers to pay by bank transfer, with payment processed outside CommerceBuild. The order is created immediately and placed on hold while you wait for the bank transfer to complete.
Set it up:
- In the CommerceBuild admin, go to Settings → Payments
- Add a new processor and select "Manual Bank Transfer" from the list
- Save the processor configuration
Using it day-to-day:
When a customer checks out using bank transfer, CommerceBuild creates the sales order immediately with an "Open" status and places it on hold. No prepayment document is created in your ERP system.
After the customer completes the bank transfer outside the system:
- Find the order in your payment records
- Verify the bank transfer has been received
- Capture the payment to record that funds were received
- Remove the hold from the order to continue fulfillment
Pay multiple open invoices at once
Where to find it: Storefront → Account → Open Invoices
When you'd use this: When a customer wants to pay several outstanding invoices in a single payment transaction.
Using it day-to-day:
Customers can select multiple open invoices and pay them together:
- Navigate to the Open Invoices page in your account
- Select individual invoices using the checkboxes, or click "Select All" to choose all open invoices
- Proceed to payment
- Complete the payment using your configured payment method
The system combines all selected invoices into a single payment transaction. The payment reference includes all invoice numbers being paid, ensuring proper reconciliation in your ERP system.
The payment form displays at a comfortable height and adjusts automatically as the content changes, without causing the page to scroll unexpectedly.
Customize how payment methods appear at checkout
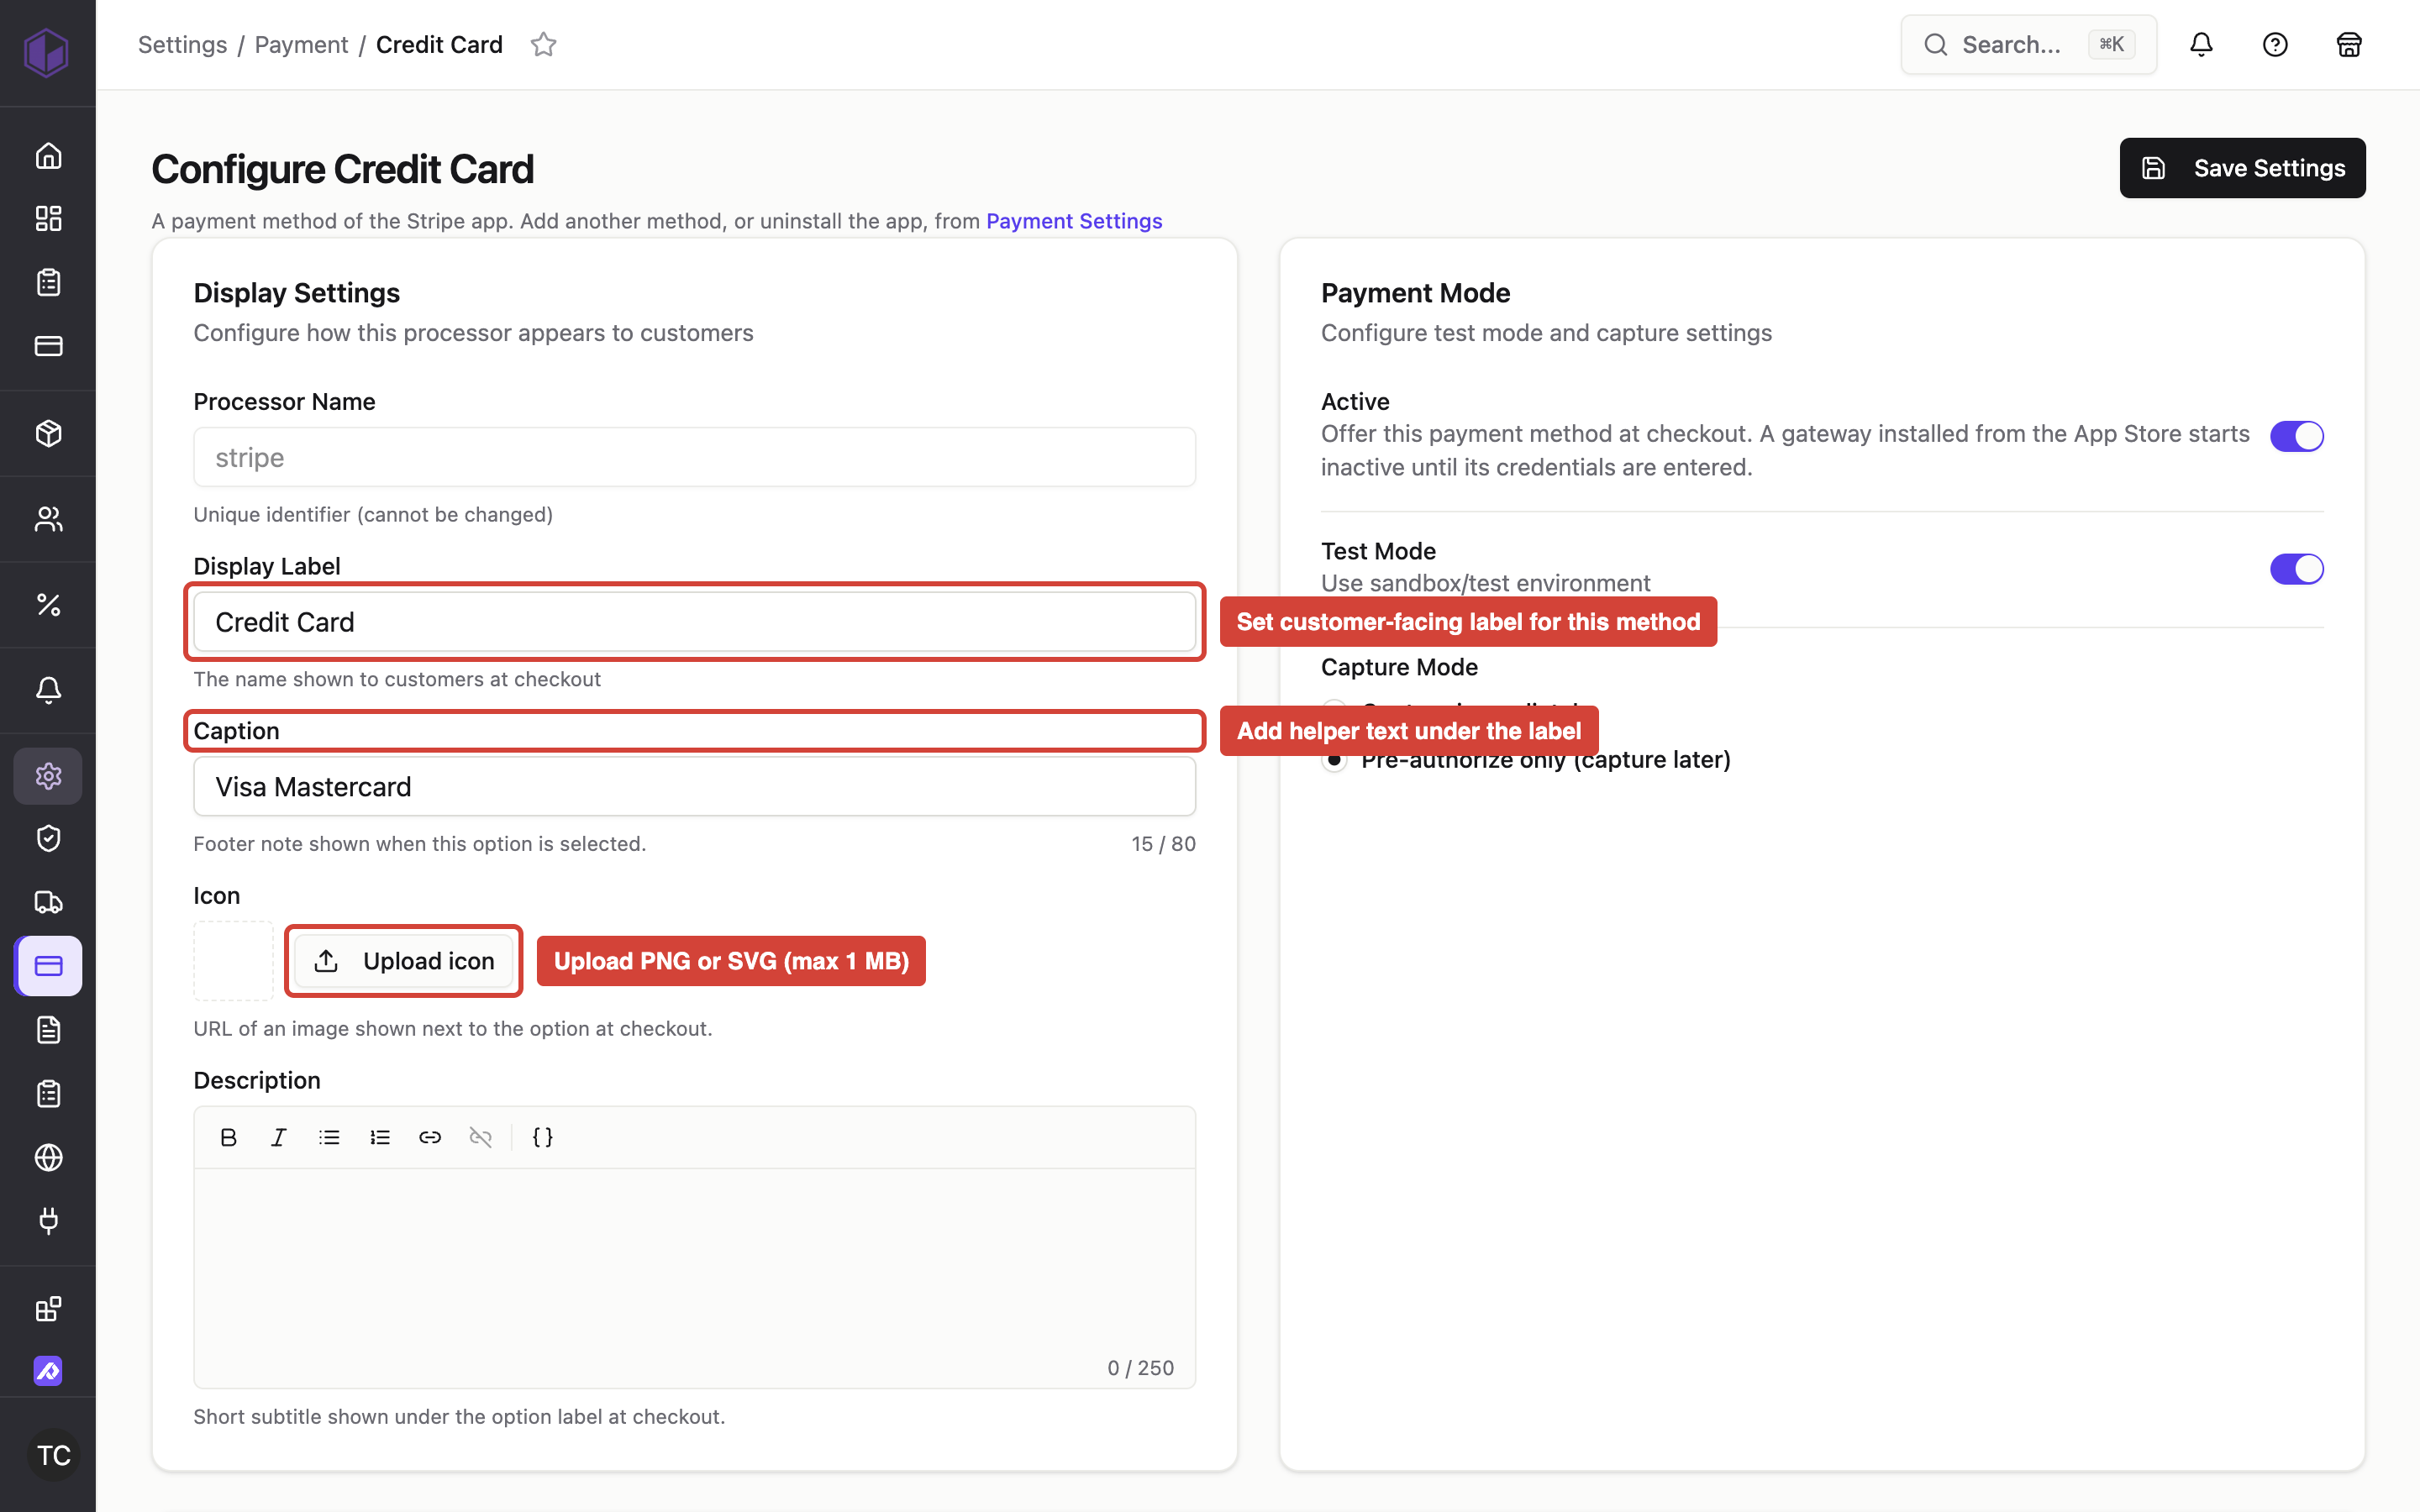
Where to find it: Admin → Settings → Payments → Configure (any processor) → Display Settings
When you'd use this: When you want to control how a payment method is presented to customers during checkout, including custom labels, descriptions, icons, and helper text.
Set it up:
- In the CommerceBuild admin, go to Settings → Payments
- Select a configured payment processor and click Configure
- In the Display Settings section, customize the presentation fields:
- Processor Name — the internal identifier for the processor
- Display Label — the name customers see for this payment method at checkout
- Description — a short multi-line description shown beside the method at checkout (optional)
- Icon — upload a PNG or SVG image (up to 1 MB) to display alongside the method label at checkout (optional)
- Caption — small helper text shown under the method label at checkout (optional)
- Click Save Settings to apply your changes
Using it day-to-day:
At checkout, customers see your configured presentation:
- The display label appears as the method name
- Your uploaded icon displays next to the label (along with any default brand icons like Visa/Mastercard logos)
- The caption appears as secondary text beneath the label
- When a customer selects the payment method, your description appears as additional information
To update the icon:
- Go to Settings → Payments → Configure (processor) → Display Settings
- Click to upload a new icon or remove the existing one
- A preview of the uploaded icon appears in the configuration screen
- Save your changes
Troubleshooting:
- Icon upload fails — Ensure your file is PNG or SVG format and smaller than 1 MB
- Description or caption text is cut off — Keep descriptions under 250 characters and captions under 80 characters for best display
- Changes don't appear at checkout — Clear your browser cache or wait a few moments for the configuration to propagate
Manage payment pre-authorizations
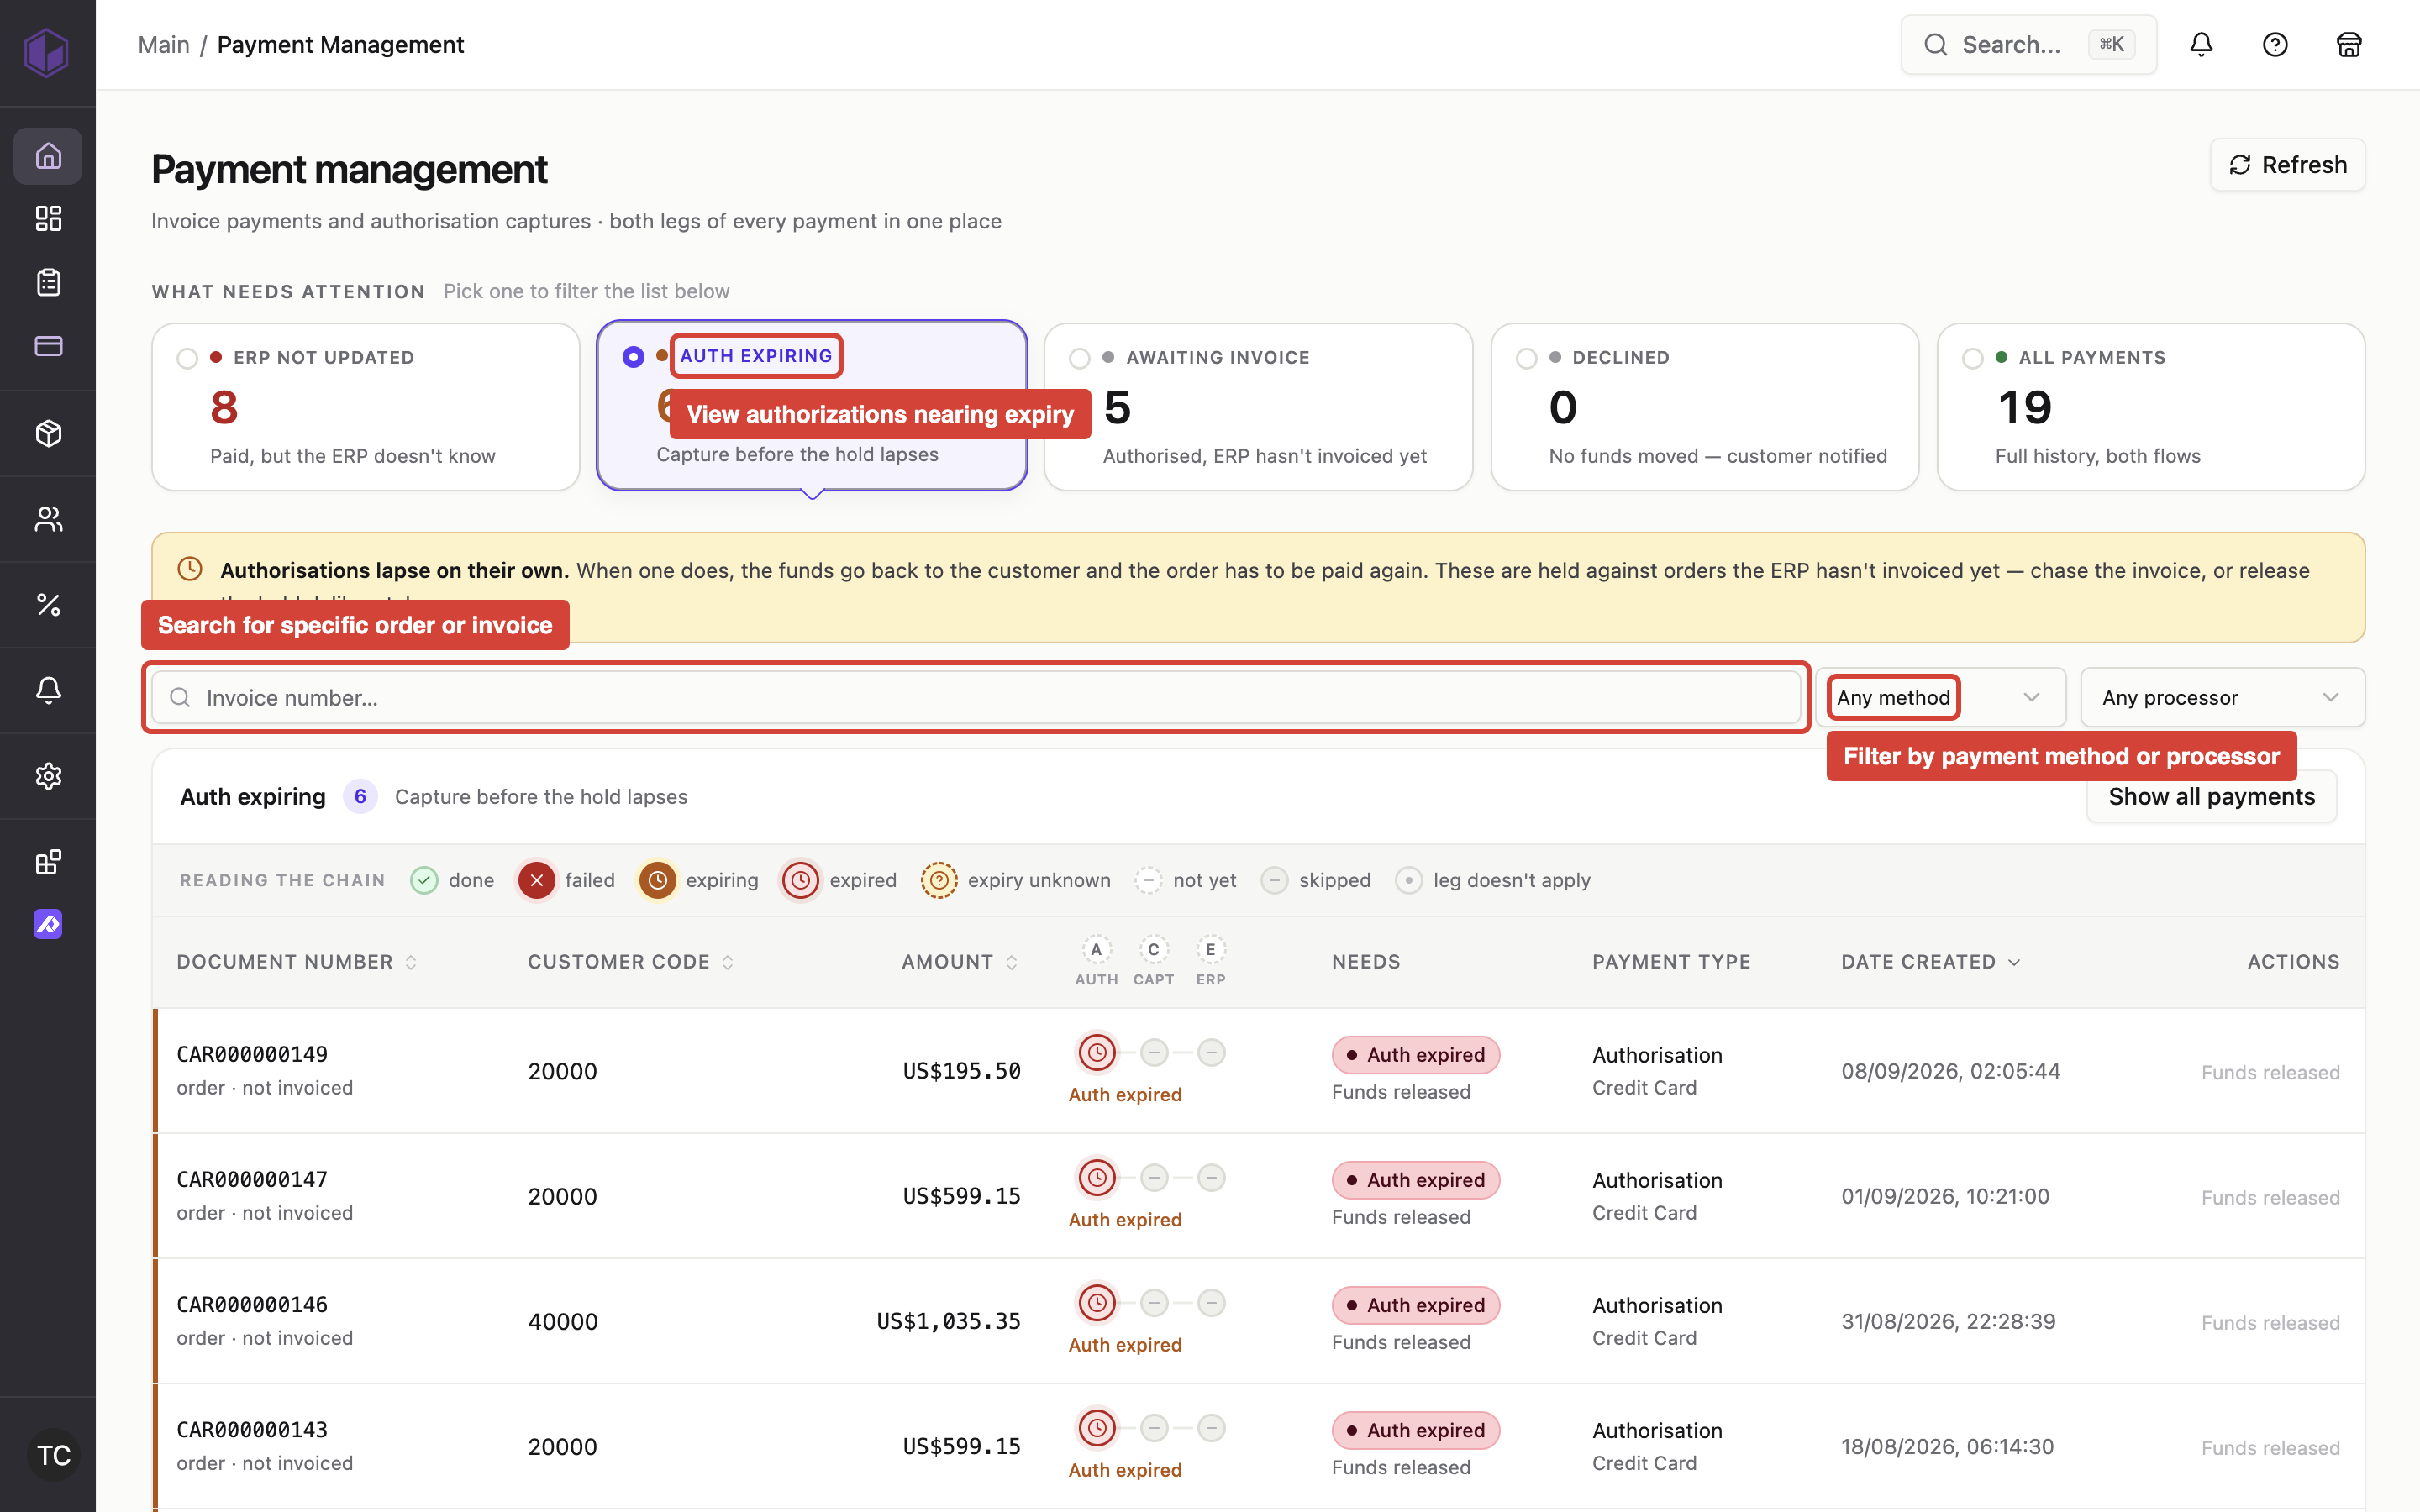
Where to find it: Admin → Payment management screen
When you'd use this: When you need to monitor and act on pending pre-authorizations before they expire, or manually release held funds without navigating to individual orders.
Using it day-to-day:
The payment management screen displays all pre-authorizations that are available to be captured. Each entry shows:
- Payment Type — whether the payment is an authorization awaiting capture, auto-captured, or manual
- Document Number — the order number for authorizations; once captured, it becomes the invoice number
Pre-authorizations are colour-coded based on how close they are to expiring:
- No colour — Less than 50% of the authorization lifespan has passed
- Orange — 50% or more of the lifespan has passed
- Red — 75% or more of the lifespan has passed
- Black — The authorization has expired
The authorization lifespan varies by payment processor (for example, Fat Zebra authorizations last 7 days, while Shift authorizations last 30 days). You can sort and filter the list by expiry status to prioritize captures.
When an authorization is captured, it's removed from the authorization list and replaced by the corresponding invoice entry.
To manually release a pre-authorization directly from this screen:
- Locate the authorization you want to release
- Select the release action
- Confirm the release to free up the held funds on the customer's card
The screen automatically filters out invoices that were created directly in your ERP system (not originating from webstore orders), so you only see payment records that have associated pre-authorization data.
View payment lifecycle and failure timestamps
Where to find it: Admin → Payment management screen → Payment lifecycle drawer
When you'd use this: When you need to see exactly when each step of a payment's lifecycle occurred, including when captures or ERP write-backs failed, to prioritize which stuck payments to investigate first.
Using it day-to-day:
The payment lifecycle drawer shows a date for every step of the payment process:
- When the payment was authorized
- When funds were captured (or when capture failed)
- When the payment was synced to your ERP (or when the sync failed)
For payments that succeeded:
Each completed step displays its timestamp. Once a capture succeeds, any earlier capture failure time disappears. Once the ERP write-back succeeds, any earlier sync failure time disappears. This ensures you only see current information — a resolved payment never shows stale failure timestamps.
For payments that failed:
When a capture fails, the drawer shows when that failure occurred. When an ERP write-back fails, the drawer shows when it last failed, clearly labelled as a failure rather than a successful sync.
For payments covering multiple invoices where the ERP accepted some of them, only the parts that genuinely failed carry a failure time. A failure that occurred after the ERP write-back succeeded is not presented as a write-back failure.
For payments taken without a prior authorization (such as invoice payments or manual bank transfers), the failure timestamps help you understand when something went wrong, since these payments have no automatic retry schedule to provide timing context.
Payments that predate this feature:
Older payment records show no failure timestamps. The system does not estimate or infer dates for failures that occurred before this capability was added.
Release payment authorizations for cancelled orders
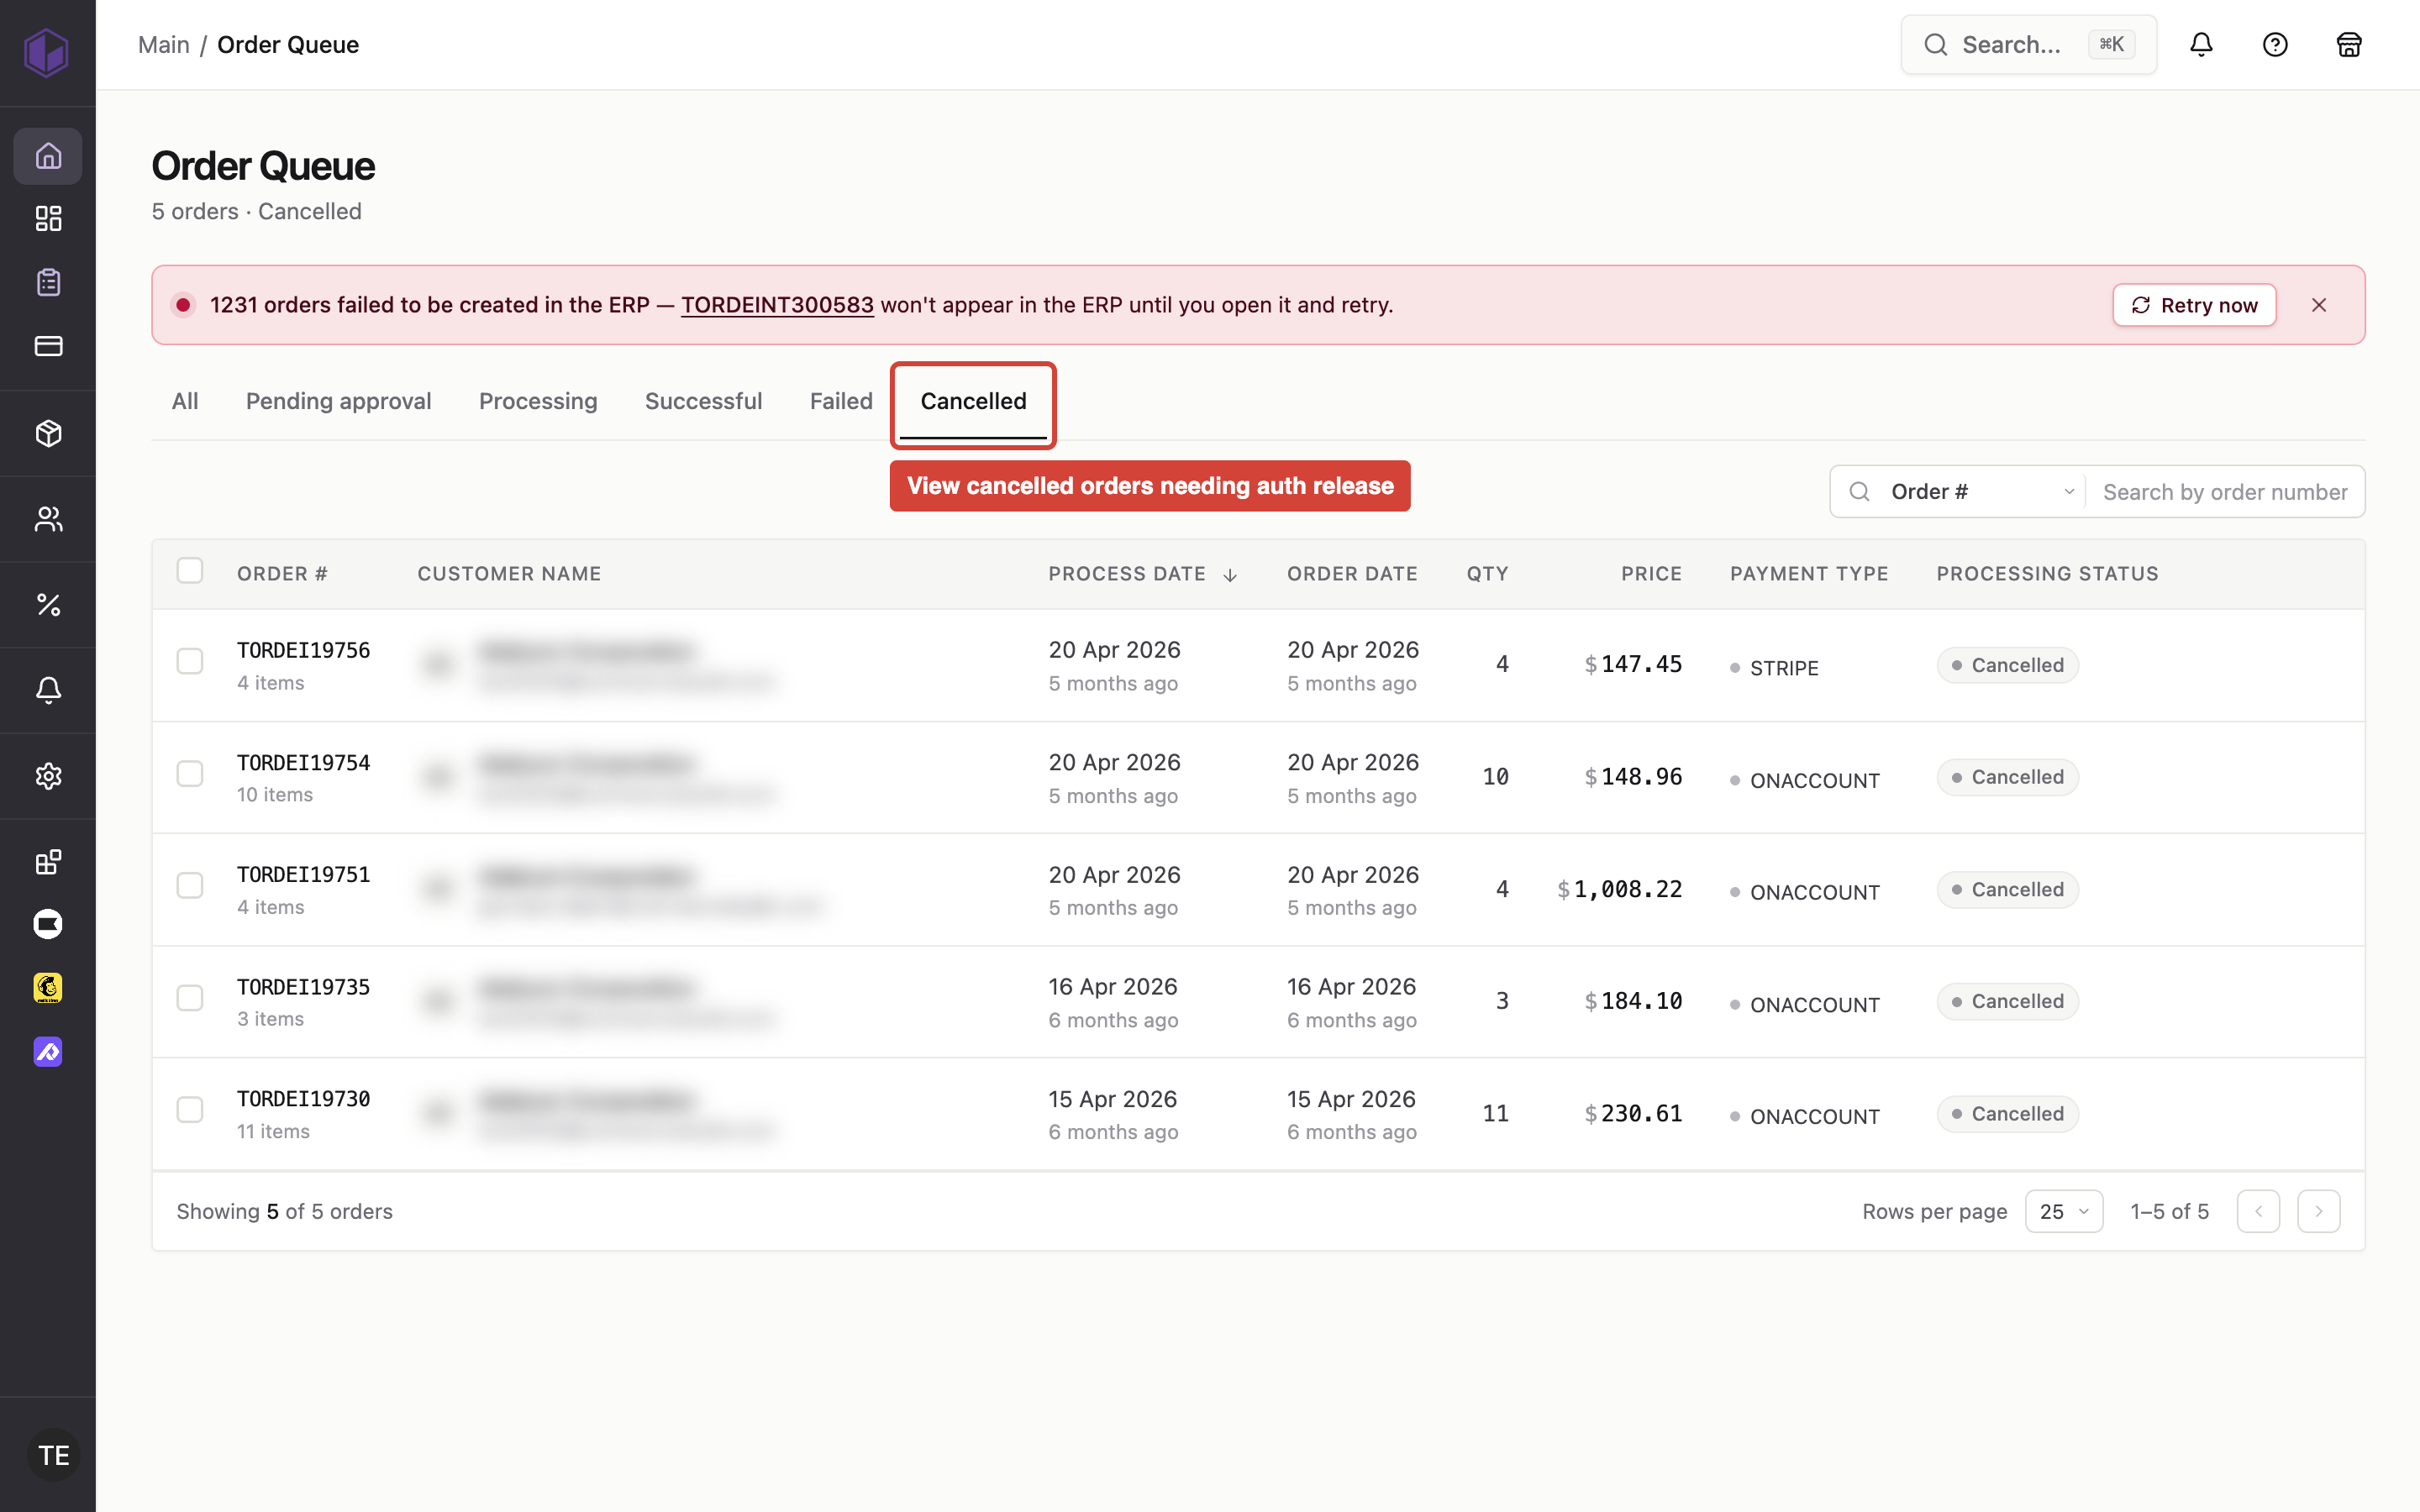
Where to find it: Admin → Order Queue →
Retry failed payment captures and invoice payments
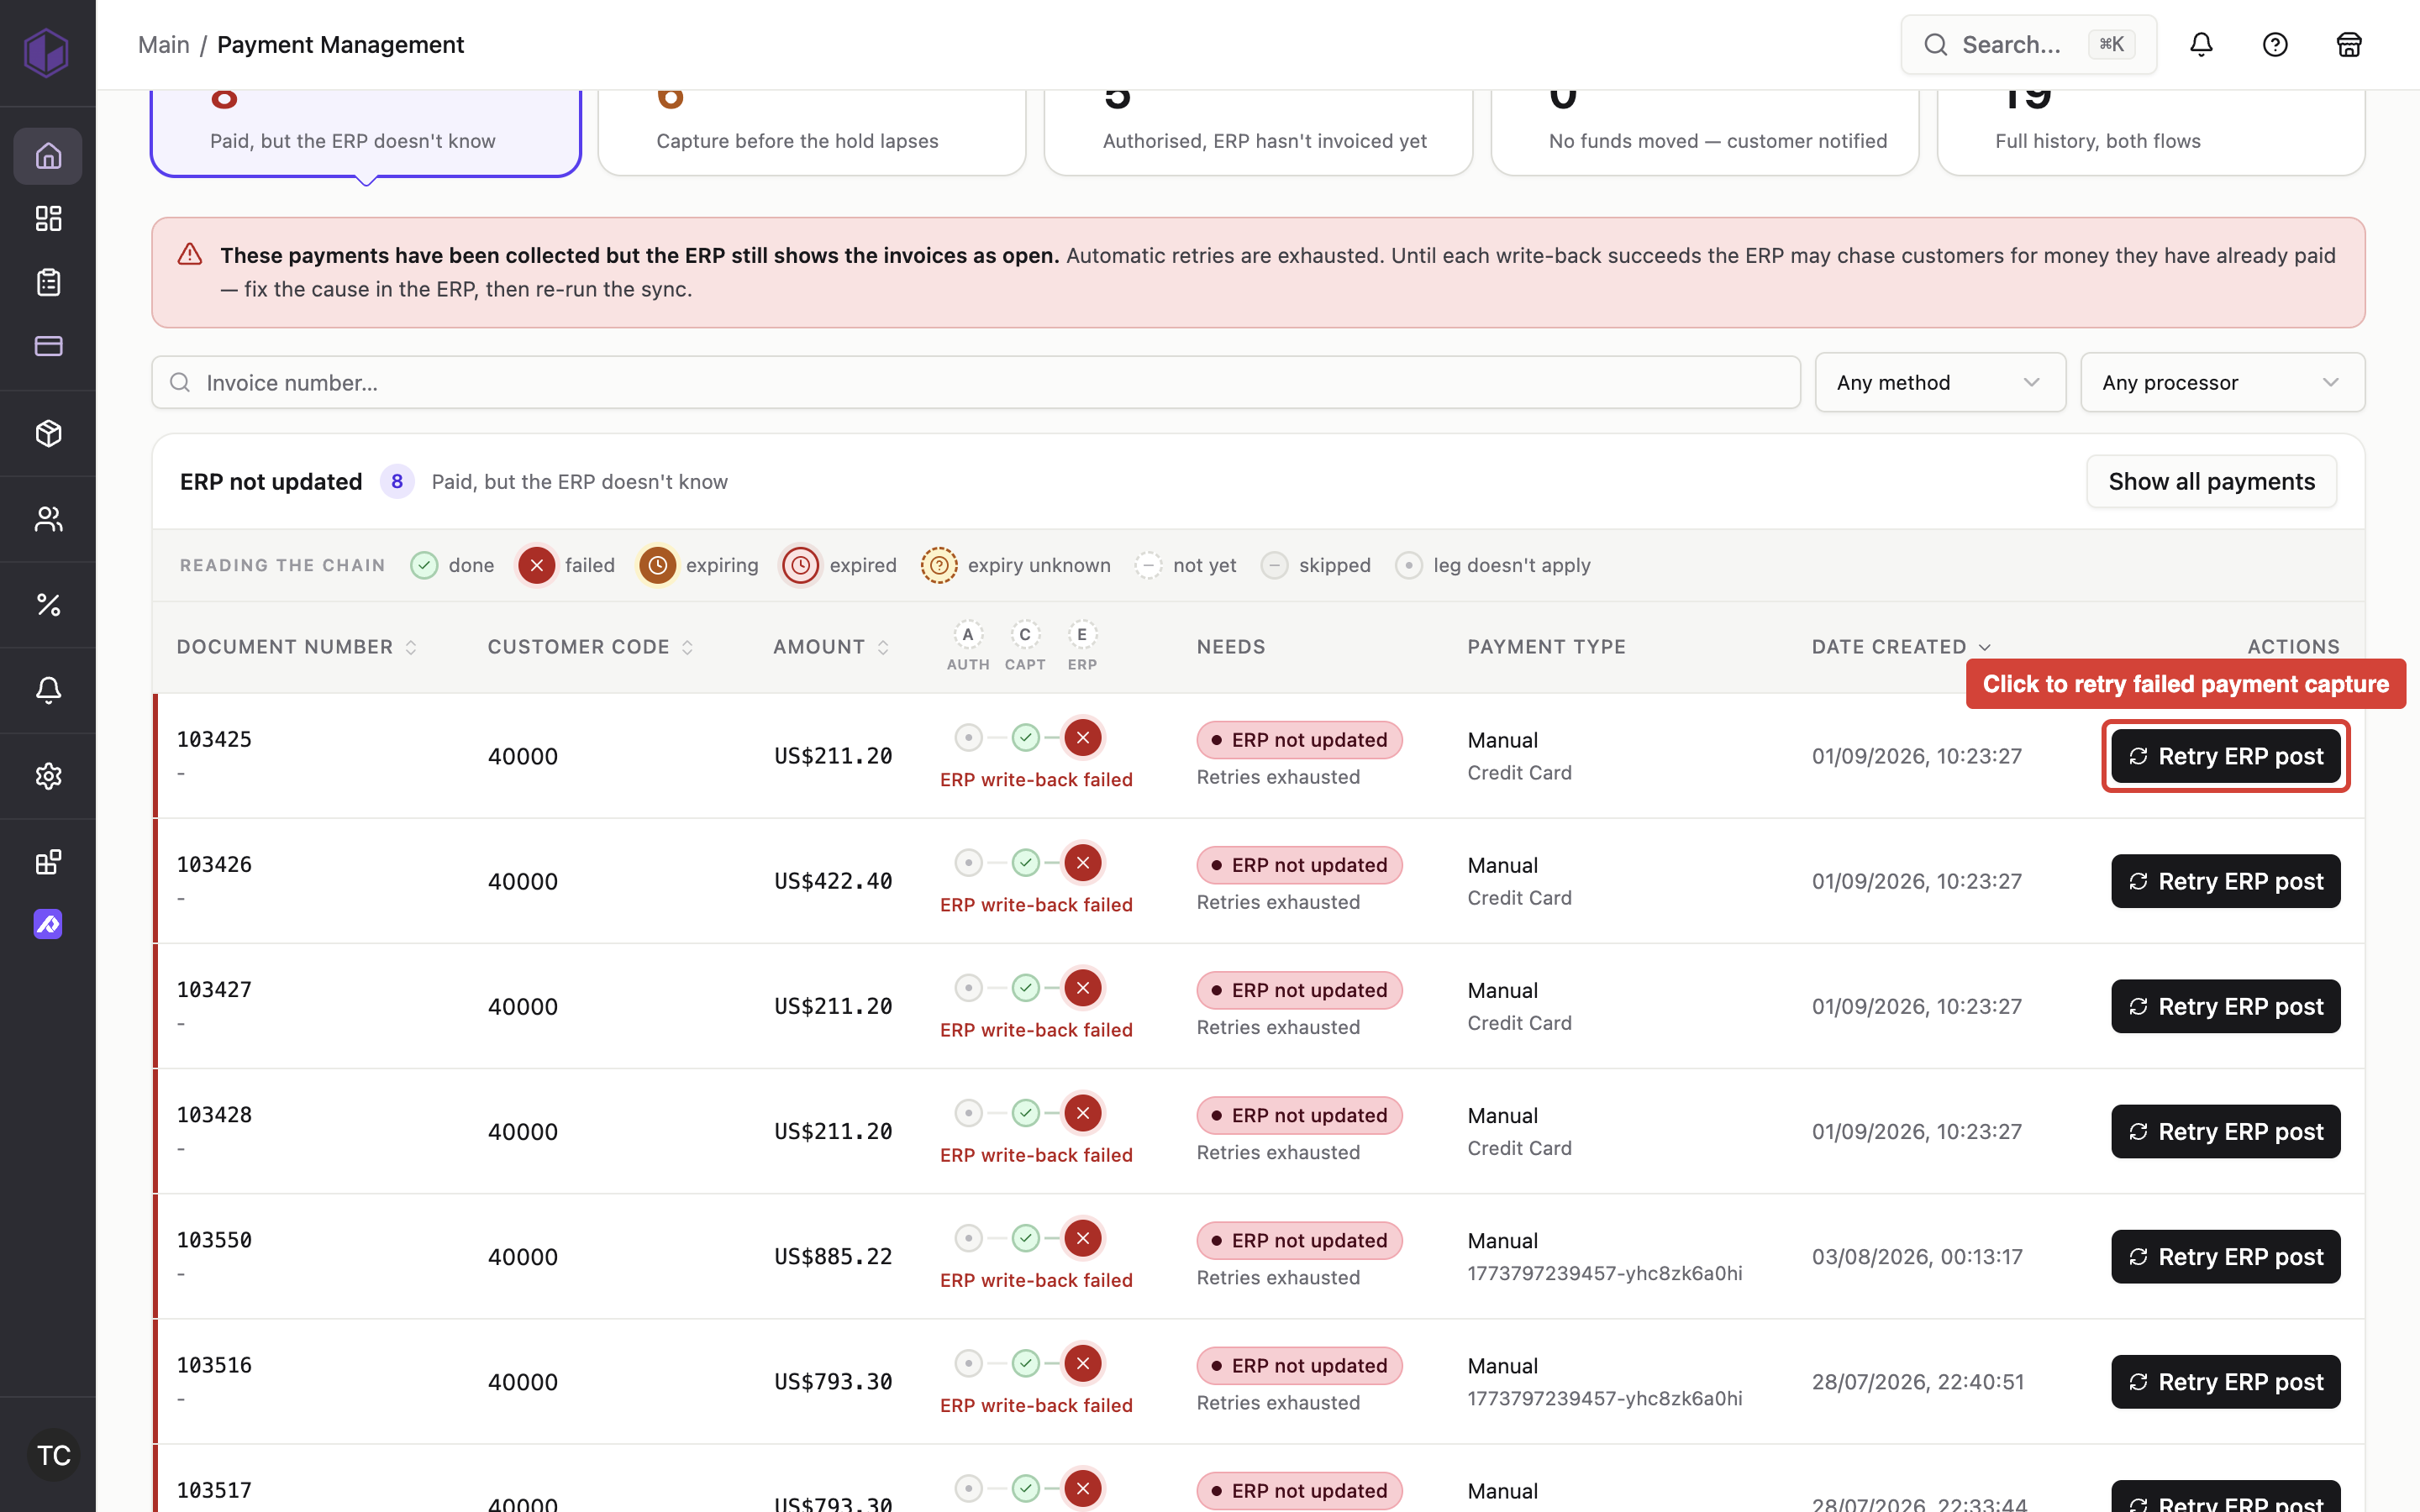
Where to find it: Admin → Payment records
**
Add a payment surcharge
Where to find it: Admin → Settings → Payments → Mapping → Surcharge item code
When you'd use this: When you want to apply a surcharge (such as a credit card processing fee) to orders that use specific payment methods. The surcharge appears as a separate line item throughout the order lifecycle.
What you need first:
- A non-stock item code configured in your ERP to represent the surcharge (if using the item line method)
- The same item code set up in Admin → Shipping → ERP Shipping (if you're using shipping surcharges)
- For Sage X3 stores: determine whether to use the item line method or the invoice element method
Set it up:
- In the CommerceBuild admin, go to Settings → Payments
- Navigate to Mapping → Surcharge item code
- If using the item line method, enter the non-stock item code that represents the surcharge
- If using Sage X3 and you want to use invoice elements instead, configure the invoice element mapping for the surcharge
- Configure the surcharge percentage for each payment processor
- Save your configuration
Using it day-to-day:
When a customer checks out using a payment method with a configured surcharge:
- The surcharge amount is calculated and displayed to the customer during checkout before they complete payment
- The surcharge appears as a separate line item (e.g., "Credit Card Fee: AU$2.90") on:
- The order completion page
- Order details in the admin
- Order details in the customer's account
- Order confirmation emails
The surcharge is recorded in your ERP system using your configured method:
- Item line method — the surcharge appears as a product line on the order using your configured non-stock item code
- Invoice element method (Sage X3) — the surcharge is recorded as an invoice element, which is the recommended approach for handling payment fees in X3
The surcharge calculation uses standard rounding (half up to two decimal places) to ensure amounts are consistent across all displays and the payment processor.
Troubleshooting:
- Duplicate key error when configuring surcharges — Ensure you haven't used the same non-stock