Shipping
Get real-time Canada Post shipping rates at checkout
Where to find it: Admin → Settings → Shipping → Add Carrier → Canada Post
When you'd use this: You're shipping from Canada and want to offer customers live Canada Post rates (domestic, USA, and international) based on their destination and package weight.
What you need first:
- A Canada Post business account with API access
- Your API key from the Canada Post Developer Program
- Your Canada Post customer number
- (Optional) Your contract ID if you have negotiated rates
Set it up:
- Navigate to Admin → Settings → Shipping and add Canada Post as a carrier
- Choose whether to use test mode (development environment) or production mode
- Enter your credentials:
- API Key — your Canada Post API key
- Customer Number — your Canada Post customer account number
- Contract ID (optional) — include this if you have a contract for discounted rates; leave blank for counter (standard) rates
- Configure which services you want to offer customers by selecting from the list of available Canada Post services (e.g., Regular Parcel, Expedited Parcel, Xpresspost, Priority)
- Set your scope: both B2B and B2C, B2B only, or B2C only
- (Optional) Add rules directly to the carrier configuration to control when services appear, adjust pricing, or handle quote failures
- Save your configuration
Using it day-to-day:
When a customer enters a shipping address, the system automatically retrieves available Canada Post services and pricing. Package dimensions are converted from millimeters to centimeters (rounded up to the nearest whole number) and weight is converted from grams to kilograms to match Canada Post requirements.
The system handles three destination types:
- Domestic (Canada) — uses postal code routing
- USA — uses ZIP code routing
- International — uses country code routing
All rates are returned in Canadian dollars (CAD).
Troubleshooting:
- No rates appear at checkout — Verify your API credentials are correct and that your ship-from postal code is valid. Canada Post requires a Canadian origin postal code.
- Rates only show for Canadian addresses — Canada Post is configured to only appear when shipping from a Canadian origin address. For other origins, use a different carrier.
- Getting counter rates instead of contract rates — Make sure you've entered your Contract ID in the carrier settings. If this field is blank, the system requests standard counter rates.
Get real-time CanPar shipping rates at checkout
Where to find it: Admin → Settings → Shipping → Add Carrier → CanPar
When you'd use this: You're shipping from Canada using CanPar and want to offer customers live CanPar rates based on their destination and package weight.
What you need first:
- A CanPar business account with API access
- Your CanPar user ID and password
- Your CanPar shipper number
Set it up:
- Navigate to Admin → Settings → Shipping and add CanPar as a carrier
- Choose whether to use test mode (development environment) or production mode
- Enter your credentials:
- User ID — your CanPar user ID
- User Password — your CanPar password
- Shipper Number — your CanPar shipper number
- Configure which services you want to offer customers by selecting from the list of available CanPar services (e.g., CanPar Ground, CanPar Overnight, CanPar Select, CanPar U.S.A.)
- Set your scope: both B2B and B2C, B2B only, or B2C only
- (Optional) Add rules directly to the carrier configuration to control when services appear, adjust pricing, or handle quote failures
- Save your configuration
Using it day-to-day:
When a customer enters a shipping address, the system automatically retrieves available CanPar services and pricing. Package dimensions are converted from millimeters to centimeters and weight is converted from grams to kilograms to match CanPar requirements.
CanPar is configured to only appear when shipping from a Canadian origin address. All rates are returned in Canadian dollars (CAD).
Troubleshooting:
- No rates appear at checkout — Verify your API credentials are correct and that your ship-from postal code is valid. CanPar requires a Canadian origin postal code.
- Rates only show for Canadian addresses — CanPar is configured to only appear when shipping from a Canadian origin address. For other origins, use a different carrier.
Get real-time CH Robinson (ETMS) LTL and truckload shipping rates at checkout
Where to find it: Admin → Settings → Shipping → Add Carrier → CH Robinson (ETMS)
When you'd use this: You ship LTL (less-than-truckload) or full truckload freight and want to offer customers live CH Robinson rates based on their destination, shipment weight, and pallet characteristics.
What you need first:
- A CH Robinson ETMS business account with API access
- Your API credentials from CH Robinson
- (Optional) Default freight class if you want to set a fallback density classification
- (Optional) Default accessorials if you have standard additional service requirements
Set it up:
- Navigate to Admin → Settings → Shipping and add CH Robinson (ETMS) as a carrier
- Choose your transport mode:
- LTL (less-than-truckload) — for partial freight loads
- Truckload — for full truck shipments
- Enter your CH Robinson API credentials
- (Optional) Set a default freight class — this applies to all pallets unless overridden at the pallet level
- (Optional) Configure default accessorials — additional services that apply to all shipments (e.g., liftgate delivery, residential delivery, inside delivery)
- Set your scope: both B2B and B2C, B2B only, or B2C only
- (Optional) Add rules directly to the carrier configuration to control when services appear, adjust pricing, or handle quote failures
- Save your configuration
Using it day-to-day:
When a customer enters a shipping address, the system automatically retrieves available CH Robinson services and pricing based on the shipment's pallets and weight.
The system supports pallet-level freight class specification — different pallets in the same shipment can have different freight classes to reflect varying density. If a pallet doesn't have a freight class specified, the system uses the default freight class configured in your carrier settings.
Accessorials configured at the carrier level apply to all shipments. You can also pass accessorials dynamically per shipment if your packaging strategy or integration provides them.
Troubleshooting:
- No rates appear at checkout — Verify your CH Robinson API credentials are correct and that your ship-from address is valid.
- Incorrect freight charges — Check that freight classes are set correctly on your pallets or in the carrier default settings. Freight class affects pricing based on density.
- Missing accessorial charges — Confirm your default accessorials are configured in the carrier settings if they should apply to all shipments.
Manage product dimensions and weight for shipping calculations
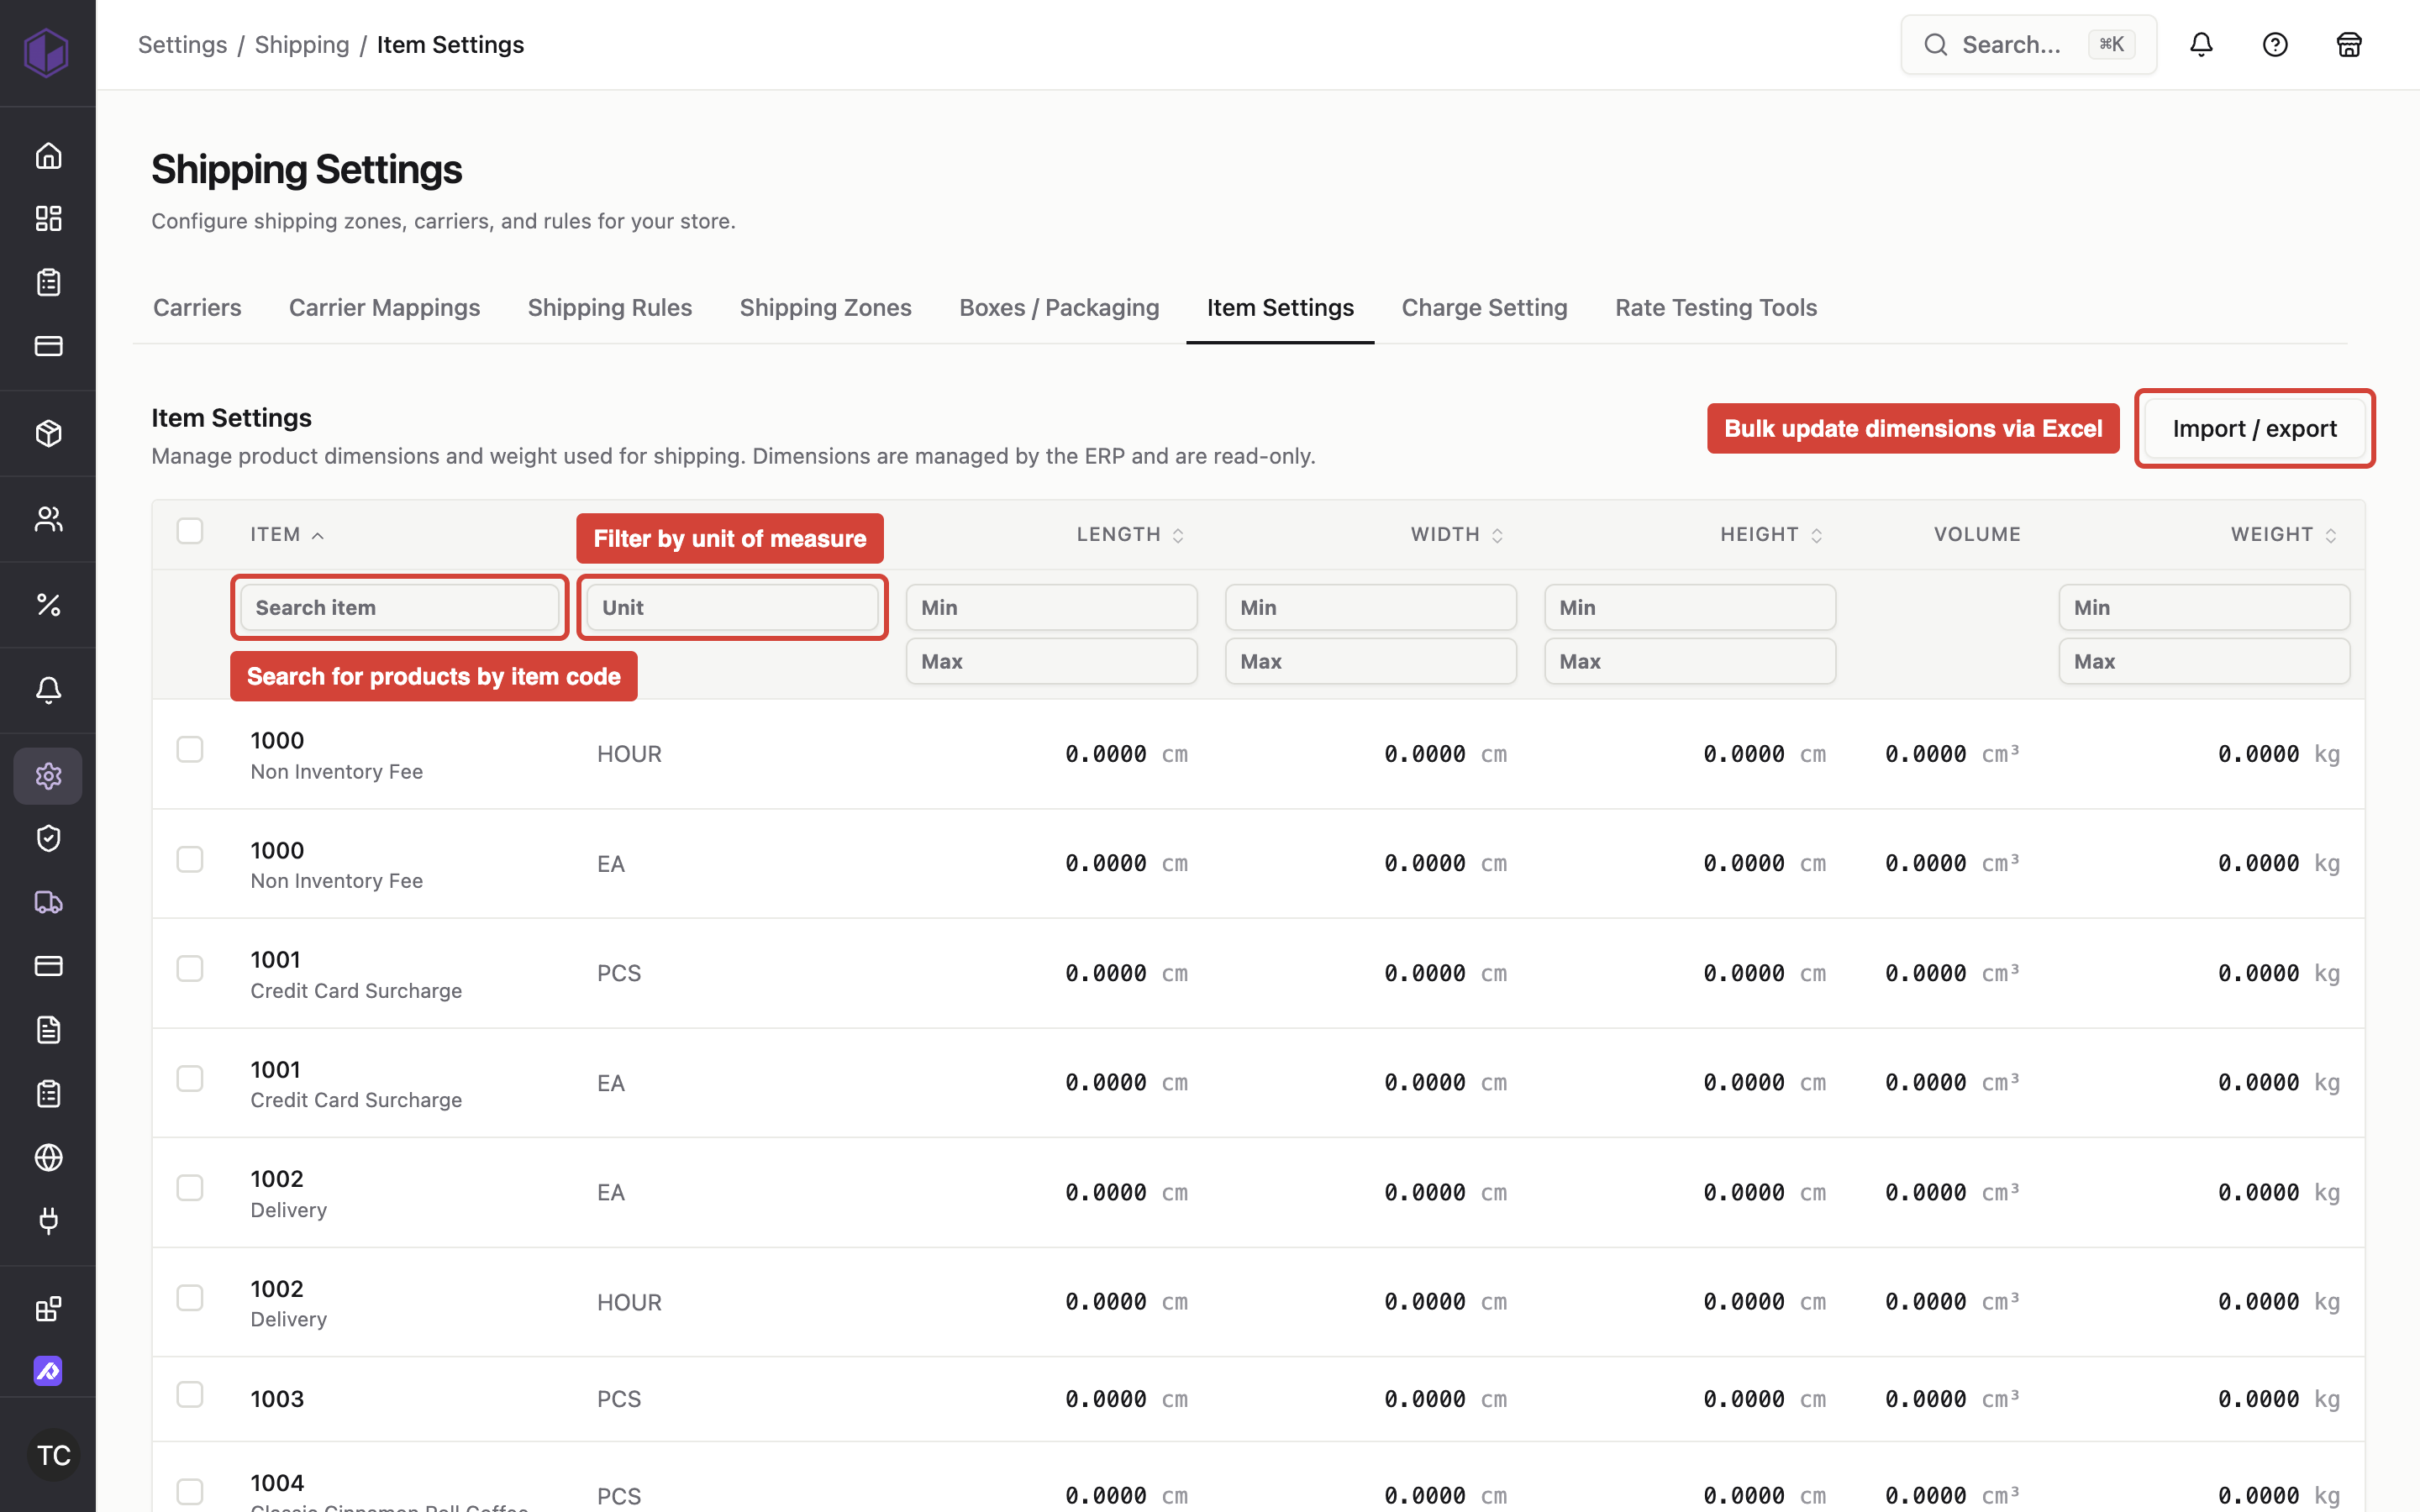
Where to find it: Admin → Settings → Shipping → Product Size
When you'd use this: You need to set or update product dimensions (length, width, height) and weight so the system can calculate accurate shipping rates at checkout. These values determine package size and carrier charges.
What you need first:
- Products configured in your catalog
- Dimension and weight measurements for your products
Set it up:
- Navigate to Admin → Settings → Shipping → Product Size
- Use the search field to find specific products by item code
- Filter the list by:
- Unit of measure (for Business Central stores)
- Dimension ranges (length, width, height)
- Weight ranges
- Sort the list by item code, unit of measure, or any dimension field
- Edit product dimensions and weight:
- For Sage 300 and Sage X3 stores, you can edit dimensions and weight directly in the admin or import them using Excel
- For Business Central stores using the Shipping API, dimensions come from your ERP and are read-only in the admin
- Save your changes
Using it day-to-day:
The system uses product dimensions and weight when calculating shipping rates at checkout. Volume is calculated as length × width × height. When a customer adds products to their cart, the system retrieves these measurements to determine package size and request accurate carrier quotes.
You can update multiple products at once using the bulk update feature — change only the fields you need to edit, and leave others unchanged.
For Business Central stores, dimensions sync automatically from your ERP and reflect your ERP's unit of measure conversions.
Troubleshooting:
- Shipping rates seem incorrect — Verify that product dimensions and weight are set correctly. Missing or inaccurate measurements can result in wrong carrier quotes.
- Can't edit dimensions — If you're using Business Central with the Shipping API, dimensions are managed in your ERP and are read-only in CommerceBuild.
- Bulk update didn't apply — Check that the item codes in your update match existing products exactly. Only valid item codes will be updated.
Configure shipping charges for ERP integration
Where to find it: Admin → Settings → Shipping → Charges
When you'd use this: You need to map CommerceBuild shipping methods to specific shipping item codes in your ERP system so that orders sync correctly with the right shipping charges and accounting codes.
What you need first:
- Shipping carriers and services configured in CommerceBuild
- Shipping item codes configured in your ERP (Business Central, Sage 300, or Sage X3)
Set it up:
- Navigate to Admin → Settings → Shipping → Charges
- Map each CommerceBuild shipping service to the corresponding ERP shipping item code
- Save your configuration
Using it day-to-day:
When an order is placed using a shipping method, the system uses your charge mapping to apply the correct shipping item code when syncing the order to your ERP. This ensures shipping charges appear correctly on invoices and match your ERP's accounting setup.
Troubleshooting:
- Shipping charges not appearing in ERP orders — Verify that your charge mappings are configured and that the ERP item codes match exactly what's set up in your ERP system.
- Wrong shipping item on ERP invoices — Check that the CommerceBuild service is mapped to the correct ERP item code in your charge settings.
Configure tracking URLs for shipment carriers
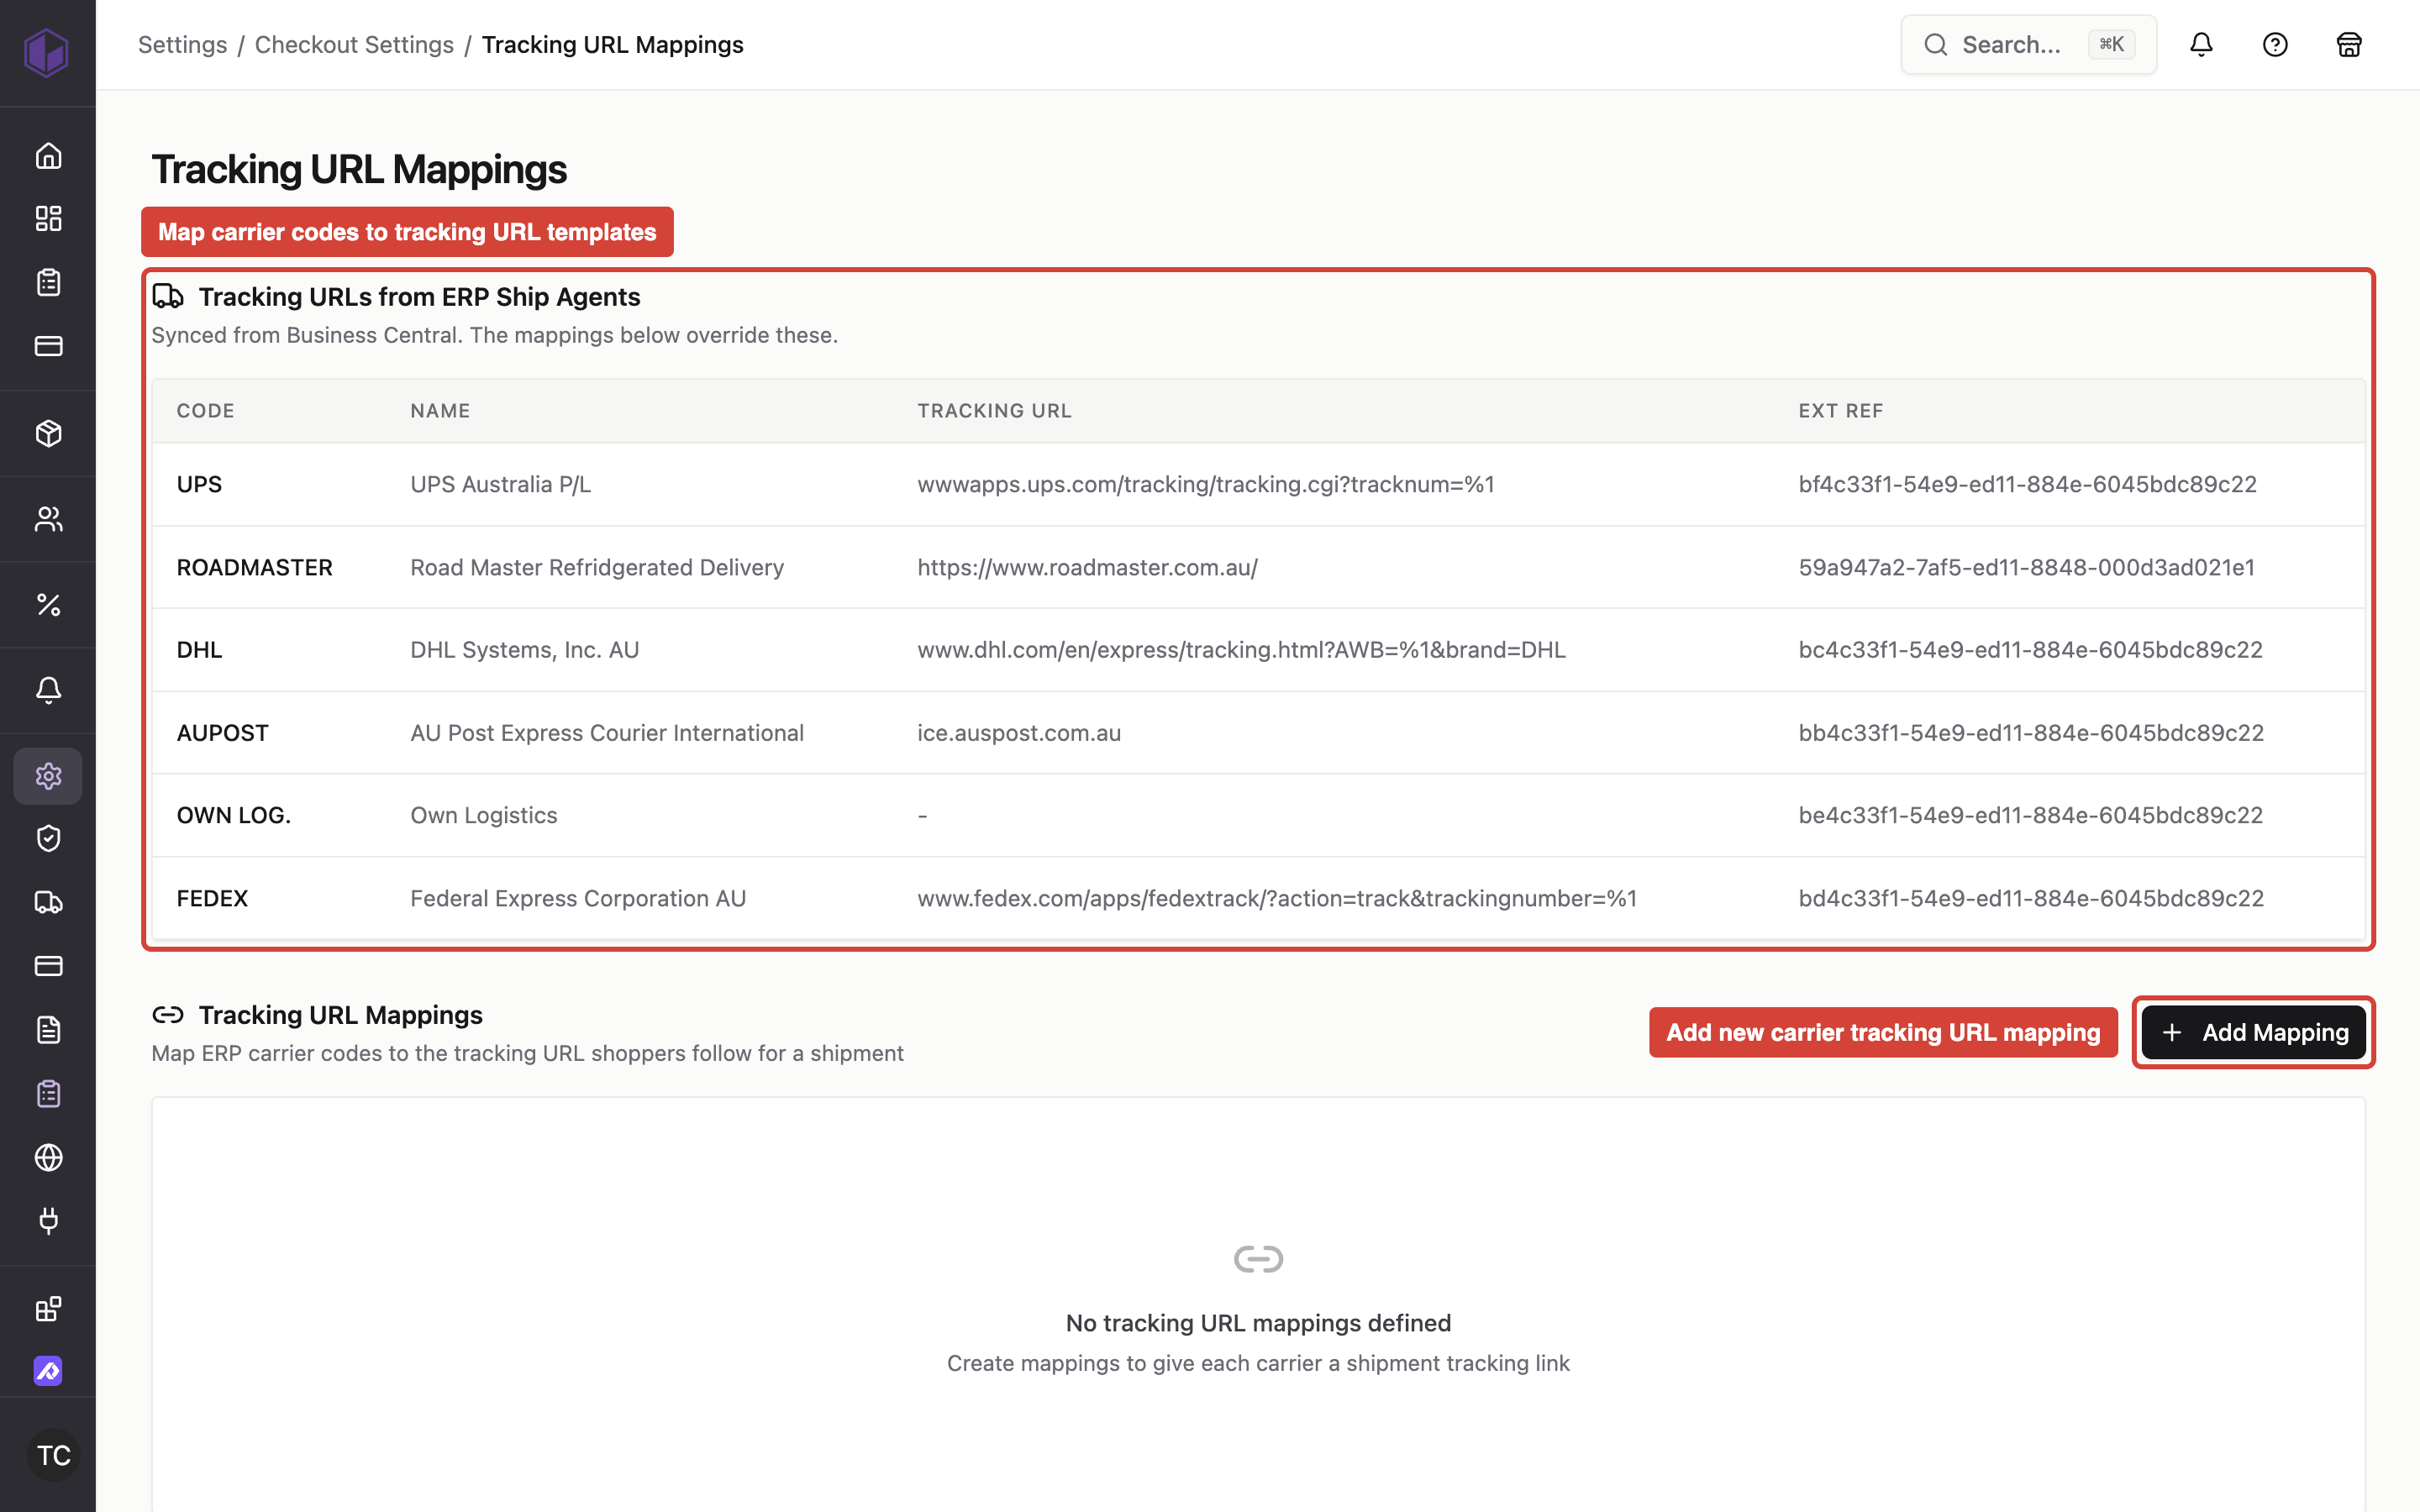
Where to find it: Admin → Settings → Shipping → Mappings → Tracking URL
When you'd use this: You want customers to click a tracking link and be redirected to the carrier's tracking page with their shipment number automatically filled in.
What you need first:
- Shipping carriers configured in CommerceBuild
- Carrier tracking URL templates (provided by your carrier or shipping department)
Set it up:
- Navigate to Admin → Settings → Shipping → Mappings → Tracking URL
- For Business Central stores, map the shipping agent code to the tracking URL template
- For Sage 300 stores, map the ship via code to the tracking URL template
- For Sage X3 stores, map the carrier code to the tracking URL template
- Use placeholders in your URL template to insert the tracking number dynamically (format depends on your carrier)
- Save your configuration
Using it day-to-day:
When an order ships and a tracking number is assigned in your ERP, the system generates a tracking link using your configured URL template. Customers can click the link to view their shipment status on the carrier's website.
Troubleshooting:
- Tracking link doesn't work — Verify that your URL template is correct and that the tracking number placeholder matches the format your carrier expects.
- No tracking link appears — Check that the carrier code in the order matches a configured tracking URL mapping.
Control which shipping services appear at checkout with rules
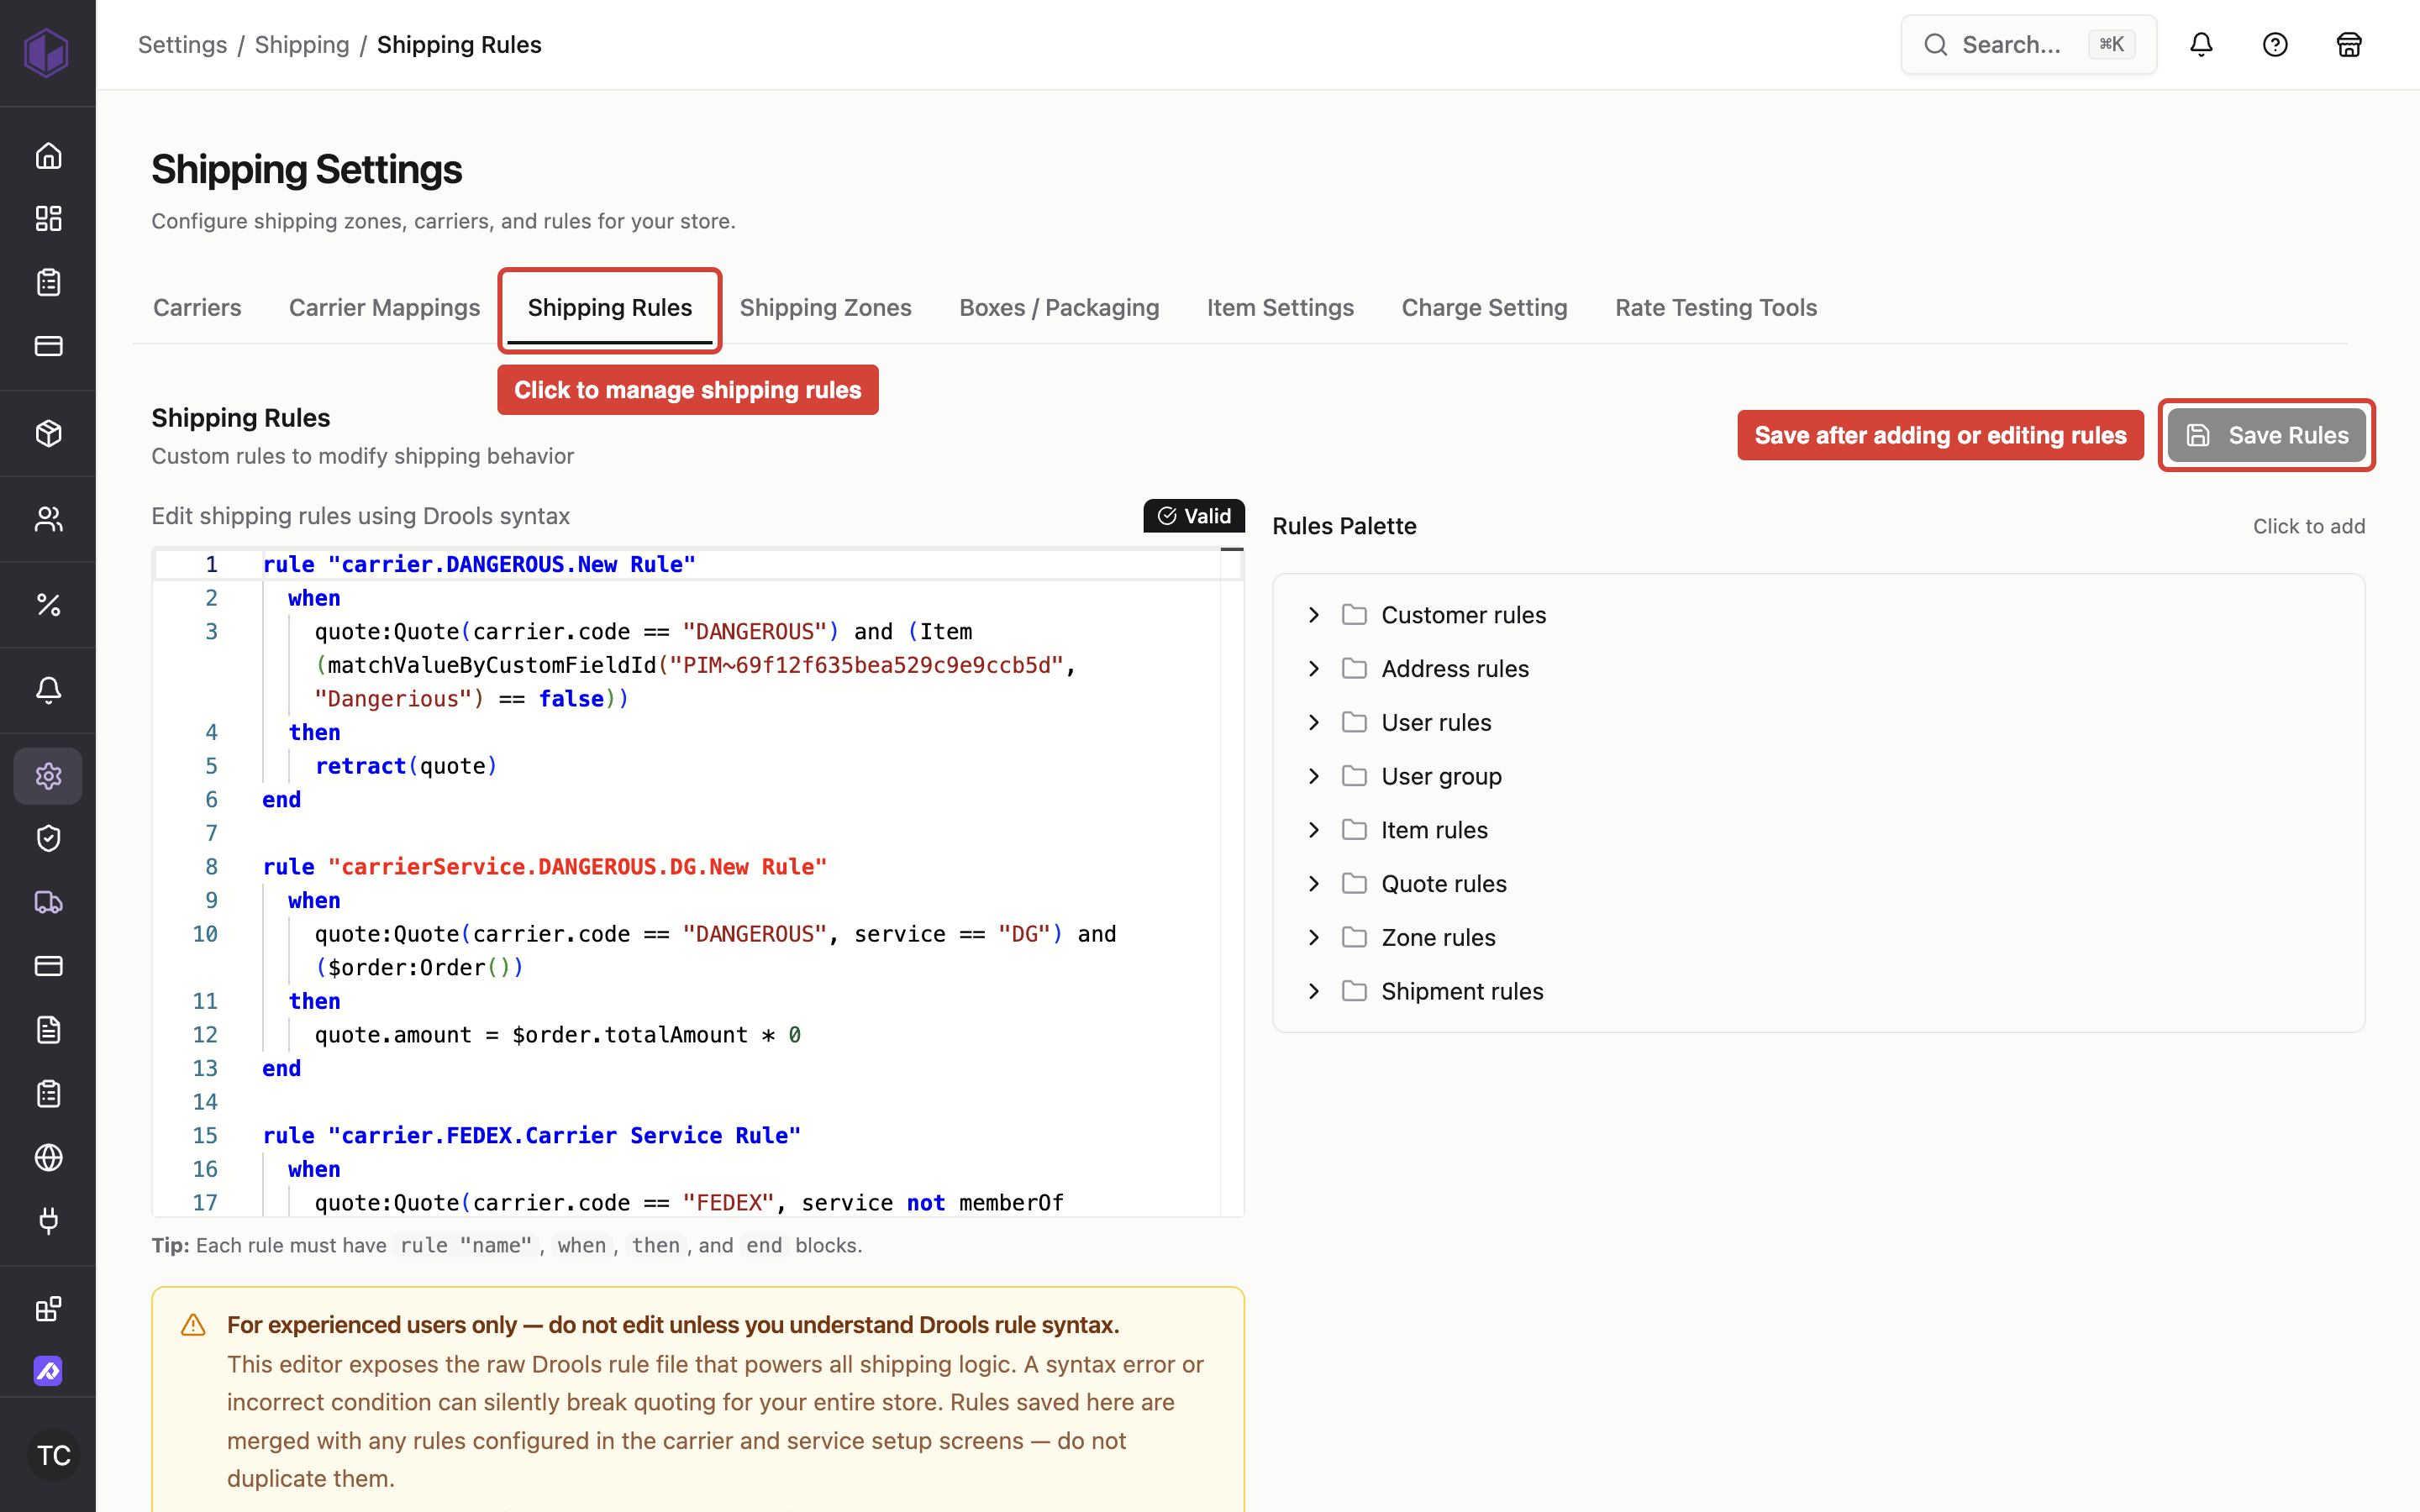
Where to find it: Admin → Settings → Shipping → Rules
When you'd use this: You want to show or hide specific shipping services based on conditions like destination, order value, or customer attributes — for example, hiding express shipping for certain ZIP codes, disabling a service when the cart value is too low, offering free shipping when a customer orders a minimum quantity of specific products, or removing options based on warehouse location codes. (B2B and B2C)
What you need first:
- Shipping carriers and services configured in Admin → Settings → Shipping
- (Optional) Custom fields on customer accounts or ship-to addresses if you want to use them in your conditions
- (Optional) Custom fields on products if you want to filter by product attributes
Set it up:
- Navigate to Admin → Settings → Shipping → Rules
- Create a new rule or edit an existing one
- Build your conditions using the rule builder — you can filter by:
- Destination country, state, or ZIP/postal code
- Carrier and service code
- Order total amount (including tax)
- Order subtotal (excluding tax)
- Order tax amount
- Total pieces in the shipment
- Total shipment weight
- Customer type (B2B or B2C)
- Ship-to location codes
- User group
- Custom fields on the customer account or ship-to address
- Item-level attributes including custom fields — for example, you can count only items matching a specific custom field value to determine if a quantity threshold has been reached
- Choose your action:
- Disable Service — hide a specific shipping service from checkout
- Disable Carrier — hide all services from a carrier
- Set Quote Amount — override the price of a service
- Calculate Quote Amount — calculate the price based on order total, order subtotal, order weight, or order total pieces multiplied by an amount you specify
- Add Markup — add a fixed amount or percentage to a service's price
- (Optional) Add a comment to document why you created this rule — the comment stays with the rule and helps your team understand its purpose when reviewing it later
- Save your rule
Using it day-to-day:
When a customer reaches checkout, the system evaluates your shipping rules against their cart, destination, and account details. Services that match "Disable Service" or "Disable Carrier" rules are hidden. Price adjustments and custom quotes are applied automatically.
You can combine multiple conditions using AND/OR logic. For example, you might disable express shipping when the destination ZIP code starts with "90" AND the order total is less than $500.
You can create quantity-based rules that look at specific product types in mixed carts. For example, you might offer free shipping only when the cart contains 10 or more items matching a custom field value — like cartons identified by a product attribute — even when the cart also contains other items like pouches or papers.
Rules are evaluated in the order they appear in your rule list. If multiple rules affect the same service, all matching rules are applied.
The system prevents you from saving a rule that has missing required fields. If you leave a rate or markup amount blank, you'll need to fill it in before the Save button becomes available.
Each rule displays the date it was last edited and the user who made the change, making it easier to track when pricing logic changed.
Troubleshooting:
- Can't save a rule — Check that all required fields are filled in. If you've selected an action like "Set Quote Amount" or "Add Markup", you must enter a numeric value before saving.
- Service not being hidden — Verify your conditions match the checkout scenario you're testing. Check that the carrier service code in your rule exactly matches the code configured on the carrier.
- Rule applying to wrong carrier — When using "Disable Service" or price adjustments, make sure you include a condition for the specific carrier code if you only want the rule to affect one carrier's services.
- Custom field condition not working — Confirm the custom field exists on the customer account or ship-to address, has a non-empty value, and the field name in your rule matches exactly.
- Quantity threshold not working in mixed carts — If you're counting only specific items (e.g., items matching a custom field value), verify the custom field is set on the products you want to count and that the field value matches your rule condition exactly.
Add rules directly to carrier configurations
Where to find it: Admin → Settings → Shipping → carrier configuration screen
When you'd use this: You want to define rules that apply only to a specific carrier without navigating to the global rules page — for example, disabling a carrier when certain conditions are met, adjusting pricing, handling quote failures for that carrier, or hiding multiple services at once.
Set it up:
- Navigate to Admin → Settings → Shipping and open the configuration screen for any carrier
- Locate the rules section within the carrier setup
- Create rules that apply specifically to this carrier using the same rule builder available in the global shipping rules area
- Available actions depend on the carrier type:
- Integrated carriers (e.g., Canada Post, CanPar, FedEx, UPS, CH Robinson) — Disable Carrier,
Add rules to individual services within carriers
Where to find it: Admin → Settings → Shipping → carrier configuration → individual service rules
When you'd use this: You want to control when a specific service appears at checkout or adjust its pricing — for example, hiding a particular ground service when the destination ZIP code is in a certain range, disabling a pickup service based on ship-to warehouse location codes, or adjusting rates for specific integrated carrier services like FedEx Ground or UPS Next Day Air.
What you need first:
- A carrier configured with services
Set it up:
- Navigate to Admin → Settings → Shipping and open your carrier configuration
- For integrated carriers (like Canada Post, FedEx, UPS, CH Robinson), select services from the dropdown list of options advertised by that carrier — this ensures service codes match exactly what the carrier's API returns
- For Standard and Pickup carriers, add services and enter service codes manually. Fill in the Amount field for each service — this is required before you can save
- Expand the service you want to add a rule to — each service can be collapsed or expanded to show its configuration
- Locate the rules section within the service
- Create rules using the same rule builder available for global and carrier-level rules
- Build conditions based on:
- Destination country, state, or ZIP/postal code (including ZIP code ranges)
- Ship-to warehouse location codes
- Order total amount
- Total pieces in the shipment
- Total shipment weight
- Customer type, user group, or custom fields
- Choose your action:
- Disable Service — hide this specific service when conditions match
- Set Quote Amount — override the price for this service
- Calculate Quote Amount — calculate the price based on order total, order weight, or order total pieces multiplied by an amount you specify
- Add Markup — add a fixed amount or percentage to this service's price
- (Optional) Add a comment to document the rule's purpose — comments help your team understand why the rule was created
- To remove a service, click the Delete Service button — the service
Calculate shipping rates based on order attributes
Where to find it: Admin → Settings → Shipping → Rules or carrier/service rules
When you'd use this: You want shipping costs to scale dynamically with order characteristics — for example, charging per kilogram for heavy shipments, calculating rates as a percentage of order value, or charging per piece for multi-package orders.
Set it up:
- Navigate to Admin → Settings → Shipping → Rules (or open a carrier or service configuration to add a rule at that level)
- Create a new rule or edit an existing one
- Build any conditions that control when this calculation applies
- Choose the Calculate Quote Amount action
- Select a basis for your calculation:
- Order Total — multiply the cart total by your specified amount
- Order Weight — multiply the shipment weight by your specified amount (choose kg or lbs as the unit)
- Order Total Pieces — multiply the number of packages by your specified amount
- Enter the input amount to multiply by
- (Optional) Add a comment to document why you created this calculation rule
- Save your rule
Using it day-to-day:
When a customer reaches checkout, the system calculates the shipping rate by taking the basis you selected (order total, weight, or pieces) and multiplying it by your input amount. For example:
- Basis: Order Weight (kg), Input Amount: